Moving from Playground to Production
This guide outlines the Atomic configuration required when preparing your production release of Atomic.
This depends on whether you’re moving between Organizations or Environments:
Moving between Atomic Environments in the same Organization:
- Move only those things scoped to the
Environment. You do not need to complete the elements scoped to theOrganization.
Moving aspects between Environments in different Atomic Organizations:
-
Complete both the aspects scoped to the
OrganizationandEnvironment. -
If you do not already have your production Organization, please contact your account representative.
Note: the following areas cannot be copied across to new Organizations:
- Analytics data associated with cards, including analytics exporter and data to populate the Insights dashboard
- Configuration debuggers data
- Security / Audit log
There are 3 areas to consider:
- Workbench
- SDK
- API
Workbench
1. Environment configuration
| Scoped to | Method to configure |
|---|---|
| Environment | Setup new |
Add the necessary Environments for your Continuous Delivery workflow. e.g. development > staging > production.
Add environments:
Manage > Environment > Add environment

2. Container Themes
| Scoped to | Methods to configure |
|---|---|
| Environment | Manual copy and paste or Setup new |
Go to:
Configuration > Container themes
In the overflow for the theme select ‘Copy to clipboard’:
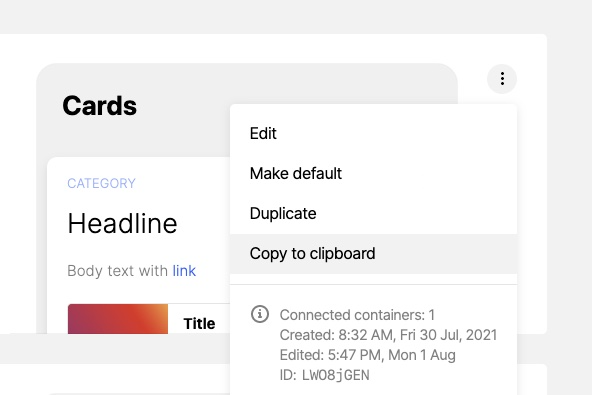
Go to the destination environment, and paste the new theme:
Configuration>Container themes- Select 'Add theme'
- Select the overflow, then 'Show JSON'
- Replace the current JSON with the copied theme JSON
- Name the theme
- Click 'update theme'
3. Card streams and stream containers
| Scoped to | Method to configure |
|---|---|
| Environment | Setup new |
Create new Streams and Stream containers.
Streams
Configuration > SDK > Streams
Stream Containers
Configuration > SDK > Stream containers
Ensure that each stream container is linked to the correct stream and theme:
- Click on the three-dot button to the right of your stream container, then click ‘Edit’
- Select the desired stream and theme(s). Review the card limit, which sets the maximum number of card instances a stream container will display to a customer at one time (the default is 50 cards).
Note: The stream containers in your new environment will be created with new ids, which you will need later when configuring your SDK installation.
You can locate and copy the stream id by going:
Configuration > SDK > Streams
4. Card templates
| Scoped to | Methods to configure |
|---|---|
| Environment | Setup new, Manual copy & paste, or API |
Copy individual templates manually
Open a card list, and in the overflow menu select Copy to clipboard.
This copies the raw card data in JSON form to your clipboard.
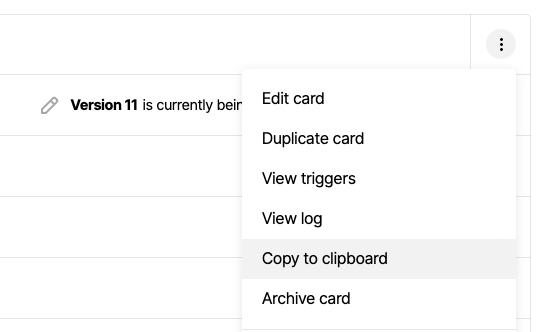
Go to the destination Cards area, and select ‘new card’.
Scroll to the 'Advanced' area of the content panel and choose ‘Show’.
Select the 'Raw card data' JSON, and then paste the copied template data.
When manually copying the JSON, you will need to re-publish cards.
5. Media
| Scoped to | Methods to configure |
|---|---|
| Environment | Re-upload image from host storage, or get image from current environment and upload to new |
Any media assets uploaded to the Workbench in your sandbox that are required in your new environment need to be uploaded to the new environment.
Note: Card templates that reference externally hosted media will continue to work.
Re-upload media to the new environment at:
Cards > Media library
6. Analytics export settings
| Scoped to | Method to configure |
|---|---|
| Environment | Set up via Workbench |
To change your environment analytics data preferences:
- Go to
Configuration>Webhooks>Analytics Export Settings - Review the preferences for this environment, and select ‘Save’.
See: Analytics export settings
7. (Optional) Publishing approval workflow
| Scoped to | Method to configure |
|---|---|
| Environment | Set up via Workbench |
To configure approvals navigate to:
Configuration > Approvals
See: Approvals
8. Workbench team member permissions
| Scoped to | Method to configure |
|---|---|
| Organization | Set up via Workbench |
Set up the necessary roles and groups.
See a detailed description on how to set up these at: Permissions
9. Add workbench members, and assign them to the appropriate groups
| Scoped to | Method to configure |
|---|---|
| Organization | Set up via Workbench |
Add members to groups when you invite them to the new Organization.
See: Invite a team member and add their permissions
If using SSO, contact us to reconfigure your SSO authentication to assign team members to groups via SAML SSO.
10. (Optional) Organization name & Organization-wide MFA enforcement
| Scoped to | Method to configure |
|---|---|
| Organization | Set up via Workbench |
Review and edit the name of the Organization at
Manage > Organization > General
Enforce multi-factor authentication (MFA) for all users at:
Manage > Organization > Authentication
11. (Optional) MFA
| Scoped to | Method to configure |
|---|---|
| Organization | Set up via Workbench |
Individual team members in this Organization can enable multi-factor authentication (MFA) for their account at:
Preferences > Your profile
Note: If MFA is required for all members of this Organization, members will be prompted to configure it when they next login.
12. (Optional) Webhooks & credentials
| Scoped to | Method to configure |
|---|---|
| Environment | Set up via Workbench |
Add webhook authentication credentials that need to be used in webhook subscription configurations in your new environment.
- Go to: Configuration > Integrations > credentials
- Select 'New credential', and add a name and type.
- Add the client ID and secret.
- Select ‘Save’.
Add any webhook subscriptions.
- Go to the 'Webhooks' tab from the Card you wish to subscribe to, and select the type and subscribed URL, or to where all Webhook subscriptions are kept: Configuration > Webhooks > Subscriptions
- Give the webhook a name, and select the types you would like to subscribe to. Add the method, URL, and credentials. Optionally add header information to send with the webhook.
Tip: Webhook subscriptions can be scoped to a single card template (choose card from select list), or all card templates (leave select list value empty).
See more at: Webhooks
13. (Optional) Add Customers tags and custom fields
| Scoped to | Method to configure |
|---|---|
| Environment | Set up via Workbench |
Tags
Create any tags you want in the new environment from:
Configuration > Customer profiles > Tags
Tip: When you upload customer records into Atomic, via CSV, or API, you can assign tags directly to individual users.
Custom fields
Define any custom fields that you plan to use at:
Configuration > Customer profiles > Custom fields
Reminder: If you plan to send Atomic additional customer profile data to store against their profile for use in creating segments and populating cards, you will need to decide on an integration pattern for this.
Records can be uploaded in CSV batches via the Workbench, or via API.
See: Custom Fields
See more: Managing Customers
14. (Optional) Setup customer segments
| Scoped to | Method to configure |
|---|---|
| Environment | Set up via Workbench |
Recreate any segments you want in the new environment directly from the Customers area
See: Segments
15. (Optional) Test (customer) accounts
| Scoped to | Method to configure |
|---|---|
| Environment | Set up via Workbench |
By default, any team member with access to your Organization in the Workbench can send themselves test card instances by targeting their Atomic Workbench customer ID.
If you want to send test cards to other people, you must create a test customer for them in the new environment via the workbench by supplying a name and customer ID of your choosing (these can be arbitrary as they are simply for testing). For example you could create a set of test customers for use in user-research or business acceptance testing.
To manage test users, go:
Configuration > Testing > Test customers
SDK
16. SDK authentication
| Scoped to | Method to configure |
|---|---|
| Environment | Set up via Workbench |
Upload the public key from the key pair your app uses to sign JWTs that are provided to the Atomic SDK in your new environment:
Configuration > SDK > API Keys
- Select 'New key'.
- Create a name for your key e.g. production-environment-1. The name you have chosen is your API key.
- Paste in your public key and click Add.
- Ensure that any JWT you provide to the SDK is signed with the private key that corresponds to this public key.
See more: API keys & SDK authentication
17. Stream containers in SDKs
| Scoped to | Method to configure |
|---|---|
| Environment or Organization | Set up via Workbench |
In the SDK integration, ensure that each of the relevant environment variables are being used to initialism the SDK in the new environment:
- The environment ID passed when initializing the SDK (Environment scoped).
- The stream container ID for each stream container instance in your app (Environment scoped).
- The API keys (from the previous step; Environment scoped).
- SDK API Host URL: Update your code to ensure all SDK integration calls to Atomic are sent to the correct (new) URL. To find your API host URL go:
Configuration>API Host(Organization scoped).
For more information see:
18. (Optional) Notification platforms
| Scoped to | Methods to configure |
|---|---|
| Environment | API or set up via Workbench |
If your app is a mobile app and you will be using Atomic’s push notification capability, upload the relevant notification platform credentials and certificates for your apps.
Via Workbench
To add notification platforms via the Workbench to go:
Configuration > Notifications > New platform
Via API
To create (or update) notification platforms via the Workbench API, see: SNS platforms
Tip: verify push notifications are working.
Ensure you have a build of your app configured with the production:
- API base URL.
- API key.
- Environment ID.
- Push notification certificate (iOS) or Server Key (Android).
Compile a test build and send yourself a card with a push notification to verify that it is working.
If a push token is present, the registration process works.
See more at: Notifications Tip: be sure to diary the renewal of any expiry dates of the certificates you add.
API
19. Update Base URL Endpoints
| Scoped to | Method to configure |
|---|---|
| Environment | Set up via Workbench |
Each Environment has a unique base URL that is used for making API requests from Atomic.
Any scripts or API tools you use need to use this new base URL. You can locate this for your new environment in:
Configuration > Base URL Endpoint
20. API Auth Controls
| Scoped to | Methods to configure |
|---|---|
| Environment | API or set up via Workbench |
To create and manage API credentials via the workbench, go:
Configuration > API > Authentication controls
Access to this workbench resource is controlled with a specific "API Authentication control" permission. See the Permissions guide to configure this permission for your workbench members.
To manage API credentials via API, you will need to first create a credential pair with the role auth, and may only rotate credential pairs with non-auth roles.
- From the Configuration section in the workbench sidebar menu, choose 'Authentication controls'.
- Click 'New Credential'
- Add the role (Workbench, Events, Auth). See more at API credential roles
- Give it a name, and select 'Add'.
See more at: API controls