Customer segments
A segment is a predefined set or combination of filters that enables you to target specific customers.
Unlike tags, where customers are added to the group either manually or via the API, a segment updates automatically and customers enter and leave based on the filter conditions being met (or not). For example, you can create segments based on:
- the time zone a customer last logged in from
- the customer not completing any cards in the last month
- the customer's date of birth being in between two dates
You can create filters based on profile fields (including custom fields and activity fields), events or tags.
Learn more about the Atomic customer data model by reading the customer data model article
An overview of creating segments & filters in the Atomic platform and how to link them to Action Flows.
How segments work
A segment is defined by its filters, and membership is worked out per customer using a process called evaluation. A customer belongs to the segment whenever their data matches the filter conditions, and leaves it when they no longer do. You can build those conditions from profile fields, custom fields, activity fields, events, and tags.
Whenever a customer's data changes, such as through the Users API, a CSV import, SDK activity, or an incoming event, that customer is re-evaluated against your segments and enters or exits segments as needed. Conditions that depend on time (such as "not seen in the last 30 days") are also kept current, so customers move in and out as time passes even when nothing else about them changes.
When you create a segment or change its filters, Atomic evaluates your whole customer base against the new criteria, so the membership always reflects the latest definition. As customers enter or exit, Atomic can fire segment-entered and segment-exited events as triggers to start Action Flows.
A single customer's change is usually reflected within seconds, but actions that check your entire customer base, such as creating, editing, or unarchiving a segment, will evaluate every customer against the filters for that segment.
For large customer volumes this process may take longer to complete, so the segment's membership and customer count can take a little time to settle after you add or change a segment. Any Action Flows triggered by a segment will run as customers enter or exit while the evaluation progresses.
Create a Segment
- In the Customers screen, click on the + button next to the word Segments on the left side of your screen.
- In the 'Create a new segment' window, give the segment a name and an optional description, and then click 'Create'.
- Click 'Add filter' to add one or more filters. When adding more than one filter, you can choose whether all these filter conditions need to be true ('match all') or whether meeting one condition ('match any') is sufficient.
- All customers that currently meet the segment criteria are shown on the screen, helping you decide whether the filter conditions have been set up correctly.
- Once the filters are configured correctly, click 'Save Changes'.
When customers are updated through API or CSV, customers will automatically enter the new segment if they meet the criteria specified. They will likewise leave a segment if they no longer meet the criteria.
Example segment with multiple filters
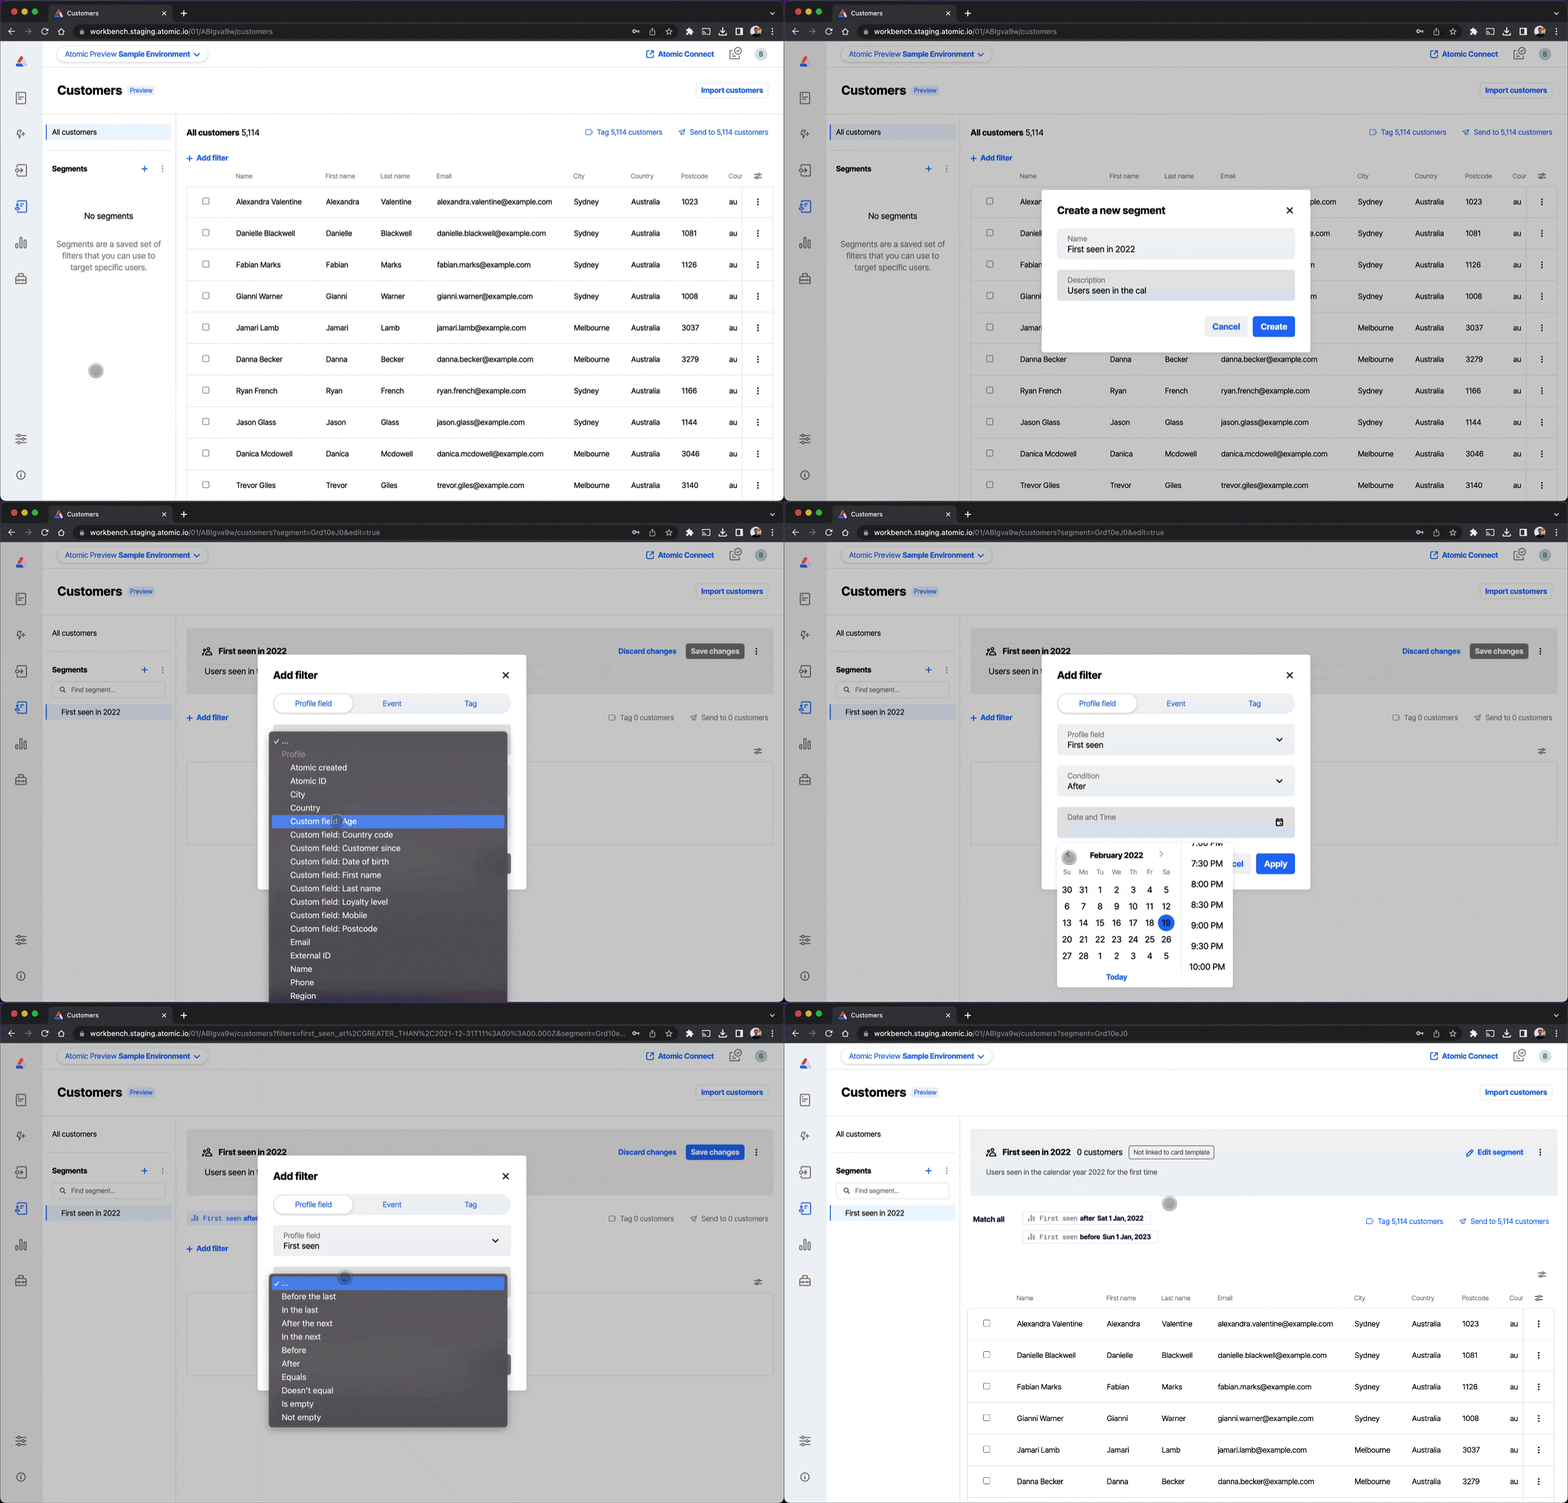
Example: let's say you want to create a segment for all customers that were 'first seen' in the year 2022.
- Create a segment (by clicking on the + button), give it a name 'first seen in 2022', and click 'Create'.
- Click 'Add filter'. In the 'profile field' tab, select 'First seen' (under Activity). Select 'After' as a condition and select '1 January 2022 12:00 AM' as the date and time.
- Click 'Apply'. The view shows all customers that were first seen after 1 January 2022.
- Click 'Add filter'. In the 'profile field' tab, select 'First seen' (under Activity). Now select 'Before' as a condition and select '1 January 2023 12:00 AM' as the date and time.
- Click 'Apply'. The view now shows all customers that match all conditions. You can change the 'match all' condition to 'match any' to see how that affects the number of customers.
- Click 'Save Changes'.
Edit a segment
- In the Customers area, select the segment you would like to edit. Click on its name to open its detailed view.
- Click on the 'Edit segment' button on the right hand side.
- You can now make changes to the segment name, description or filters.
- Click the 'save changes' button. When the segment is used as a trigger to one or more Action Flows, you will see a warning message.
- Confirm again by clicking 'Save changes'.
Archiving segments
Archiving lets you pause a segment without losing it. An archived segment keeps its current members and its most recent statistics, but stops evaluating customer changes against its filters, so its membership won't change and it won't trigger Action Flows. It also can't be used to target or send to customers.
Archiving is a good alternative to deleting when you want to retire a segment but keep its data, or might want to use it again later, for example:
- Retiring a seasonal or campaign segment you may want to reuse later.
- Temporarily stopping a segment that drives Action Flows, without deleting the setup.
- Tidying up your segment list while preserving historical segments for reference.
Archive a segment
- In the Customers area, open the segment you want to archive.
- Click the overflow menu (three vertical dots) next to 'Edit segment' and select 'Archive segment'.
- If the segment is linked to any published Action Flows, you'll see a warning listing them. Those Action Flows will no longer be triggered by changes to the segment while the segment is archived.
- Confirm by clicking 'Archive segment'.
Archived segments are hidden from the main list. To see them, turn on the 'Show archived segments' toggle by clicking the menu icon next to the Segments header.
Archived segments cannot be added as a trigger for Action Flows, and cannot be used as a target when starting an Action Flow using the API.
Unarchive a segment
- Turn on 'Show archived segments' in the Segments list and open the archived segment.
- Click the menu icon next to 'Edit Segment' and select 'Unarchive segment'.
- Confirm by clicking 'Unarchive segment'.
When you unarchive, Atomic resumes evaluating the segment and brings it up to date to reflect any changes that happened while it was archived. Customers entering or exiting at that point will trigger any linked Action Flows as normal.
Pausing Action Flow triggers
Pausing a segment's triggers stops it from starting Action Flows when customers enter or exit it, across the whole environment, without changing the segment itself. Unlike archiving, the segment keeps evaluating your customer base and its membership stays up to date - customers still enter and exit as their data changes. The only thing that stops is the segment triggering Action Flows.
Pausing is a good choice when you want to keep a segment live and accurate but temporarily hold the Action Flows it drives, for example:
- Pausing outreach during a quiet period, a maintenance window, or a public holiday.
- Stopping flows while you review or rework the Action Flows a segment triggers.
- Holding a campaign without unpublishing its Action Flows or archiving the segment that keeps its audience current.
A paused segment is shown with a Paused tag in the segments list and in the segment header.
Pause a segment's triggers
- In the Customers area, open the segment you want to pause.
- Click the menu next to 'Edit segment' and select Pause Action Flow triggers.
- If the segment is linked to any Action Flows, you'll see a confirmation window listing them, with published Action Flows highlighted so you know which live flows are affected.
- Confirm by clicking Pause triggers.
While paused, customers still enter and exit the segment as normal, but no linked Action Flows are triggered. Action Flow instances that have already started continue to run.
Resume a segment's triggers
- In the Customers area, open the paused segment.
- Click the menu next to 'Edit segment' and select Resume Action Flow triggers. You can also click the Paused tag in the segment header.
- Confirm by clicking Resume triggers.
The segment will trigger its linked Action Flows again when customers enter or exit it.
Pausing a segment here stops it triggering every Action Flow across the environment. To stop a segment trigger on just one Action Flow while leaving the others running, disable that trigger from within the Action Flow instead. See Pausing and resuming segment and event triggers.
Delete a Segment
- In the Customers area, select the segment you would like to delete.
- Then click the menu icon next to 'Edit segment' and select 'Delete segment'.
- Confirm by clicking the 'Delete segment' button.
If the segment is used as a trigger to one or more Action Flows, you will see a warning message showing what Action Flows the segment is linked to.
Using segments to trigger an Action Flow
After creating a segment, you can now have Atomic react when customer enters or exits your segment over time by creating segment triggers for your Action Flows.
You can manually trigger an Action Flow for the customers within a segment from the Customers dashboard, or using the API with the segment target type.
Archived segments cannot be used for triggering an Action Flow.