Android SDK - Current (25.2.0)
Introduction
The Atomic Android SDK is distributed as an AAR, allowing you to integrate an Atomic stream container or single card view into your Android app and present action cards to your customers.
The current stable release is 25.2.0.
Device and Version Support
Android 5/ Android 21 and above are supported. It is recommended to use the latest compileSdkVersion available.
Boilerplate app
You can use our Android boilerplate app to help you get started with the Atomic SDK for Android. You can download it from its GitHub repository. If you're working on a jetpack compose project, you can download the Jetpack Compose boilerplate here. Alternatively, you can follow this guide.
Installation
The SDK can be installed as a Gradle dependency or by manually downloading the AAR file.
Gradle
The SDK is hosted on our public Maven repository. You'll need to add the following repository to your root build.gradle or settings.gradle file depending on how your project is setup:
    repositories {
      ...
      maven {
        url  "https://downloads.atomic.io/android-sdk/maven"
      }
    }
Then, add the following to your app’s build.gradle
dependencies {
    implementation 'io.atomic.actioncards:aacsdk:25.2.0'
}
Manual Installation
If you prefer to manually download and integrate the Atomic SDK into your app, you can download the AAR and POM files from the Packages section of the Android SDK releases repository.
If documentation doesn't appear in Android Studio
The Atomic SDK includes documentation for all public-facing methods, using the sources.jar file. Follow these steps if this documentation doesn't appear in Android Studio:
- Download the sources package (ending with
sources.jar) from thePackagessection of the Android SDK releases repository. - Open a class in your app that uses a method from the Atomic SDK, and press F1 on that method in the SDK.
- Once the decompiled source code is shown, click on "Choose Source" from the top right.
- Use the system dialog to select the file downloaded in step 1.
- Close the decompiled source view. Press F1 again on the SDK method to view the source documentation.
Setup
Initialize the SDK
Before you can use the Atomic SDK, you must initialize it and provide the required configuration details.
Firstly, in your application's onCreate method, call the SDK init method, passing your application context:
- Java
- Kotlin
AACSDK.init(this);
AACSDK.init(this)
Next, set your SDK API host, environment ID and API key. You can find these details in the Atomic Workbench.
Environment ID and API key
- Open the Atomic Workbench, and navigate to the Configuration area.
- Under the 'SDK' header, your API host is in the 'API Host' section, your API key is in the 'API keys' section, and your environment ID is at the top of the page under 'Environment ID'.
- The
apiKeyvalue is the Key name you set when adding an SDK API key, not the public key or any generated ID. See SDK API keys for details.
The SDK API host is different to the API base URL endpoint, which is also available under Configuration. The SDK API host ends with client-api.atomic.io.
- Java
- Kotlin
AACSDK.setApiHost("<apiHost>");
AACSDK.setEnvironmentId("<environmentId>");
AACSDK.setApiKey("<apiKey>");
AACSDK.setApiHost("<apiHost>")
AACSDK.setEnvironmentId("<environmentId>")
AACSDK.setApiKey("<apiKey>")
Login convenience method
Each individual setting can be applied singularly as above. Since SDK 1.3.4 you can also use a convenience method called login which allows populating the four main settings in one call. The parameters are as follows:
AACSDK.login(apiHost: String,
             apiKey: String,
             environmentId: String,
             sessionDelegate: ((String?) -> Unit) -> Unit)
            )
An example of calling login:
AACSDK.login("<apiHost>", "<apiKey>", "<environmentId>", requestToken)
Authenticating requests using a JWT
Atomic SDK uses a JSON Web Token (JWT) to perform authentications.
The SDK Authentication guide provides step-by-step instructions on how to generate a JWT and add a public key to the Workbench.
Within your host app, you will need to call the setSessionDelegate method to provide the requestToken object.
- Java
- Kotlin
AACSDK.setSessionDelegate(requestToken);
AACSDK.setSessionDelegate(requestToken)
JWT expiry interval
The Atomic SDK allows you to configure the time interval to determine whether the JSON Web Token has expired. If the interval between the current time and the token's exp field is smaller than that interval, the token is considered to be expired. If this method is not set, the default value is 60 seconds. The interval must not be smaller than zero.
In the code sample below the interval is set to 5 minutes (300 seconds).
- Java
- Kotlin
AACSDK.setExpiryInterval(300);
AACSDK.setExpiryInterval(300)
JWT retry interval
(Requires Atomic SDK 1.1.5+)
The Atomic SDK allows you to configure the timeout interval (in seconds) between retries to get a JSON Web Token from the session delegate if it returns a null token. The SDK will not request a new token for this amount of seconds from your supplied session delegate. The default value is 0, which means it will immediately retry your session delegate for a new token.
- Java
- Kotlin
AACSDK.setTimeoutInterval(10);
AACSDK.setTimeoutInterval(10)
JWT custom user ID field
(introduced in 25.1.1)
To use a custom field in your JWT for the user ID used by the Atomic Platform you must first configure this field in the Atomic Workbench for the relevant SDK API Key.
Once you have the API Key configuration in place, you need to call the AACSDK.setTokenUserIdAttribute(attribute: String) method, providing the key for the attribute in your JWT that represents the user id.
You should call this method before setting the authentication delegate.
- Java
- Kotlin
AACSDK.setTokenUserIdAttribute("custom_user_id_field");
AACSDK.setTokenUserIdAttribute("custom_user_id_field")
WebSockets and HTTP API Protocols
Atomic SDK uses WebSockets as a default communication protocol to fetch and send data to Atomic Platform. However, if the WebSockets connection is interrupted and cannot be re-established after three attempts, Atomic SDK fallbacks to HTTP.
Besides the default behavior, communication between the Atomic SDK and Atomic Platform can be established by using HTTP. To switch protocols use setApiProtocol:
- Java
- Kotlin
AACSDK.setApiProtocol(AACSDK.ApiProtocol.HTTP.INSTANCE);
AACSDK.apiProtocol = AACSDK.ApiProtocol.HTTP
Displaying containers
The Atomic Android SDK supports the following display modes:
- Embedded - The stream container is being embedded inside of another view, and does not require a way to dismiss it. Both vertical and horizontal stream containers are embedded.
- Single Card View — The first card from a stream container is displayed without any surrounding UI.
This section applies to all types of container: vertical, horizontal and single card view.
You need to embed containers inside an Activity that has fragment support, or inside a Fragment.
You'll need to pass:
- Your stream container ID as a string;
You can then start the container by passing:
- The ID of the view to embed the stream container in;
- The fragment manager to support embedding of the stream container. If embedded in an
ActivityusegetFragmentManager(); if embedding in aFragmentusegetChildFragmentManager().
You must retain stream container instances so that they are restored properly during configuration changes. More information on how to achieve this is available in the Android developer documentation. ViewModels are used in the examples below; however, any other state-saving technique that does not involve serialization, such as dependency injection, may also be used.
Special care must also be taken to ensure the SDK works after system-initated process death, follow the advice for managing system-iniated process death with the SDK here.
Stream container ID
First, you’ll need to locate your stream container ID.
Navigate to the Workbench, select Configuration > SDK > Stream containers and find the ID next to the stream container you are integrating.
- Java
- Kotlin
// Example in a fragment
public class MyFragment extends Fragment {

  private MyViewModel myViewModel;

  @Override
  public void onStart() {
    super.onStart();

    if (myViewModel.streamContainer == null) {
      myViewModel.streamContainer =
          AACStreamContainer.create(
              "1234");
    }

    myViewModel.streamContainer.start(R.id.someView, this.getChildFragmentManager());
  }
}
// Example in an Activity
class MainActivity : Activity {

  private lateinit var viewModel: MainViewModel

  override fun onCreate(savedInstanceState: Bundle?) {
    super.onCreate(savedInstanceState)
	viewModel = ViewModelProvider(this)[MainViewModel::class.java]

    setContentView(R.layout.activity_main)

    if (viewModel.streamContainer == null) {
      viewModel.streamContainer = AACStreamContainer.create("1234")
	}

    viewModel.container.start(R.id.someView, supportFragmentManager)
  }
}
Note that AACStreamContainer.create is a factory method responsible for setting up an AACStreamContainer. The method start creates a new fragment or reuses an existing one and adds the stream container to the view matching the provided viewId parameter.
This implies that AACStreamContainer.create should be called once for each stream container used in the app and start can be called multiple times, such as during configuration changes.
You should also call destroy on your stream container instance at the appropriate time. This method is responsible for destroying and removing any stream container fragments from the fragment manager passed to start. See the Disposing of a stream container section for more information.
Configuring multiple containers with a permanent container in the home screen
We recommend using FragmentManager.replace instead of add in the following scenario:
- your app design has a stream container (either single card or multiple stream) as part of an always active home screen and
- the app opens a fragment to show an additional container
This is due to Android lifecycle events (onPause/onResume) not triggering on the home fragment, as it is still active when there is another fragment above it on the stack. Closing that fragment does not trigger the lifecycle events and may cause unexpected results from the SDK.
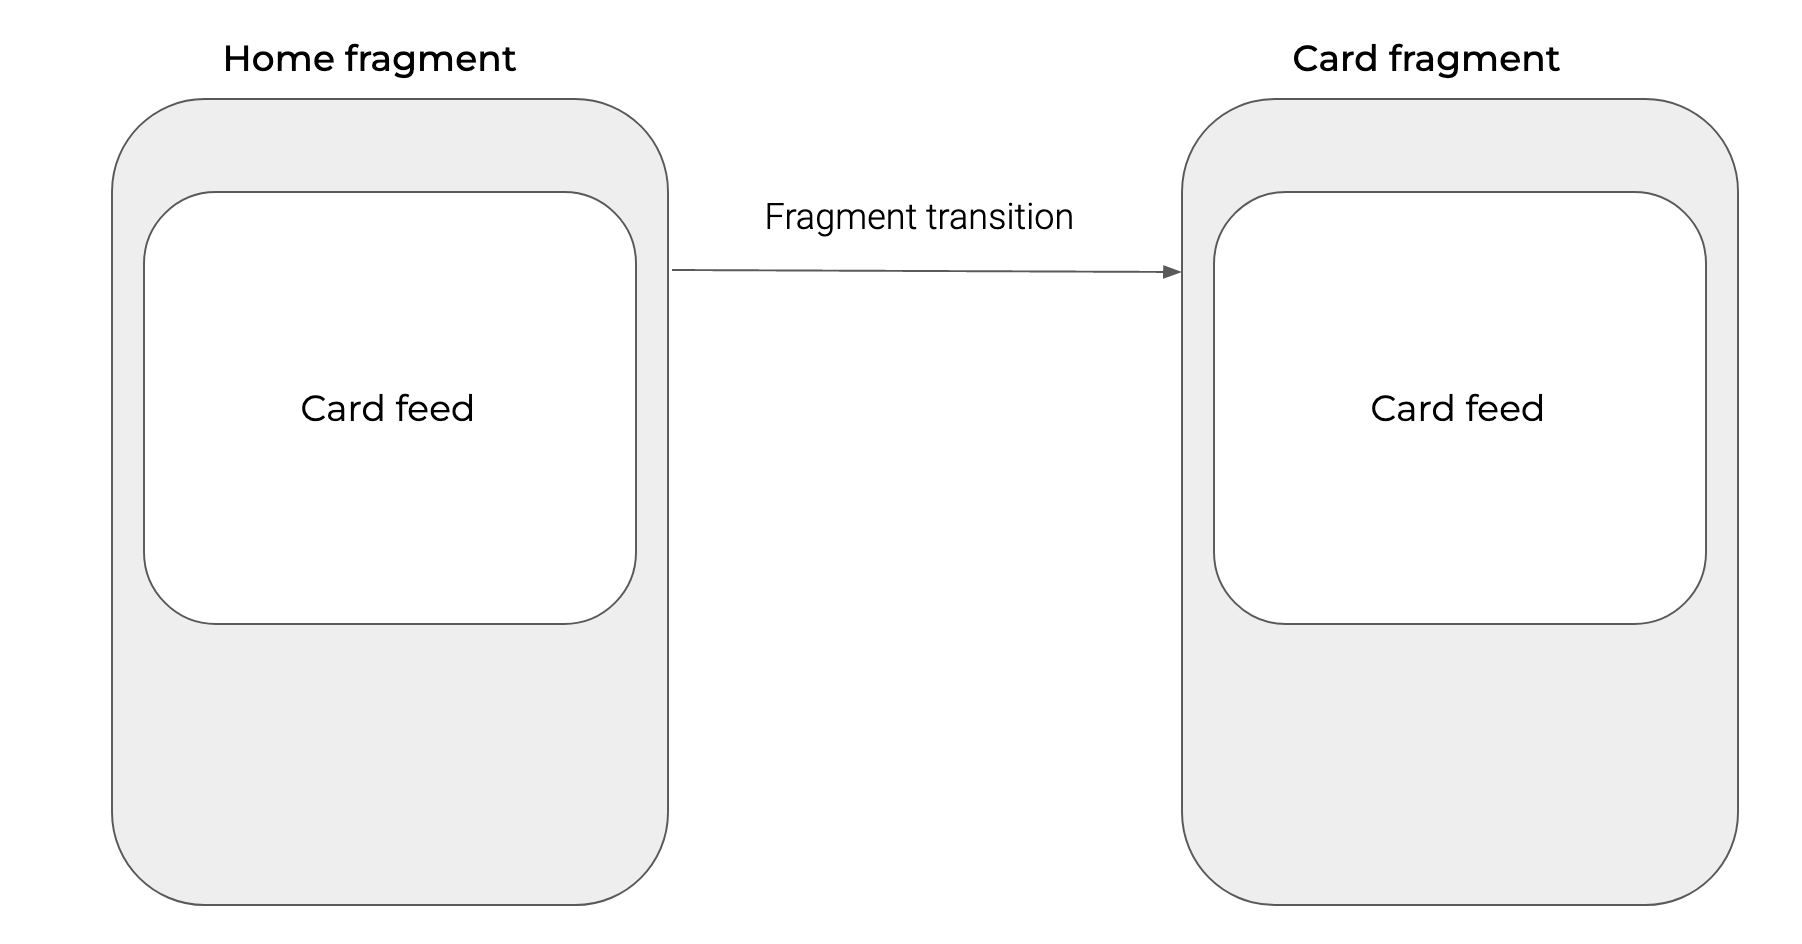
// example of calling replace rather than add
binding.showCardsButton.setOnClickListener {
    val cardFragment = CardFragment()
    parentFragmentManager.beginTransaction()
        .replace(R.id.fragment_container, cardFragment, "CARD_FRAGMENT")
        .addToBackStack(this.javaClass.simpleName)
        .commit()
}
If you are using a NavDrawer or Tabs then this is not an issue as the views are resumed or recreated.
Jetpack compose
Since the SDK uses a fragment to display the stream container, we cannot directly call it from compose. There are a few ways we can mix both worlds where you can have Jetpack Compose, but still able to launch the stream container along side it. In this sample, ComposeView is used to achieve that. You can checkout the boilerplate branch here.
Below is a class called ComposeFrameLayout which is a regular FrameLayout. This FrameLayout contains a ComposeView that returns
Compose content.
class ComposeFrameLayout @JvmOverloads constructor(
context: Context, attrs: AttributeSet? = null,
defStyleAttr: Int = 0
) : FrameLayout(context, attrs, defStyleAttr) {

    init {
        addView(
            ComposeView(context).apply {

                setViewCompositionStrategy(
                    ViewCompositionStrategy.DisposeOnViewTreeLifecycleDestroyed
                )
                setContent {
                    val toast = Toast.makeText(
                        LocalContext.current,
                        "You have just interacted with a composable",
                        Toast.LENGTH_LONG
                    )

                    Column {
                        Row() {
                            MaterialTheme {
                                CardDetails(
                                    title = "Composable inside a FrameLayout",
                                    description = "This is a sample code where you " +
                                            "can create a composable which act as a normal view." +
                                            "You can add this to your XML layout like a regular FrameLayout",
                                    onClick = { toast.show() },
                                    buttonLabel = "Click me"
                                )
                            }
                        }
                    }
                }
            }
        )
    }
}
The XML layout below contains 3 container layouts. A regular FrameLayout, a ComposeView, and the ComposeFrameLayout created above.
The FrameLayout with id stream_container is the container on which we want to display the
stream container.
    <FrameLayout
            android:id="@+id/stream_container"
            android:layout_width="match_parent"
            android:layout_height="300dp"
            app:layout_constraintStart_toStartOf="parent"
            app:layout_constraintEnd_toEndOf="parent"


    <io.atomic.sdk.components.ComposeFrameLayout
        android:id ="@+id/compose_frameLayout"
        android:layout_width="match_parent"
        android:layout_height="wrap_content"
        app:layout_constraintStart_toStartOf="parent"
        app:layout_constraintEnd_toEndOf="parent"
        app:layout_constraintTop_toBottomOf="@id/stream_container"
        android:paddingTop="5dp"/>


    <androidx.compose.ui.platform.ComposeView
        android:id="@+id/compose_view"
        android:layout_width="match_parent"
        android:layout_height="wrap_content"
        app:layout_constraintStart_toStartOf="parent"
        app:layout_constraintEnd_toEndOf="parent"
        app:layout_constraintTop_toBottomOf="@id/compose_frameLayout"
        android:paddingTop="5dp"
        />
The code below shows that the SDK uses the stream_container to load its fragment and at the same time
write Jetpack Compose components by getting a reference from the composeView element from the XML. You can use this
inside an Activity or a Fragment.
override fun onCreate(savedInstanceState: Bundle?) {
super.onCreate(savedInstanceState)

        setContentView(R.layout.main_layout)

        // Reference the viewModel
        viewModel = ViewModelProvider(this)[BoilerPlateViewModel::class.java]

        // Start the stream container
        viewModel.streamContainer?.start(R.id.stream_container, supportFragmentManager)


        //Reference the composeView element from xml layout
        val composeView = findViewById<ComposeView>(R.id.compose_view)
        //This is where you set your jetpack compose compose contents
        composeView.apply {
            //Dispose of the Composition when the view's LifecycleOwner is destroyed
            setViewCompositionStrategy(
                ViewCompositionStrategy.DisposeOnViewTreeLifecycleDestroyed
            )

            setContent {
                // Do all your compose stuffs here
            }
        }
 }
Configuration options
Style and presentation
The stream container can be configured with different display modes, styling and behavior via the following properties:
presentationStyle: indicates how the stream container is being displayed. Either:- With no button in its top left (
PresentationMode.WITHOUT_ACTION_BUTTON); - With an action button that triggers a custom action you handle (
PresentationMode.WITH_ACTION_BUTTON).
- With no button in its top left (
toastMessagesEnabled: indicates whether toast messages are shown in the stream container. Defaults totrue. From version 23.3.0 toast messages will also appear when using the single card view. Prior to this, the setting will have no effect on the single card view.cardListHeaderEnabled: indicates whether the card list header should be shown in the stream container. Defaults totrueand has no effect in single card view, as the card list header is always hidden.launchBackgroundColor: The background color to use for the launch screen, seen on first load.launchIconColor: The color of the icon displayed on the launch screen, seen on first load.launchButtonColor: The color of the buttons that allow the user to retry the first load, if the request fails.launchTextColor: The text color to use for the view displayed when the SDK is first presented.statusBarBackgroundColor: The background color to use for the status bar on secondary screens, such as the snooze selection screen.runtimeVariableAnalyticsEnabled: Whether theruntime-vars-updatedanalytics event should be sent when runtime variables are resolved. Defaults totrue. If your runtime variables implementation includes sensitive data, you can set this flag tofalseto prevent such analytics events from being sent.submitButtonWithPayloadActionHandler: Triggered when a submit button with an associated custom action payload, as defined in the Workbench, causes a card to be successfully submitted.linkButtonWithPayloadActionHandler: Triggered when the user taps on a link button with an associated custom action payload, as defined in the Workbench.cardListFooterMessage: An optional footer message to be displayed below the last card in the card list, if at least one is present, ornullif no message should show. Does not apply in single card view.interfaceStyle: The interface style (light, dark or automatic) to apply to the stream container.verticalScrollingEnabled: An optional setting to control whether the single card view will automatically become scrollable when displaying a card longer than the length of its container. Defaults to true (Only available onAACSingleCardView).
Functionality
cardListRefreshInterval: How frequently the card list should be refreshed. Defaults to 15 seconds, and must be at least 1 second. If set to 0 then polling is disabled.
Setting the card refresh interval to a value less than 15 seconds may negatively impact device battery life and is not recommended.
actionDelegate: An optional delegate that handles actions triggered inside of the stream container, such as the tap of the custom action button in the top right of the stream container.cardDidRequestRunTimeVariablesHandler: If your cards supply runtime variables you can provide this handler to resolve them.runtimeVariableResolutionTimeout: Controls the timeout for the handler that supplies runtime variable values. If the timeout is reached, runtime variables will fall back to their default values.cardVotingOptions: The voting options displayed for all cards in the stream container. By default, no voting options are enabled.
Custom strings
You can also customize the following strings on a stream container instance:
cardListTitle: The title to display at the top of the card list. If not specified, defaults to "Cards".allCardsCompleted: The message displayed when the user has received at least one card before, and there are no cards to show - defaults to "All caught up".awaitingFirstCard: The message displayed over the card list, when the user has never received a card before - defaults to "Cards will appear here when there’s something to action."cardSnoozeTitle: The title for the feature allowing a user to snooze a card - defaults to "Remind me".votingUsefulTitle: The title to display for the action a user taps when they flag a card as useful - defaults to "This is useful".votingNotUsefulTitle: The title to display for the action a user taps when they flag a card as not useful - defaults to "This isn't useful".votingFeedbackTitle: The title to display at the top of the screen allowing a user to provide feedback - defaults to "Send feedback".toastCardDismissMessage: Customized toast message for when the user dismisses a card - defaults to "Card dismissed"toastCardCompletedMessage: Customized toast message for when the user completes a card - defaults to "Card completed"toastCardSnoozeMessage: Customized toast messages for when the user snoozes a card - defaults to "Snoozed until X" whereXis the time the user dismissed the card until.toastCardFeedbackMessage: Customized toast message for when the user sends feedback (votes) for a card - defaults to "Feedback received"
Displaying a vertical container
To display a vertical container, you do not need to supply any additional parameters.
Creating a vertical stream container
The displaying containers section lists all the building blocks that are needed to create a container. The code below shows an example of how it all fits together. It shows how to set the session delegate using a request token, initialise a container with the container id 1234, assign the string Things to do as title on top of the container and assign the color black to the launch icon.
- Java
- Kotlin
// Set Session Delegate
  private Unit requestToken(Function1<? super String, Unit> onTokenReceived) {
    try {
      onTokenReceived(yourMethodToGetAToken());
    } catch (Exception e){
      Log.debug("Error getting request Token ${e.message}");
      onTokenReceived.invoke(null);
    }
    return null;
  }
AACSDK.setSessionDelegate(this::requestToken);

final AACStreamContainer streamContainer = AACStreamContainer.create("1234");

// configure and start the container
streamContainer.setCardListTitle("Things to do");
streamContainer.setLaunchIconColor(Color.parseColor("#000000"));
streamContainer.start(R.id.someView, this.getChildFragmentManager());
// Set Session Delegate
val requestToken: (((String?) -> Unit) -> Unit) = { onTokenReceived ->
    runBlocking {
      try {
        token = yourMethodToGetAToken()
        onTokenReceived(token)
      } catch (e: Exception){
        Log.debug("Error getting request Token ${e.message}")
        onTokenReceived(null)
      }
    }
  }
AACSDK.setSessionDelegate(requestToken)

val container = AACStreamContainer.create("1234")

// configure and start the stream container
container.apply {
  cardListTitle = "Things to do"
  launchIconColor = Color.parseColor("#000000")
  start(R.id.someView, supportFragmentManager)
}
Displaying a custom header
(Requires Atomic SDK 1.1.0+)
You can provide a custom layout xml file as a header that scrolls up along with the cards. The custom header is placed below the built-in header if the built-in one is enabled. It is provided by your app via
streamContainer.customHeader = <R.id.your_layout>
It has no effect in the single card view.
The layout can be any valid XML based view layout. As no binding is done via the Atomic SDK, your view must have fixed assets and values set in the layout file. The view can reference any @color, @string or @drawable that is bundled with your app. For example:
res/layout/header_test.xml
<?xml version="1.0" encoding="utf-8"?>
<LinearLayout
    xmlns:android="http://schemas.android.com/apk/res/android"
    android:layout_width="match_parent"
    android:layout_height="wrap_content"
    xmlns:app="http://schemas.android.com/apk/res-auto"
    android:background="@color/greenPrimary"
    android:padding="10dp"
    android:gravity="center_horizontal"
    android:orientation="vertical">
    <TextView
        android:layout_width="wrap_content"
        android:layout_height="wrap_content"
        android:textStyle="bold"
        android:textColor="@color/atomic_white"
        android:textSize="18sp"
        android:text="THIS IS A TEST HEADER" />
    <View
        android:layout_margin="8dp"
        android:layout_width="match_parent"
        android:layout_height="1dp"
        android:background="@android:color/black"
        />
    <TextView
        android:layout_width="wrap_content"
        android:layout_height="wrap_content"
        android:textStyle="bold"
        android:textColor="@color/atomic_white"
        android:textSize="18sp"
        android:text="Maybe a subtitle" />

    <androidx.constraintlayout.widget.ConstraintLayout
        android:layout_width="match_parent"
        android:layout_height="wrap_content"
        android:orientation="horizontal"
        android:layout_margin="10dp"
        android:gravity="center">

        <ImageView
            android:id="@+id/aac_image_left"
            android:layout_width="wrap_content"
            android:layout_height="wrap_content"
            android:src="@drawable/atomic"
            app:layout_constraintStart_toStartOf="parent"
            app:layout_constraintTop_toTopOf="parent"
            />
        <TextView
            android:layout_width="wrap_content"
            android:layout_height="wrap_content"
            android:textStyle="bold"
            android:textColor="@color/atomic_white"
            android:textSize="14sp"
            app:layout_constraintLeft_toLeftOf="parent"
            app:layout_constraintRight_toRightOf="parent"
            app:layout_constraintTop_toTopOf="parent"
            app:layout_constraintBottom_toBottomOf="parent"

            android:text="Or anything really"/>
        <ImageView
            android:layout_width="wrap_content"
            android:layout_height="wrap_content"
            android:src="@drawable/atomic"
            app:layout_constraintEnd_toEndOf="parent"
            app:layout_constraintTop_toTopOf="parent" />
    </androidx.constraintlayout.widget.ConstraintLayout>
</LinearLayout>
This would be called from your code when you initialise your AACStreamContainer.
- Java
- Kotlin
// add a custom header here to the container, or null for none
streamContainer.setCustomHeader(R.layout.header_test);
// add a custom header here to the container, or null for none
streamContainer.customHeader = R.layout.header_test
Displaying a horizontal stream container
Displaying a horizontal stream container, where cards are shown from left to right, is not yet available in the Android SDK.
Displaying a single card
You can add a single card view to your app using the AACSingleCardView.create method. A single card view displays the first card in a given stream container, without any surrounding UI. This allows the card to fit in with the rest of your app UI.
In single card view, pull to refresh is disabled.
You configure a single card view in the same way as a vertical stream container, by passing:
- Your stream container ID as a string;
You can then start the single card view by passing:
- The ID of the view to embed the single card view in;
- The fragment manager to support embedding of the single card view. If embedded in an
ActivityusegetFragmentManager(); if embedding in aFragmentusegetChildFragmentManager().
You must retain stream container instances so that they are restored properly during configuration changes. More information on how to achieve this is available in the Android developer documentation.
Configuration options for the single card view
Single card view also supports an additional argument:
- An optional callback -
onChangeCardSize- which allows you to be notified when the single card view changes size.
- Java
- Kotlin
// Example in a fragment
public class MyFragment extends Fragment {
  @Override
  public void onStart() {
    super.onStart();
    final AACSingleCardView singleCard = AACSingleCardView.create("1234");
    singleCard.start(R.id.someView, this.getChildFragmentManager());
  }
}
// Example in an Activity
class MainActivity : Activity {
  override fun onCreate(savedInstanceState: Bundle?) {
    super.onCreate(savedInstanceState)
    setContentView(R.layout.activity_main)

    val singleCard = AACSingleCardView.create("1234")
    singleCard.start(R.id.someView, supportFragmentManager)
  }
}
Disposing of a stream container
To ensure that your stream container is disposed of correctly, you must call the destroy method on your stream container or single card view instance, passing the fragment manager you supplied to the start call. This will ensure that the fragment housing the stream container is removed. It is recommended to do this when the hosting Activity or Fragment is destroyed.
- Java
- Kotlin
public class MyFragment extends Fragment {
  AACStreamContainer streamContainer;

  @Override
  public void onDestroy() {
    streamContainer.destroy(this.getChildFragmentManager());
  }
}
class MyFragment: Fragment {
  private lateinit var streamContainer: AACStreamContainer

  override fun onDestroy() {
	super.onDestroy()
    streamContainer.destroy(this.childFragmentManager)
  }
}
Customizing the first time loading experience
When a stream container with a given ID is launched for the first time on a user's device, the SDK loads the theme and caches it for future use. On subsequent launches of the same stream container, the cached theme is used and the theme is updated in the background, for the next launch. Note that this first time loading screen is not presented in single card view - if a single card view fails to load, it collapses to a height of 0.
The SDK supports some basic properties to style the first time load screen, which displays a loading spinner in the center of the container. If the theme fails to load for the first time, an error message is displayed with a 'Try again' button. One of two error messages are possible - 'Couldn't load data' or 'No internet connection'.
First time loading screen colors are customized using the following properties on AACStreamContainer:
launchBackgroundColor: the background of the first time loading screen. Defaults to white.launchTextColor: the color to use for the error message shown when the theme fails to load. Defaults to black at 50% opacity.launchLoadingColor: the color to use for the loading spinner on the first time loading screen. Defaults to black.launchButtonColor: the color to use for the 'Try again' button, shown when the theme fails to load. Defaults to black.
You can also customize the text for the first load screen error messages and the 'Try again' button, using the following properties.
Note: These customized error messages also apply to the card list screen.
noInternetMessage: the error message shown when the user does not have an internet connection.apiErrorMessage: the error message shown when the theme or card list cannot be loaded due to an API error.tryAgainButtonTitle: the title of the button allowing the user to retry the failed request for the card list or theme.
API-driven card containers
(introduced in 23.4.0)
In version 23.4.0, we've introduced a new feature for observing stream containers with pure SDK API, even when that container's UI is not loaded into memory.
When you opt to observe a stream container, it is updated by default immediately after any changes in the published cards.
Should the WebSocket be unavailable, the cards are updated at regular intervals, which you can specify. Upon any change in cards, the callback block is executed with the updated card list or null if the cards couldn't be fetched. Note that the specified time interval for updates cannot be less than 1 second.
The following code snippet shows the simplest use case scenario:
- Java
- Kotlin
AACStreamContainer container = AACStreamContainer.create("containerId");

String token = AACSDK.observeStreamContainer(container, (update) -> {
  Log.d("[Observer]", "Container updated");
  return null;
});

container.startUpdates();

container.stopUpdates();
AACSDK.stopObservingStreamContainer(token);
val container = AACStreamContainer.create("containerId")

val token = AACSDK.observeStreamContainer(container) {
  Log.d("[Observer]", "Container updated")
}

container.startUpdates()

container.stopUpdates()
AACSDK.stopObservingStreamContainer(token)
In the callback, the cards parameter is an list of Card objects.
Each Card contains a variety of other class types that represent the card elements defined in Workbench.
Detailed documentation for the classes involved in constructing a Card object is not included in this guide.
However, you can refer to the examples provided below, which demonstrate several typical use cases.
Configuration options
Just like when using the UI stream containers, you can configure the AACStreamContainer object with optional configuration options.
Not all options will apply to the API-driven stream container as some are specific to the UI.
In order to configure these options, set the following properties on the AACStreamContainer instance before you call the startUpdates() method.
- cardListRefreshInterval: defines how frequently the system checks for updates when the WebSocket service is unavailable. The default interval is 15 seconds, but it must be at least 1 second. If a value less than 1 second is specified, it defaults to 1 second.
- cardDidRequestRunTimeVariablesHandler: a delegate for resolving runtime variables for the cards. Defaults to
null. See Runtime variables for more details of runtime variables. - runtimeVariableResolutionTimeout: the maximum time allocated for resolving variables in the delegate. If the tasks within the delegate method exceed this timeout, or if the completionHandler is not called within this timeframe, default values will be used for all runtime variables. The default timeout is 5 seconds and it cannot be negative.
- runtimeVariableAnalyticsEnabled: whether the
runtime-vars-updatedanalytics event, which includes the resolved values of each runtime variable, should be sent upon resolution. The default setting is NO. If you set this flag to YES, ensure that the resolved values of your runtime variables do not contain sensitive information that shouldn't appear in analytics. See SDK analytics for more details on runtime variable analytics.
Stopping the observation
You can stop the observation using the token returned from the observation call mentioned above, please note this will not stop the SDK from continuing to receive updates for the stream container through WebSockets and polling. To stop these call the stopUpdates() method.
- Java
- Kotlin
// Stops the observation callback.
AACSDK.stopObservingStreamContainer(token);

// Closes WebSocket connection and stops polling
container.stopUpdates();
// Stops the observation callback.
AACSDK.stopObservingStreamContainer(token)

// Closes WebSocket connection and stops polling
container.stopUpdates()
Examples
Accessing card metadata
Card metadata encompasses data that, while not part of the card's content, are still critical pieces of information. Key metadata elements include:
- Card instance ID: This is the unique identifier assigned to a card upon its publication.
- Card priority: Defined in the Workbench, this determines the card's position within the feed. A priority of 1 indicates the highest priority, placing the card at the top of the feed.
- Action flags: Also defined in the Workbench, these flags dictate the visibility of options such as dismissing, snoozing, and voting menus for the card.
The code snippet below shows how to access these metadata elements for a card instance.
- Java
- Kotlin
String token = AACSDK.observeStreamContainer(container, (update) -> {
    if (update != null && update.get(0) != null) {
      Card card = update.get(0);
      Log.d("[Card]", "The card instance ID is: " + card.getInstance().getId());
      Log.d("[Card]", "The card priority is: " + card.getMetadata().getPriority());
      Log.d("[Card]", "The card has a dismiss overflow menu: " + card.getActions().getDismiss().getOverflow());
    }
  return null;
});
val token = observeStreamContainer(container) { update: List<Card?>? ->
  update?.first()?.let { card ->
    Log.d("[Card]", "The card instance ID is: ${card.instance.id}")
    Log.d("[Card]", "The card priority is: ${card.metadata.priority}")
    Log.d("[Card]", "The card has a dismiss overflow menu: ${card.actions.dismiss.overflow}")
  }
}
Traversing card elements
Elements refer to the contents that are defined in the Workbench on the Content page of a card. All elements that are at the same hierarchical level within a card are encapsulated in an LayoutNode object. Elements at the top level are accessible through the defaultLayout property of the CardInstance. The nodes property within defaultLayout contains them.
The code snippet below shows how to traverse through all the elements in a card and extract the text representing the card's category.
- Java
- Kotlin
String token = AACSDK.observeStreamContainer(container, (update) -> {
  if (update != null && update.get(0) != null) {
      Card card = update.get(0);
      card.getDefaultView().getNodes().forEach((layoutNode -> {
        String type = layoutNode.getType();
        if (type.equals("category")) {
          Object rawText = layoutNode.getAttributes().get("text");
          String textWithVariablesReplaced = card.stringWithResolvedVariables(rawText);
          Log.d("[Node]", "Category nodes text is " + textWithVariablesReplaced);
        }
    }));
  }
  return null;
});
val container = create("containerId")
val token = observeStreamContainer(container) { update: List<Card?>? ->
  update?.first()?.let { card ->
    card.defaultView.nodes.forEach { layoutNode ->
      if (layoutNode.type == "category") {
        val rawText = layoutNode.attributes["text"]
        val textWithVariablesReplaced = card.stringWithResolvedVariables(rawText)
        Log.d("[Node]", "Category nodes text is $textWithVariablesReplaced")
      }
    }
  }
}
The LayoutNode class can represent properties for the various elements you can create in Workbench. Detailed documentation for all these properties is not provided, but they correspond to the raw card JSON viewable in the workbench.
Accessing subviews
Subviews are layouts that differ from the defaultLayout and each has a unique subview ID. See Link to subview on how to get the subview ID.
The following code snippet shows how to retrieve a subview layout using a specific subview ID.
- Java
- Kotlin
  String token = AACSDK.observeStreamContainer(container, (update) -> {
  if (update != null && update.get(0) != null) {
    Card card = update.get(0);
    CardSubview subview = card.getSubviews().get("subviewId");
    if (subview != null) {
      String title = card.stringWithResolvedVariables(subview.getTitle());
      Log.d("[Subview]", "Title is " + title);
    }
  }
  return null;
  });
val container = AACStreamContainer.create("containerId")
val token = AACSDK.observeStreamContainer(container) { update ->
  update?.first()?.let { card ->
    card.subviews["subviewId"]?.let { subview ->
      val title = card.stringWithResolvedVariables(subview.title)
      Log.d("[Subview]", "Title is ${title}")
    }
  }
}
API-driven card actions
(introduced in 23.4.0)
In version 23.4.0, we've introduced a new feature that execute card actions through pure SDK API. The currently supported actions are: dismiss, submit, and snooze. To execute these card actions, follow these two steps:
-
Create a card action object: Use the corresponding initialization methods of the
AACCardActionclass. You'll need a AACStreamContainer instance and a card instance ID or Card object for this. The card instance ID can be obtained from the API-driven stream container. See API-driven card containers for more details. -
Execute the action: Call the method
AACSDK.onCardActionto perform the card action. -
Check the result of the action in the result callback.
Dismissing a card
The following code snippet shows how to dismiss a card.
- Java
- Kotlin
AACSDK.onCardAction(container, new AACCardAction.Dismiss(Card.createWithId("cardInstanceId")), (aacCardActionResult) -> {
  if (aacCardActionResult instanceof AACCardActionResult.Success) {
    Log.d("[CardAction]", "Dismiss successful");
  } else if (aacCardActionResult instanceof AACCardActionResult.DataError) {
    Log.d("[CardAction]", "Dismiss data error");
  } else {
    Log.d("[CardAction]", "Dismiss network error");
  }
  return null;
  });
}
val container = AACStreamContainer.create("containerId")
AACSDK.onCardAction(container, AACCardAction.Dismiss(Card.createWithId("cardInstanceId"))) { aacCardActionResult ->
  when (aacCardActionResult) {
    AACCardActionResult.Success -> {
      Log.d("[CardAction]", "Dismiss successful")
    }
    AACCardActionResult.DataError -> {
      Log.d("[CardAction]", "Dismiss data error")
    }
    AACCardActionResult.NetworkError -> {
      Log.d("[CardAction]", "Dismiss network error")
    }
  }
}
Submitting a Card
You have the option to submit certain values along with a card. These values are optional and should be encapsulated in an HashMap<String, Any> object, using String keys and values that are either strings, numbers, or booleans.
While editing cards in Workbench, you can add input components onto cards and apply various validation rules, such as Required, Minimum length, or Maximum length.
The input elements can be used to submit user-input values, where the validation rules are applied when submitting cards through UIs of stream containers.
However, for this non-UI version, support for input components is not available yet.
There is currently no mechanism to store values in these input components through this API, and the specified validation rules won't be enforced when submitting cards.
The following code snippet shows how to submit a card with specific values.
- Java
- Kotlin
AACStreamContainer container = AACStreamContainer.create("containerId");
HashMap<String, Object> map = new HashMap<>();
map.put("stringKey", "value");
map.put("numericKey", 22);
map.put("booleanKey", false);

AACSDK.onCardAction(container, new AACCardAction.Submit(Card.createWithId("cardInstanceId"), map), (aacCardActionResult) -> {
    if (aacCardActionResult instanceof AACCardActionResult.Success) {
      Log.d("[CardAction]", "Dismiss successful");
    } else if (aacCardActionResult instanceof AACCardActionResult.DataError) {
      Log.d("[CardAction]", "Dismiss data error");
    } else {
      Log.d("[CardAction]", "Dismiss network error");
    }
    return null;
  });
}
AACSDK.onCardAction(
  container,
  AACCardAction.Submit(
    Card.createWithId("cardInstanceId"),
    mutableMapOf("stringKey" to "string", "numberKey" to 22, "booleanKey" to false)
  )
) { aacCardActionResult ->
  when (aacCardActionResult) {
    AACCardActionResult.Success -> {
      Log.d("[CardAction]", "Submit successful")
    }
    AACCardActionResult.DataError -> {
      Log.d("[CardAction]", "Submit data error")
    }
    AACCardActionResult.NetworkError -> {
      Log.d("[CardAction]", "Submit network error")
    }
  }
}
Snoozing a Card
When snoozing a card, you must specify a non-negative interval in seconds. The following code snippet shows how to snooze a card for a duration of 1 minute (60 seconds).
- Java
- Kotlin
AACSDK.onCardAction(container, new AACCardAction.Snooze(Card.createWithId("cardInstanceId"), 60), (aacCardActionResult) -> {
  if (aacCardActionResult instanceof AACCardActionResult.Success) {
    Log.d("[CardAction]", "Dismiss successful");
  } else if (aacCardActionResult instanceof AACCardActionResult.DataError) {
    Log.d("[CardAction]", "Dismiss data error");
  } else {
    Log.d("[CardAction]", "Dismiss network error");
  }
  return null;
});
AACSDK.onCardAction(
  container,
  AACCardAction.Snooze(
  Card.createWithId("cardInstanceId"),
  60
)) { aacCardActionResult ->
  when (aacCardActionResult) {
    AACCardActionResult.Success -> {
      Log.d("[CardAction]", "Snooze successful")
    }
    AACCardActionResult.DataError -> {
      Log.d("[CardAction]", "Snooze data error")
    }
    AACCardActionResult.NetworkError -> {
      Log.d("[CardAction]", "Snooze network error")
    }
  }
}
Dark mode
Stream containers and single card views support dark mode. You configure an (optional) dark theme for your stream container in the Atomic Workbench.
The interface style determines which theme is rendered:
AACInterfaceStyle.AUTOMATIC: If the user's device is currently set to light mode, the stream container will use the light (default) theme. If the user's device is currently set to dark mode, the stream container will use the dark theme (or fallback to the light theme if no dark theme is configured). On Android versions that don't support night mode, this setting is equivalent toAACInterfaceStyle.LIGHT.AACInterfaceStyle.LIGHT: The stream container will always render in light mode, regardless of the device setting.AACInterfaceStyle.DARK: The stream container will always render in dark mode, regardless of the device setting.
To change the interface style, set the corresponding value for the interfaceStyle property on your AACStreamContainer or AACSingleCardView instance.
Filtering cards
(Requires Atomic SDK 1.3.5+)
Stream containers (vertical or horizontal), single card views and container card count observers can have one or more filters applied. These filters determine which cards are displayed, or how many cards are counted.
A stream container filter consists of two parts: a filter value and an operator.
Filter values
The filter value is used to filter cards in a stream container. The following list outlines all card attributes that can be used as a filter value.
| Card attribute | Description | Value type |
|---|---|---|
| Priority | Card priority defined in Workbench, Card -> Delivery | Int |
| Card template created date | The date time when a card template is created | Date |
| Card template ID | The template ID of a card, see below for how to get it | String |
| Card template name | The template name of a card | String |
| Custom variable | Action Flow variables, optionally referenced in the card content | Multiple |
Use corresponding static methods of AACCardFilterValue to create a filter value.
Examples
Card priority
The following code snippet shows how to create a filter value that represents a card priority 3.
- Java
- Kotlin
AACCardFilterValue filterValue = AACCardFilterValue.byPriority(3);
val filterValue = AACCardFilterValue.byPriority(3)
Custom variable
The following code snippet shows how to create a filter value that represents a boolean custom variable isSpecial.
- Java
- Kotlin
AACCardFilterValue filterValue = AACCardFilterValue.byVariableName("isSpecial", false);
val filterValue = AACCardFilterValue.byVariableName("isSpecial", false)
Note: It's important to specify the right value type when referencing custom variables for filter value. There are five types of variables in the Workbench, currently four are supported: String, Number, Date and Boolean.
On the card editing page, click on the ID part of the overflow menu at the upper-right corner.

Filter operators
The operator is the operational logic applied to a filter value (some operators require 2 or more values).
The following table outlines available operators.
| Operator | Description | Supported types |
|---|---|---|
| equalTo | Equal to the filter value | Int, Date, String, Boolean |
| notEqualTo | Not equal to the filter value | Int, Date, String, Boolean |
| greaterThan | Greater than the filter value | Int, Date |
| greaterThanOrEqualTo | Greater than or equal to the filter value | Int, Date |
| lessThan | Less than the filter value | Int, Date |
| lessThanOrEqualTo | Less than or equal to the filter value | Int, Date |
| contains | In one of the filter values | Int, Date, String |
| notIn | Not in one of the filter values | Int, Date, String |
| between | In the range of start and end, inclusive | Int, Date |
After creating a filter value, use the corresponding static method on the AACCardListFilter class to combine it with an operator.
Examples
Card priority range
The following code snippet shows how to create a filter that filters card with priority between 2 and 6 inclusive.
- Java
- Kotlin
AACCardFilterValue fv1 = AACCardFilterValue.byPriority(2);
AACCardFilterValue fv2 = AACCardFilterValue.byPriority(6);
AACCardListFilter filter = AACCardListFilter.between(Arrays.asList(fv1, fv2));
val fv1 = AACCardFilterValue.byPriority(2)
val fv2 = AACCardFilterValue.byPriority(6)
val filter = AACCardListFilter.between(listOf(fv1, fv2))
Each operator supports different type of values. For example, operator lessThan only support Int and Date. So passing String values to that operator will raise an exception.
Applying filters to a stream container
There are three steps to filter cards in a stream container:
-
Create one or more
AACCardFilterValueobjects. -
Combine filter values with filter operators to form a
AACCardFilter. -
Apply filter(s).
3.1. For stream containers, call
streamContainer.applyFilter(listOf(filter1, filter2)streamContainer.applyFilter(myFilter)[]toapplyFilter.
Examples
Card priority 5 and above
The following code snippet shows how to only display cards with priority > 5 in a stream container.
- Java
- Kotlin
AACCardFilterValue fv1 = AACCardFilterValue.byPriority(5);
AACCardListFilter filter = AACCardListFilter.greaterThan(fv1);
...

// Acquire the stream container object and apply filter
streamContainer.applyFilter(filter);
val fv1 = AACCardFilterValue.byPriority(5)
val filter = AACCardListFilter.greaterThan(fv1)
...

// Acquire the stream container object and apply filter
streamContainer.applyFilter(filter)
Card template names
The following code snippet shows how to only display cards with the template names 'card 1', 'card 2', or 'card 3' in a stream container.
- Java
- Kotlin
AACCardFilterValue fv1 = AACCardFilterValue.byCardTemplateName("card1");
AACCardFilterValue fv2 = AACCardFilterValue.byCardTemplateName("card2");
AACCardFilterValue fv3 = AACCardFilterValue.byCardTemplateName("card3");
AACCardListFilter filter = AACCardListFilter.contains(Arrays.asList(fv1, fv2, fv3));
...

// Acquire the stream container object and apply filter
streamContainer.applyFilter(filter);
val fv1 = AACCardFilterValue.byCardTemplateName("card1")
val fv2 = AACCardFilterValue.byCardTemplateName("card2")
val fv3 = AACCardFilterValue.byCardTemplateName("card3")
val filter = AACCardListFilter.contains(listOf(fv1, fv2, fv3))
...

// Acquire the stream container object and apply filter
streamContainer.applyFilter(filter);
Combination of filter values
The following code snippet shows how to only display cards with priority != 6 and custom variable isSpecial == true in a stream container.
Note: isSpecial is a Boolean custom variable defined in Workbench.
- Java
- Kotlin
AACCardFilterValue fv1 = AACCardFilterValue.byPriority(6);
AACCardListFilter filter1 = AACCardListFilter.notEqualTo(fv1);

AACCardFilterValue fv2 = AACCardFilterValue.byVariableName("isSpecial", true);
AACCardListFilter filter2 = AACCardListFilter.notEqualTo(fv2);

...

// Acquire the stream container object and apply filter
streamContainer.applyFilter(Arrays.asList(fv1, fv2));
val fv1 = AACCardFilterValue.byPriority(6)
val filter1 = AACCardListFilter.notEqualTo(fv1)

val fv2 = AACCardFilterValue.byVariableName("isSpecial", true)
val filter2 = AACCardListFilter.notEqualTo(fv2)

...

// Acquire the stream container object and apply filter
streamContainer.applyFilter(listOf(fv1, fv2))
Legacy filter
Stream containers and single card views can have an optional filter applied, which affects the cards displayed.
One filter is currently supported - filterCardsById. This filter requests that the stream container or single card view show only a card matching the specified card instance ID, if it exists. This method is called on an instance of AACStreamContainer or AACSingleCardView.
The card instance ID can be found in the push notification payload, allowing you to apply the filter in response to a push notification being tapped.
- Java
- Kotlin
streamContainer.filterCardsById(this.getChildFragmentManager(), "cardId");
streamContainer.filterCardsById(childFragmentManager, "cardId")
Supporting custom actions on submit and link buttons
In the Atomic Workbench, you can create a submit or link button with a custom action payload.
- When such a link button is tapped, the
linkButtonWithPayloadActionHandlercallback is invoked on your stream container. - When such a submit button is tapped, and after the card is successfully submitted, the
submitButtonWithPayloadActionHandlercallback is invoked on your stream container.
These callbacks are passed an action object, containing the payload that was defined in the Workbench for that button. You can use this payload to determine the action to take, within your app, when the submit or link button is tapped.
The action object also contains the card instance ID and stream container ID where the custom action was triggered.
- Java
- Kotlin
streamContainer.setSubmitButtonWithPayloadActionHandler(action -> {
  // Perform an action when the submit button successfully submits the card.
  return Unit.INSTANCE;
});

streamContainer.setLinkButtonWithPayloadActionHandler(action -> {
  // Perform an action when the link button with a custom payload is tapped.
  return Unit.INSTANCE;
});
streamContainer.submitButtonWithPayloadActionHandler = { action ->
  // Perform an action when the submit button successfully submits the card.
}

streamContainer.linkButtonWithPayloadActionHandler = { action ->
  // Perform an action when the link button with a custom payload is tapped.
}
Customizing toast messages for card events
(Requires Atomic SDK 1.1.0+)
You can customize any of the toast messages used when dismissing, completing, snoozing and placing feedback on a card. This is configurable for each stream container and you simply supply a string for each custom message. If you do not supply a string the defaults will be used.
Options are:
toastCardDismissMessage: Customized toast message for when the user dismisses a card - defaults to "Card dismissed"toastCardCompletedMessage: Customized toast message for when the user completes a card - defaults to "Card completed"toastCardSnoozeMessage: Customized toast messages for when the user snoozes a card - defaults to "Snoozed until X" whereXis the time the user dismissed the card until.toastCardFeedbackMessage: Customized toast message for when the user sends feedback (votes) for a card - defaults to "Feedback received"
- Java
- Kotlin
streamContainer.setToastCardDismissMessage("The card has been dismissed");
streamContainer.setToastCardCompletedMessage("The card has been completed");
streamContainer.setToastCardSnoozeMessage(null); // this will show the default. Assigning null is optional
streamContainer.setToastCardFeedbackMessage("Thanks for the feedback");
streamContainer.toastCardDismissMessage = "The card has been dismissed"
streamContainer.toastCardCompletedMessage = "The card has been completed"
streamContainer.toastCardSnoozeMessage = null // this will show the default. Assigning null is optional
streamContainer.toastCardFeedbackMessage = "Thanks for the feedback"
Card snoozing
The Atomic SDKs provide the ability to snooze a card from a stream container or single card view. Snooze functionality is exposed through the card’s action buttons, overflow menu and the quick actions menu (exposed by swiping a card to the left, on iOS and Android).
Tapping on the snooze option from either location brings up the snooze date and time selection screen. The user selects a date and time in the future until which the card will be snoozed. Snoozing a card will result in the card disappearing from the user’s card list or single card view, and reappearing again at the selected date and time. A user can snooze a card more than once.
When a card comes out of a snoozed state, if the card has an associated push notification, and the user has push notifications enabled, the user will see another notification, where the title is prefixed with Snoozed:.
You can customize the title of the snooze functionality, as displayed in a card’s overflow menu and in the title of the card snooze screen. The default title, if none is specified, is Remind me.
On an AACStreamContainer instance, call the appropriate setter to change the title of the card snooze feature:
- Java
- Kotlin
streamContainer.setCardSnoozeTitle("Snooze");
streamContainer.cardSnoozeTitle = "Snooze"
Prevent Snoozing Beyond Expiry Date
(introduced in 24.3.0)
The SDK will now prevent users from selecting a date and time that exceeds the card's expiry date when snoozing the card.
There are three ways to snooze a card in the Atomic SDK:
- Overflow Menu: Click on the "Remind me" overflow menu option and then select a date and time using the integrated selector.
- Snooze Button: Tap a snooze button on the card and select a date & time on the snooze activity.
- Pre-set Snooze Button: Tap a snooze button with a pre-set snooze period. This snoozes the card instantly.
If a card has an expiry date set, new validation will prevent snoozing the card to a date that matches or exceeds the expiry date, except in scenario 3, where the snooze period is pre-configured from the workbench.
Card voting
The Atomic SDKs support card voting, which allows you to gauge user sentiment towards the cards you send. When integrating the SDKs, you can choose to enable options for customers to indicate whether a card was useful to the user or not, accessible when they tap on the overflow button in the top right of a card.
If the user indicates that the card was useful, a corresponding analytics event is sent for that card (card-voted-up).
If they indicate that the card was not useful, they are presented with a secondary screen where they can choose to provide further feedback. The available reasons for why a card wasn’t useful are:
- It’s not relevant;
- I see this too often;
- Something else.
If they select "Something else", a free-form input is presented, where the user can provide additional feedback. The free form input is limited to 280 characters. After tapping "Submit", an analytics event containing this feedback is sent (card-voted-down).
You can customize the titles that are displayed for these actions, as well as the title displayed on the secondary feedback screen. By default these are:
- Thumbs up - "This is useful";
- Thumbs down - "This isn’t useful";
- Secondary screen title - "Send feedback".
Card voting is disabled by default. You can enable positive card voting ("This is useful"), negative card voting ("This isn’t useful"), or both:
- Java
- Kotlin
streamContainer.setCardVotingOptions(EnumSet.of(VotingOption.Useful, VotingOption.NotUseful)); // Enable both voting options
streamContainer.setCardVotingOptions(EnumSet.of(VotingOption.Useful)); // Enable one voting option
streamContainer.setCardVotingOptions(EnumSet.of(VotingOption.None)); // Disable voting (default)
streamContainer.cardVotingOptions = EnumSet.of(VotingOption.Useful, VotingOption.NotUseful) // Enable both voting options
streamContainer.cardVotingOptions = EnumSet.of(VotingOption.Useful) // Enable one voting option
streamContainer.cardVotingOptions = EnumSet.of(VotingOption.None) // Disable voting (default)
You can also customize the titles for the card voting options, and the title displayed at the top of the feedback screen, presented when a user indicates the card wasn’t useful:
- Java
- Kotlin
streamContainer.setVotingFeedbackTitle("Provide feedback");
streamContainer.setVotingUsefulTitle("Thumbs up");
streamContainer.setVotingNotUsefulTitle("Thumbs down");
streamContainer.votingFeedbackTitle = "Provide feedback"
streamContainer.votingUsefulTitle = "Thumbs up"
streamContainer.votingNotUsefulTitle = "Thumbs down"
Refreshing a stream container manually
There is no method that allows you to manually refresh a container in the Android SDK (unlike iOS).
As soon as a new card is available, the container is refreshed.
Responding to card events
The SDK allows you to perform custom actions in response to events occurring on a card, such as when a user:
- submits a card;
- dismisses a card;
- snoozes a card;
- indicates a card is useful (when card voting is enabled);
- indicates a card is not useful (when card voting is enabled).
To be notified when these happen, assign a card event handler to your stream container:
- Java
- Kotlin
streamContainer.setCardEventHandler(event -> {
  // Perform an action in response to the provided event
  return Unit.INSTANCE;
});
streamContainer.cardEventHandler = { event ->
  // Perform an action in response to the provided event
}
Sending custom events
You can send custom events directly to the Atomic Platform for the logged in user, via the
sendUserSettings function from AACSDK
A custom event can be used in the Workbench to create segments for card targeting. For more details of custom events, see Custom Events.
The event will be created for the user defined by the authentication token returned in the session delegate. As such, you cannot specifically target user IDs using this function.
- Java
- Kotlin
HashMap properties = new HashMap<String, String>();
properties.put("firstName", "Fred");
properties.put("surname", "Flintstone");
AACCustomEvent event = new AACCustomEvent("myCustomEvent", properties);
AACSDK.sendCustomEvent(event, null); // assign a completion handler if required, but null in this example
val customEvent = AACCustomEvent("myCustomEvent", mapOf("Firstname" to "Fred", "Surname" to "Flintstone"))

AACSDK.sendCustomEvent(customEvent) { result ->
  when (result) {
    AACSDKSendCustomEventsResult.DataError -> { /* handle error */ }
    AACSDKSendCustomEventsResult.Success -> { /* do something with result */ }
  }
}
Push notifications
The Android SDK supports push notifications via Firebase Cloud Messaging (FCM). You'll need to add your Service account private key (JSON) file to the Workbench and complete some app and SDK level configuration.
For a working example of integrating push notifications in a native Android app, see the notifications branch of our boilerplate app.
Configure Firebase Cloud Messaging (FCM)
To use push notifications in the SDK you'll need to have FCM set up for your application. If you haven't done that yet, follow the Firebase Cloud Messaging guide to set up an Android client.
Custom Channel ID
You can also configure Atomic push notifications to be sent with a custom channel ID, which places them in a specific channel within your app's notification settings. This feature is supported in Android 8 (API 26) and above, and can be configured using the notification platforms API. More information on this API is available in our SNS platform documentation. If you do not configure your notification platform with a custom channel ID, Atomic push notifications will be placed in a default Miscellaneous channel.
Configure your Notification Platform
Once you have FCM set up you'll need to create a new Notification Platform in the Workbench.
To add a Notification Platform, see: Notifications in the Configuration area.
Register the user against specific stream containers for push notifications
You need to indicate to the Atomic Platform which stream containers are eligible to receive push notifications in your app for the current device.
- Java
- Kotlin
ArrayList<String> streamContainerIds = new ArrayList<>();
streamContainerIds.add("1234");

AACSDK.registerStreamContainersForNotifications(streamContainerIds)
val streamContainerIds = ArrayList<String>()
streamContainerIds.add("1234")

AACSDK.registerStreamContainersForNotifications(streamContainerIds)
You will need to do this each time the logged in user changes.
To deregister the device for Atomic notifications for your app, such as when a user completely logs out of your app, call deregisterDeviceForNotifications on AACSDK:
- Java
- Kotlin
AACSDK.deregisterDeviceForNotifications();
AACSDK.deregisterDeviceForNotifications()
This should be done before the call to logout().
Registration and deregistration callback
The following methods take an additional parameter - a callback that is invoked when the request completes, to indicate whether it succeeded or failed:
-
AACSDK.deregisterDeviceForNotifications -
AACSDK.registerStreamContainersForNotifications -
AACSDK.registerDeviceForNotifications
This allow you to retry the request to register the push token, or register a user for notifications in the given stream containers, in the event that the request fails.
For example, in the following code registerDeviceForNotifications calls the method retryRegisterForNotifications when registerDeviceForNotifications doesn't succeed:
- Java
- Kotlin
AACSDK.registerStreamContainersForNotifications(streamContainerIds,
    (it) -> {
      if (! it.isSuccess()){
        retryRegisterForNotifications();
      }
      return Unit.INSTANCE;
    });
AACSDK.registerStreamContainersForNotifications(streamContainerIds) {
  when (it){
    is AACSDKRegistrationCallback.Success -> {}
    else -> { retryRegisterForNotifications() }
  }
}
Note that the callback is an optional parameter, so if no callback is required, just use null, or in Kotlin omit it entirely:
- Java
- Kotlin
AACSDK.registerStreamContainersForNotifications(streamContainerIds, null);
AACSDK.registerStreamContainersForNotifications(streamContainerIds)
Register the device to receive notifications
Whenever your Firebase push token changes, you'll need to register it with Atomic so that notifications can be sent to the device.
One way to do this is by extending the FirebaseMessagingService and listening for token changes. This method may get called on app startup, before you have set up the SDK or received your JWT token from your authentication process. To ensure that the authenticated API call to Atomic can succeed, save the token in this method and call the registerDeviceForNotification methods later, after you have set up the SDK.
- Java
- Kotlin
public class FirebaseMessagingService extends com.google.firebase.messaging.FirebaseMessagingService {

  @Override
  public void onNewToken(@NonNull String s) {
    super.onNewToken(s);

    // Save the device token, you may then use this token to call AACSDK.registerDeviceForNotifications(token)
    // After you have setup Atomic with your sessionDelegate
    cacheDeviceTokenAndRegisterWhenReady(s)
  }
}
class FirebaseMessagingService : com.google.firebase.messaging.FirebaseMessagingService() {
  override fun onNewToken(s: String) {
    super.onNewToken(s)

    // Save the device token, you may then use this token to call AACSDK.registerDeviceForNotifications(token)
    // After you have setup Atomic with your sessionDelegate
    cacheDeviceTokenAndRegisterWhenReady(s)
  }
}
Alternatively, you can get the current token using the FirebaseMessaging.getInstance().token property, this will work at any time and avoids having to cache the token.
- Java
- Kotlin
FirebaseMessaging.getInstance().getToken()
    .addOnCompleteListener(new OnCompleteListener<String>() {
        @Override
        public void onComplete(@NonNull Task<String> task) {
          if (!task.isSuccessful()) {
            Log.w(TAG, "Fetching FCM registration token failed", task.getException());
            return;
          }

          // Get new FCM registration token
          String token = task.getResult();

          // Register the device token with Atomic
          AACSDK.registerDeviceForNotifications(token)
        }
    });
FirebaseMessaging.getInstance().token.addOnCompleteListener(OnCompleteListener { task ->
    if (!task.isSuccessful) {
        Log.w(TAG, "Fetching FCM registration token failed", task.exception)
        return@OnCompleteListener
    }

    // Get new FCM registration token
    val token = task.result

    // Register the device token with Atomic
    AACSDK.registerDeviceForNotifications(token)
})
Detect push notifications originating from Atomic
Use the AACSDK.notificationFromPushPayload method to determine if a notification originated from Atomic and, if so, extract specific data from the notification.
Atomic push notification objects (AACPushNotification) contain:
- the instance ID of the card the push notification relates to;
- the ID of the stream container where the push notification was generated;
- any custom data that you choose to supply as part of the event that generated the card.
The custom data that you supply can be used in your decision making, to determine which action to take in response to the notification.
If the provided push notification did not originate from Atomic, this method will return null.
When your app is running in the foreground
In your FirebaseMessagingService subclass, you can intercept and check for Atomic notifications in onMessageReceived, as in the example below.
- Java
- Kotlin
public class FirebaseMessagingService
    extends com.google.firebase.messaging.FirebaseMessagingService {

  @Override
  public void onMessageReceived(@NonNull RemoteMessage remoteMessage) {
    super.onMessageReceived(remoteMessage);
    Map data = remoteMessage.getData();
    AACPushNotification pushNotification = AACSDK.notificationFromPushPayload(data);

    if (pushNotification != null) {
      // This is an Atomic push notification, do something here.
      // You may choose to create a notification to display in the notification tray, or store some state for later use.
    }
  }
}
class FirebaseMessagingService : com.google.firebase.messaging.FirebaseMessagingService() {
  override fun onMessageReceived(remoteMessage: RemoteMessage) {
    super.onMessageReceived(remoteMessage)

    val data = remoteMessage.data
    val pushNotification = AACSDK.notificationFromPushPayload(data)

    if (pushNotification != null) {
      // This is an Atomic push notification, do something here.
      // You may choose to create a notification to display in the notification tray, or store some state for later use.
    }
  }
}
When your app is running in the background
By default, tapping on an Atomic push notification that is generated while your app is in the background will launch your app.
Within the activity that is launched, you can call AACSDK.notificationFromPushPayload, passing the intent. If the push notification that triggered app launch originated from Atomic, this method will return an AACPushNotification object; otherwise, it will return null.
- Java
- Kotlin
public class MyActivity extends Activity {

  @Override
  protected void onCreate(@Nullable Bundle savedInstanceState) {
    super.onCreate(savedInstanceState);

    AACPushNotification pushNotification = AACSDK.notificationFromPushPayload(getIntent())

    if (pushNotification != null) {
      // This intent was started from an Atomic push notification.
      // You may choose to navigate to a particular screen, or save some state for later use.
    }
  }
}
class MyActivity : Activity() {
  override fun onCreate(savedInstanceState: Bundle?) {
    super.onCreate(savedInstanceState)

    val notification = AACSDK.notificationFromPushPayload(intent)

    if(notification != null) {
      // This intent was started from an Atomic push notification.
      // You may choose to navigate to a particular screen, or save some state for later use.
    }
  }
}
Retrieving card count without displaying a Stream Container
The Atomic SDK exposes a LiveData object where the count active cards can be obtained. Such object can be obtained by calling AACSDK.getLiveCardCountForStreamContainer.
- Java
- Kotlin
final Observer<String> countObserver = new Observer<String>() {
      @Override
      public void onChanged(@Nullable final int newCount) {
        // Update the UI, in this case, a TextView.
        Log.d("MyApp", "Card count: $newCount");
      }
    };
AACSDK.getLiveCardCountForStreamContainer(aacStreamContainer).observe(this, countObserver);
AACSDK.getLiveCardCountForStreamContainer(aacStreamContainer).observe(this, Observer { i: Int? ->
      Log.d("MyApp", "Card count: $i")
    })
To have getLiveCardCountForStreamContainer update its values, AACStreamContainer must be initialized to receive updates without UI binding.
- Java
- Kotlin
val streamContainer = AACStreamContainer(streamContainerId);
streamContainer.startUpdates();
val streamContainer = AACStreamContainer(streamContainerId)
streamContainer.startUpdates()
Start updates schedules polling for new feed updates, and if WebSockets are opens a WebSocket connection and subscribes to the Atomic platform for live updates to the containers feed. It requires its Runtime Variable Handler and any other Stream Container Settings to be set on the container AACStreamContainer object before this method is called.
Because startUpdates is not controlled by a lifecycle-aware component such as a fragment or activity, it must be manually stopped to prevent leaking memory or using more of the users resources than neccesary. To stop the scheduled updates and un-subscribe from further upates call stopUpdates() in the onDestroy() method of your activity or fragment.
- Java
- Kotlin
 public void onDestroy() {
   super.onDestroy();
   streamContainer.stopUpdates();
 }
override fun onDestroy() {
  super.onDestroy()
  streamContainer.stopUpdates()
}
Retrieving the count of active and unseen cards
All cards are unseen the moment they are sent. A card becomes "seen" when it has been shown on the customer's screen (even if only briefly or partly). A quick scroll-through might not make the card "seen", this depends on the scrolling speed. The user metrics only count "active" cards, which means that snoozed and embargoed cards will not be included in the count.
The Atomic Android SDK exposes an object where user specific card count information can be found: user metrics. These metrics include:
- The number of cards available to the user across all stream containers;
- The number of cards that haven't been seen across all stream containers;
- The number of cards available to the user in a specific stream container (equivalent to the card count functionality in the previous section);
- The number of cards not yet seen by the user in a specific stream container.
These metrics enable you to display badges in your UI that indicate how many cards are available to the user but not yet viewed, or the total number of cards available to the user.
This method returns null if user metrics cannot be retrieved.
- Java
- Kotlin
AACSDK.userMetrics(userMetrics -> {
  if(userMetrics != null) {
    Log.d("User metrics", "Total cards in all containers: " + userMetrics.getTotalCards());
    Log.d("User metrics", "Unseen cards in all containers: " + userMetrics.getUnseenCards());

    Log.d("User metrics", "Total cards in container: " + userMetrics.totalCardsForStreamContainer("containerId"));
    Log.d("User metrics", "Unseen cards in container: " + userMetrics.unseenCardsForStreamContainer("containerId"));
  }

  return Unit.INSTANCE;
});
AACSDK.userMetrics { userMetrics ->
  userMetrics?.let {
    Log.d("User metrics", "Total cards in all containers: ${userMetrics.totalCards}")
    Log.d("User metrics", "Unseen cards in all containers: ${userMetrics.unseenCards}")

    Log.d("User metrics", "Total cards in container: ${userMetrics.totalCardsForStreamContainer("containerId")}")
    Log.d("User metrics", "Unseen cards in container: ${userMetrics.unseenCardsForStreamContainer("containerId")}")
  }
}
In order to retrieve the user metrics object, and receive information about the nature of the error if the request fails. You may use the userMetricsWithResultFunction.
- Java
- Kotlin
AACSDK.userMetricsWithResult(result -> {
    if (result instanceof AACSDKUserMetricsResult.Success) {
        Log.d("User Metrics", ((AACSDKUserMetricsResult.Success) result).getUserMetrics().toString());
    }
    if (result instanceof AACSDKUserMetricsResult.DataError) {
        Log.d("User Metrics", ((AACSDKUserMetricsResult.DataError) result).getError().toString());
    }
    return Unit.INSTANCE;
});
AACSDK.userMetricsWithResult { result ->
    when (result) {
        is AACSDKUserMetricsResult.Success -> {
            Log.d("User Metrics", result.userMetrics.toString())
        }
        is AACSDKUserMetricsResult.DataError -> {
            Log.d("User Metrics", result.error.message ?: "No error message")
        }
    }
}
Runtime variables
Runtime variables are resolved in the SDK at runtime, rather than from an event payload when the card is assembled. Runtime variables are defined in the Atomic Workbench.
The SDK will ask the host app to resolve runtime variables when a list of cards is loaded (and at least one card has a runtime variable), or when new cards become available due to WebSockets pushing or HTTP polling (and at least one card has a runtime variable).
Runtime variables can currently only be resolved to string values.
Runtime variables are resolved via the AACStreamContainer.cardDidRequestRunTimeVariablesHandler callback. If this callback is not provided then runtime variables will fall back to their default values, as defined in the Atomic Workbench.
This method, when called by the SDK, provides you with:
- An array of objects representing the cards in the list. Each card object contains:
- The event name that triggered the card’s creation;
- The lifecycle identifier associated with the card;
- A method that you call to resolve each variable on that card (
resolveVariableWithNameAndValue(name, value)).
- A callback (
completionHandler), that must be called by the host app with resolved cards once all variables are resolved.
If a variable is not resolved, that variable will use its default value, as defined in the Atomic Workbench.
If you do not call the completionHandler before the runtimeVariableResolutionTimeout elapses (defined on AACStreamContainer), the default values for all runtime variables will be used. Calling the completion handler more than once has no effect.
- Java
- Kotlin
streamContainer.setCardDidRequestRunTimeVariablesHandler(
        (List<AACCardInstance> aacCardInstances,
            Function1<? super List<AACCardInstance>, Unit> unitFunction1) -> {
          for (AACCardInstance card : aacCardInstances) {
            card.resolveVariableWithNameAndValue("numberOfItems", "12");
          }

          unitFunction1.invoke(aacCardInstances);

          return Unit.INSTANCE;
        });
streamContainer.cardDidRequestRunTimeVariablesHandler = { cards, done ->
  for (card in cards) {
    card.resolveVariableWithNameAndValue("numberOfItems", "12")
  }

  done(cards)
}
Updating runtime variables manually
You can manually update runtime variables at any time by calling the updateVariables method on AACStreamContainer:
- Java
- Kotlin
streamContainer.updateVariables();
streamContainer.updateVariables()
Accessibility and fonts
The Atomic SDKs support a variety of accessibility features on each platform. These features make it easier for vision-impaired customers to use Atomic's SDKs inside of your app.
These features also allow your app, with Atomic integrated, to continue to fulfil your wider accessibility requirements.
Dynamic font scaling
The Atomic Android SDKs supports dynamic font scaling. Typography styles opt-in to dynamic scaling to respond to the font size preference set by the user in their device settings. On Android, this feature is enabled in the Settings app, under "Font size".
To opt-in to dynamic font scaling:
- Open the Atomic Workbench.
- Navigate to the Theme Editor (Configuration > SDK > Container themes).
- Select a theme and then a typography style inside of that theme (e.g. Headline > Typography).
- Toggle the 'Dynamic sizing' switch on, and optionally supply a minimum and maximum font size.
Typography styles that do not have 'Dynamic scaling' enabled stay at a fixed size regardless of the user's text size (this is the default behavior for all typography styles).
Font sizing behavior
When the user changes their system-wide text size on Android, the SDK will automatically re-render any components containing typography styles that opt-in to dynamic scaling (typography styles that have the 'Dynamic scaling' option enabled in the stream container theme).
Example scaling scenario
A typography style is configured in the Workbench with the following properties:
- Font size:
17px - Dynamic scaling:
On - Dynamic scaling minimum size:
15px - Dynamic scaling maximum size:
30px
On Android, the following font sizes would be used for each scale factor (examples only; actual scale factors returned by the operating system may differ):
| Scale factor | Resultant size |
|---|---|
| 0.75 | 15px (12.75px is below min) |
| 1 | 17px |
| 1.15 | 19.55px |
| 1.25 | 21.25px |
| 1.5 | 25.5px |
| 2 | 30px (34px is above max) |
Alternate text
As of Android SDK 0.16.0, alternate text is supported on all image and video components. This alternate text is supplied by you when authoring a card, and is used to describe the image or video itself. Alternate text forms part of a description that is passed to the system screen reader (when enabled).
The following description is used for each image or video format:
| Format | Text supplied to screen reader |
|---|---|
| Banner | Alternate text |
| Inline | Alternate text |
| Text | Label is used (also defined in the Workbench), as this component does not render an image thumbnail |
| Thumbnail | Alternate text, label and description |
Using embedded fonts in themes
(Requires Atomic SDK 1.0.0+)
To map a font in a stream container theme to one embedded in your app, use the registerEmbeddedFonts method on AACSDK, passing an array of AACEmbeddedFont objects, each containing the following:
- A
familyNamethat matches the font family name declared in the theme within the Atomic Workbench; - A
weight- eitherAACFontWeight.BoldorAACFontWeight.None; - A
style- eitherAACFontStyle.ItalicorAACFontStyle.None; - A
typeface, as aTypefaceobject, which provides a font loaded from your app's resources. This can be a font bundled with your application or one provided by the operating system.
If the familyName, weight and style of a font in the stream container theme matches an AACEmbeddedFont instance that you've registered with the SDK, the SDK will use the typeface when applying that font, and will not download the font from a remote URL.
In the example below, any use of a custom font named BrandFont in your theme, that is bold and italicized, would use the system monospace font instead:
If the family name, weight and style do not match a custom font in the stream container theme exactly, the SDK will download the font at the remote URL specified in the theme instead.
- Java
- Kotlin
AACSDK.registerEmbeddedFonts(Arrays.asList(new AACEmbeddedFont[]{
    new AACEmbeddedFont("BrandFont", Typeface.MONOSPACE, AACFontWeight.Bold, AACFontStyle.Italic)
}));
AACSDK.registerEmbeddedFonts(listOf(
    AACEmbeddedFont("BrandFont", Typeface.MONOSPACE, AACFontWeight.Bold, AACFontStyle.Italic)
))}
SDK Analytics
If you use runtime variables on a card, you can optionally choose to send the resolved values of any runtime variables back to the Atomic Platform as an analytics event. This per-card analytics event - runtime-vars-updated - contains the values of runtime variables rendered in the card and seen by the end user. Therefore, you should not enable this feature if your runtime variables contain sensitive data that you do not wish to store on the Atomic Platform.
To enable this feature, set the runtimeVariableAnalyticsEnabled flag on your stream container or single card view:
- Java
- Kotlin
streamContainer.setRuntimeVariableAnalyticsEnabled(false);
streamContainer.runtimeVariableAnalyticsEnabled = false
}
Network request security
The Atomic Android SDK provides functionality to further secure the SDK implementation in your own app.
Allow or deny network requests
You can choose to implement an SDK-wide network request handler, which determines whether requests originating from the Atomic SDK are allowed to proceed. This enables you to permit network requests only to domains or subdomains that you approve.
To enable this functionality, create a request handler implementing the AACNetworkRequestHandler interface, implement the dispositionForAtomicRequest(url) method and call setNetworkRequestHandler on AACSDK to assign it to the SDK. The request handler is called for every network request from the SDK.
Within the dispositionForAtomicRequest method, you can inspect the request URL and return one of the following dispositions:
AACNetworkRequestDisposition.Allow: The request is allowed to proceed.AACNetworkRequestDisposition.Deny: The request is not allowed to proceed and will be cancelled.AACNetworkRequestDisposition.AllowWithCertificatePins: The request can proceed if a hash of the subject public key info (SPKI) from part of the certificate chain matches one of the pin objects provided (see below for more information).
If you do not implement this request handler, all requests are permitted.
Allow requests with certificate pinning
When you return AACNetworkRequestDisposition.AllowWithCertificatePins in the AACNetworkRequestHandler above, you will be required to supply a list of AACCertificatePin objects. Each object contains a SHA-256 hash of the subject public key info (SPKI) from part of the domain's certificate chain, which is then base64 encoded.
When pinning requests for the Atomic API (<orgId>.client-api.atomic.io), we strongly recommend pinning to all available Amazon root certificates, which is the approach recommended by Amazon Web Services. SHA256 hashes for Amazon's root certificates are available on the Amazon Trust website.
You can convert these SHA256 hashes to a base64 representation, as required by the SDK, using the following Terminal command: openssl base64 -e <<< "<SHA256 hash>"
If the hashed, base64-encoded SPKI from part of the request's certificate chain matches any of the provided pin objects, the request is allowed to proceed. If it does not match any of the provided pins, the request is denied.
If you return this disposition for a non-HTTPS request, the request will be denied.
- Java
- Kotlin
AACSDK.setNetworkRequestHandler(new AACNetworkRequestHandler() {
  @NotNull
  @Override
  public AACNetworkRequestDisposition dispositionForAtomicRequest(@NotNull String url) {
    Uri uri = Uri.parse(url);

    if(uri.getHost() == null) {
      return Deny.INSTANCE;
    }

    switch(uri.getHost()) {
      case "atomic.io":
        ArrayList<AACCertificatePin> pins = new ArrayList();
        pins.add(new AACCertificatePin("AAAAAA="));

        return new AACNetworkRequestDisposition.AllowWithCertificatePins(pins);
      case "placeholder.com":
        return Allow.INSTANCE;
      default:
        return Deny.INSTANCE;
    }
  }
});
AACSDK.setNetworkRequestHandler(object: AACNetworkRequestHandler {
  override fun dispositionForAtomicRequest(url: String): AACNetworkRequestDisposition {
    return when(val host = Uri.parse(url).host) {
      // Allow requests to atomic.io with certificate pinning.
      "atomic.io" -> AACNetworkRequestDisposition.AllowWithCertificatePins(listOf(
          AACCertificatePin("AAAAAA=")
      ))
      // Always allow requests to placeholder.com.
      "placeholder.com" -> AACNetworkRequestDisposition.Allow
      // Deny all other requests.
      else -> AACNetworkRequestDisposition.Deny
    }
  }
})
Updating user data
(Requires Atomic Android SDK 1.2.4+)
The SDK allows you to update profile & preference data for the logged in user via the updateUser method of AACSDK.
Setting up profile fields
For simple setup, create an AACUserSettings object and set some profile fields, then call the method AACSDK.updateUser(userSettings, callback). The following optional profile fields can be supplied to update the data for the user:
external_id: An optional string that represents an external identifier for the user.name: An optional string that represents the name of the user.email: An optional string that represents the email address of the user.phone: An optional string that represents the phone number of the user.city: An optional string that represents the city of the user.country: An optional string that represents the country of the user.region: An optional string that represents the region of the user.
Any fields which have not been supplied will remain unmodified after the user update.
The following code snippet shows how to set up some profile fields.
- Kotlin
- Java
let settings = AACUserSettings()
// Set up some basic profile fields.
settings.externalID = "an external ID"
settings.name = "John Smith"
settings.email = "john@smith.net"

AACSDK.updateUser(settings) { result ->
  // do something with the callback result here
}
settings = new AACUserSettings();
// Set up some basic profile fields.
settings.setExternalID("an external ID");
settings.setName("John Smith");
settings.setEmail("john@smith.net");

AACSDK.updateUser(settings);
Setting up custom profile fields
You can also set up your custom fields of the user profile. Custom fields must first be created in Atomic Workbench before you can update them. For more details of custom fields, see Custom Fields.
There are two types of custom fields: date and text. Use AACUserSettings.setDateForCustomField(date, customField)AACUserSettings.setTextForCustomField(text, customField)
Note: Use the name property in the Workbench to identify a custom field, not the label property.
The following code snippet shows how to set up a date and a text field.
- Kotlin
- Java
userSettings.setDateForCustomField(LocalDateTime.now(), "dateField")
userSettings.setTextForCustomField("test", "testfield")
userSettings.setDateForCustomField(LocalDateTime.now(), "dateField");
userSettings.setTextForCustomField("test", "testfield");
Setting up notification preferences
You can use the following optional property and method to update the notification preferences for the user. Again, any fields which have not been supplied will remain unmodified after the user update.
notificationsEnabled: An optional boolean to determine whether notifications are enabled. The default notification setting of a user istrue.setNotificationTime(timeframes: List<AACUserNotificationTimeframe>, weekday: NotificationDays): An optional method that defines the notification time preferences of the user for different days of the week. If you specifyNotificationDays.defaultto theweekdayparameter, the notification time preferences will be applied to every day.
Each day accepts an array of notification time periods, these are periods during which notifications are allowed. If an empty array is provided notifications will be disabled for that day.
The following code snippet shows how to set up notification periods between 8am - 5:30pm & 7pm - 10pm on Monday.
- Kotlin
- Java
val userSettings = AACUserSettings()
val timeFrames = listOf(
    AACUserNotificationTimeframe(8, 0, 17, 30),
    AACUserNotificationTimeframe(19, 0, 22, 0)
)

userSettings.setNotificationTime(timeFrames, AACUserSettings.NotificationDays.mon)
List<AACUserNotificationTimeframe> timeFrames = new ArrayList<>(
    Arrays.asList(
    new AACUserNotificationTimeframe(8, 0, 17, 0),
    new AACUserNotificationTimeframe(19, 0, 22, 0)
));

userSettings.setNotificationTime(timeFrames, AACUserSettings.NotificationDays.mon);
Hours are in the 24h format that must be between 0 & 23 inclusive, while minutes are values between 0 & 59 inclusive.
UpdateUser method: full example
The following code snippet shows an example of using the updateUser method to update profile fields, custom profile fields and notification preferences.
- Kotlin
val userSettings = AACUserSettings()
userSettings.name = "Test User"
userSettings.city = "TestVille"
userSettings.country = "Testmania"
userSettings.region = "Testonia"
userSettings.email = "test.user@test.com"
userSettings.phone = "555-1234"

userSettings.setTextForCustomField("test", "testfield")
userSettings.setTextForCustomField("test 2", "testfield2")
userSettings.setDateForCustomField(LocalDateTime.now(), "dateField")

userSettings.notificationsEnabled = true

val timeFrames = listOf(
    AACUserNotificationTimeframe(8, 0, 17, 0),
    AACUserNotificationTimeframe(19, 0, 22, 0)
)

userSettings.setNotificationTime(timeFrames, AACUserSettings.NotificationDays.mon)

AACSDK.updateUser(userSettings) { result ->
    when (result){
        is AACSDKSendUserSettingsResult.DataError -> { // do something with error
        }
        is AACSDKSendUserSettingsResult.Success -> { // do something
        }
    }
}
Though all fields of AACUserSettings are optional, you must supply at least one field when calling AACSDK.updateUser
Observing SDK events
(introduced in 23.3.0)
The Atomic Android SDK provides functionality to observe SDK events that symbolize identifiable SDK activities such as card feed changes or user interactions with cards. The following code snippet shows how to observe SDK events.
- Kotlin
- Java
AACSDK.observeSDKEvents {
    // do something with returned events
}
AACSDK.observeSDKEvents(event -> {
    // do something here with returned events
});
To stop observing, just assign null to observeSDKEvents
The SDK provides all observed events in the class AACSDKObserverEvent. An event has a corresponding eventType property taken from AACEventName enum class. The payload for each event is different and dependant on the eventType, but they closely follow Atomic analytics events. For detailed information about these events, please refer to Analytics reference.
Each event shares common information such as an eventName, timestamp, indentifier, and where appropriate, userId and containerId.
Below is a table of events, with the payload properties that are relevant for that event:
| Event name | Payload properties |
|---|---|
| UserRedirected | cardContext.cardViewState, properties.url, properties.payload |
| RuntimeVarsUpdated | properties.resolvedVariables |
| CardVotedDown | cardContext.cardInstanceId, properties.reason, properties.message |
| RequestFailed | properties.path, properties.statusCode |
| VideoPlayed | properties.url |
| VideoCompleted | properties.url |
| CardSubviewExited | properties.subviewId, properties.subviewLevel, properties.subviewTitle |
| CardSubviewDisplayed | properties.subviewId, properties.subviewLevel, properties.subviewTitle |
| Submitted | cardContext.cardInstanceId, properties.payload |
| Dismissed | Same as below |
| CardDisplayed | Same as below |
| CardVotedUp | Same as below |
| SnoozeOptionsDisplayed | Same as below |
| SnoozeOptionsCanceled | cardContext.cardInstanceId |
| Snoozed | cardContext.cardInstanceId, properties.payload("unsnooze") |
| CardFeedUpdated | cardCount |
| StreamDisplayed | containerId |
| NotificationRecieved | N/A |
| SdkInitialized | N/A |
Process events and their payloads
- Kotlin
- Java
  private fun logEventMessage(event: AACSDKObserverEvent) {
    Log.d("OBSERVE MESSAGE", event.eventName.name)
    val payload = StringBuilder()
    payload.append("TimeStamp: ${event.timestamp} ")
    payload.append("EventId: ${event.identifier} ")
    payload.append("UserId: ${event.userId} ")
    payload.append("ContainerId: ${event.sdkContext.containerId ?: ""} ")

    when (event.eventName) {
      AACEventName.UserRedirected -> payload.append("viewState: ${event.cardContext?.cardViewState} redirect: ${event.properties?.url} payload: ${event.properties?.payload} ")
      AACEventName.RuntimeVarsUpdated -> payload.append("runtimevars: ${event.properties?.resolvedVariables ?: ""}")
      AACEventName.CardVotedDown -> payload.append("card Id: ${event.cardContext?.cardInstanceId} reason: ${event.properties?.reason} message:${event.properties?.message} ")
      AACEventName.RequestFailed -> payload.append("path: ${event.properties?.path} statusCode: ${event.properties?.statusCode} ")
      AACEventName.VideoPlayed -> payload.append("url: ${event.properties?.url} ")
      AACEventName.VideoCompleted -> payload.append("url: ${event.properties?.url} ")
      AACEventName.CardSubviewExited,
      AACEventName.CardSubviewDisplayed -> payload.append("subViewId: ${event.properties?.subviewId} level: ${event.properties?.subviewLevel} subviewTitle: ${event.properties?.subviewTitle} ")
      AACEventName.Submitted -> payload.append("card Id: ${event.cardContext?.cardInstanceId} payload: ${event.properties?.payload}")
      AACEventName.Dismissed, AACEventName.CardDisplayed, AACEventName.CardVotedUp,
      AACEventName.SnoozeOptionsDisplayed, AACEventName.SnoozeOptionsCanceled -> payload.append("card Id: ${event.cardContext?.cardInstanceId} ")
      AACEventName.Snoozed -> payload.append("card Id: ${event.cardContext?.cardInstanceId} unsnoozeDate: ${event.properties?.payload?.get("unsnooze") ?: ""} ")
      AACEventName.CardFeedUpdated -> payload.append("card count: ${event.cardCount} ")
      else -> {} // no payload outside of common
    }

    Log.d("OBSERVE MESSAGE PAYLOAD", "Payload: $payload")
  }
AACSDK.observeSDKEvents(event -> {

    StringBuilder payload = new StringBuilder();
    payload.append("TimeStamp:"); payload.append(event.getTimestamp());
    payload.append("EventId:"); payload.append(event.getIdentifier());
    payload.append("UserId:"); payload.append(event.getUserId());
    payload.append("ContainerId:"); payload.append(event.getSdkContext().getContainerId());

    // do some stuff based on event name. Note not exhaustive - examples only
    switch (event.getEventName()) {

        case NotificationReceived:
            payload.append("viewState:" + event.getCardContext().getCardViewState() +
                    " redirect: " + event.getProperties().getUrl() +
                    " payload: " + event.getProperties().getPayload());
            break;
        case Submitted:
            payload.append("card Id:" + event.getCardContext().getCardInstanceId() +
                    " payload:" + event.getProperties().getPayload());
            break;
        case Dismissed:
        case CardDisplayed:
        case CardVotedUp:
        case SnoozeOptionsDisplayed:
        case SnoozeOptionsCanceled:
            payload.append("card Id:" + event.getCardContext().getCardInstanceId());
            break;
        case Snoozed:
            payload.append("card Id:" + event.getCardContext().getCardInstanceId() +
                    " unsnoozeDate:" + event.getProperties().getPayload().get("unsnooze"));
            break;
        case CardFeedUpdated:
            payload.append("card count:" + event.getCardCount());
            break;
    }

    Log.d("Observer Payload", payload.toString());

    return null;
});
Metadata pass-through
(introduced in 24.3.0)
Any metadata sent from an API request can now be accessed from within the SDK using the SDK Event Observer, once enabled in the Workbench
Currently the metadata is only returned in the card-displayed event.
An example body in an API request to an Action Flow trigger endpoint might look like:
{
  "flows": [
    {
      "payload": {
        "metadata": {
          "account": "123445",
          "fruit": "apple"
        }
      },
      "target": {
        "type": "user",
        "targetUserIds": "user-123"
      }
    }
  ]
}
To retrieve the metadata just capture the card-displayed event in an SDK Event Observer, such as:
AACSDK.observeSDKEvents { event ->
    when (event.eventName) {
        AACEventName.CardDisplayed -> {
            event.metadata?.payloadMetadata?.toString()?.let { Logger.debug("Metadata: ${it}") }
        }
        else -> {
            print(event)
        }
    }
}

Example output: Metadata: {account=123445, fruit=apple}
Any metadata is in the property payloadMetadata of type Map<String, Any> of the metadata object of the event, as demonstrated in the example above.
Utility methods
Debug logging
Enable debug logging to view verbose logs of activity within the SDK, printed to the device’s console. Debug logging is disabled by default, and should not be enabled in release builds.
- Java
- Kotlin
AACSDK.enableDebugMode(level);
AACSDK.enableDebugMode(level)
The parameter level is an integer that indicates the verbosity level of the logs exposed:
- Level 0: Default, no logs exposed
- Level 1: Operations and transactions are exposed
- Level 2: Operations, transactions and its details are exposed, plus level 1.
- Level 3: Internal developer logs, plus level 2
Logout
Logout will effectively end the user's session. It will clear theme and card caches, send any pending analytics events to the platform, and then log out the current user. The session delegate will also be reset and SDK settings cleared, which will cease any network traffic.
To logout, call:
- Java
- Kotlin
AACSDK.logout(() -> {});
AACSDK.logout { logoutResult ->

}
Since SDK v1.3.4 logout has an additional boolean parameter called deregisterDeviceForNotifications. This will also deregister the device for push notifications on logout if the parameter is true. The parameter defaults to false and can be set optionally.
- Java
- Kotlin
AACSDK.logout(true, () -> {});
AACSDK.logout(true) { logoutResult ->

}
If your application allows switching between users or user roles, it is recommended that you wait until the logout callback has returned before logging in a new user.
Notifying the SDK of background and foreground states
If your app does not initialise the SDK with observerProcessLifecycleOwner set to true in the init function, you can notify the SDK that your app has entered the background or resumed to the foreground using the following methods:
- Java
- Kotlin
// your app is now in the foreground
AACSDK.applicationForegrounded();
// your app has been backgrounded
AACSDK.applicationBackgrounded();
// your app is now in the foreground
AACSDK.applicationForegrounded()
// your app has been backgrounded
AACSDK.applicationBackgrounded()
Setting the version of the client app
The SDK provides a method AACSDK.setClientAppVersion for setting the current version of your app. An app version is used with analytics to make it easy to track issues between app versions and general analytics around versions.
Version strings longer than 128 characters will be trimmed to that length.
From Atomic SDK 1.2.0, the client app version defaults to unknown if you do not call this method.
The following code snippet sets the client app's version to Version 14.2 (14C18).
- Java
- Kotlin
AACSDK.setClientAppVersion("Version 14.2 (14C18)");
AACSDK.setClientAppVersion("Version 14.2 (14C18)")
Managing system-initiated process death
On Android, the system may kill your app process while it is in the background to free up resources for other apps. The Atomic SDK requires configuration that can not be automatically restored after the process is recreated, for example, the authentication delegate, the application context, and stream container configuration. To prevent crashes after your app is restored, and to ensure that the SDK functions correctly after process death, there are some guidelines you must follow.
- Always call the
AACSDK.init(context)method in the Application class of your app.
When the application is restored after process death, activities may be recreated in a different order to the usual flow of the app. For example, if you currently initialize the SDK in a login Activity that is part of a flow, when the app is recreated the Atomic SDK may be visible, but the code to initialize it may not have been executed. This can cause the SDK to raise exceptions, crashing your app.
- Store the AACStreamContainer objects in the ViewModel, and check for their existence when creating your activity or fragment.
AACStreamContainer objects should be persisted in memory across configuration changes, this will avoid unnecessary work such as extra calls to subscribe to the Atomic platform. However, whether you use ViewModels, or another in-memory persistence technique such as dependency injection, after system initiated process death these references will be cleared. Android, however, will still attempt to recreate the UI of the stream containers or single card view. This may lead to a situation where there is a visible, but non-functional stream container underneath the recreated container.
To prevent this, in the onCreate method of your Activity or Fragment. Check for the existence of the in-memory AACStreamContainer object and call the super.onCreate(savedInstanceState) method with the parameter null when the AACStreamContainer object is null. For example.
override fun onCreate(savedInstanceState: Bundle?) {
  if (viewModel.streamContainer == null) {
    super.onCreate(null)
  } else {
    super.onCreate(savedInstanceState)
  }
  // Creates the container, and stores it in a nullable property in the ViewModel.
  // Then calls the start() method to show it in the UI
  initAndStartStreamContainer()
}
- Test that your application works correctly after system initiated process death.
Simulating system-initiated process death can be done using the ADB cli. To do this, launch your application from Android Studio. Navigate to the Atomic stream container in your app, then place your app in the background.
Open the terminal and call this command, replacing com.yourapp.applicationId with the applicationId of your app.
adb shell am kill com.yourapp.applicationId
Re-open your app from the app switcher, it should gracefully re-open and work as usual. The Atomic SDK will not retain form state or position in the UI after process death, subviews and media activities will be closed.
If the app crashes immediately after re-opening, ensure you are following the advice above and investigate the LogCat output to determine the cause of the problem. If this is your first time testing system-initiated process death in your app there may be other components that do not handle this scenario gracefully. Try removing Atomic to see if the issues persist.
If you still have issues after following these recommendations, please contact our support team.
Image linking to a URI
We've added support for a new feature on image elements in an Atomic cards which allows a user to navigate to a URI such as a webpage, open a card subview, or send a custom payload to your app when clicked.
From the card builder add an image element to your card. Click on Edit and select
the Link tab in the Action modal. Select the Link tab and choose the appropriate link action. For example to redirect to a webpage fill out the URL
for each platform you wish it to apply to. Once rendered, the image element should redirect to the URL specified when clicked.
Card maximum width
We've added a new configuration property called cardMaxWidth.
This is an additional feature to restrict the width of the card.
- It's applicable to both vertical containers and single card views.
- If
cardMaxWidthis larger than the screen width, it will be ignored and the container's width will be used. - If
cardMaxWidthis set to zero or a negative number, the value will also be ignored and the container's width will be used. - The default value of
cardMaxWidthis zero and will use the container's width. - The value specified for
cardMaxWidthis in pixel.
- Java
- Kotlin
AACStreamContainer streamContainer = AACStreamContainer.create("1234");
streamContainer.setCardMaxWidth(1500);
val streamContainer = AACStreamContainer.create("1234")
streamContainer.cardMaxWidth = 1500
Custom Icons
See the card element reference for supported SVG features in custom icons.
We've added support for custom icon integration with the SDK
- Components such as Buttons, Category, Text and Headline now supports custom icons in SVG format
- Custom themes for color and opacity are now supported.
- All icons will be displayed with the colors as dictated in the SVG file.
- Black is used if no colors are specified in the SVG file.
- Where a currentColor value is used in the SVG file, the following hierarchy is applied:
- Use the icon theme color and opacity if this has been supplied.
- Use the color of the text associated with the icon.
- Use a default black color.
- Opacity will be applied to icons when the workbench theme is applied.
- If an SVG is unsupported, invalid, or the URL is inaccessible due to network issues or certificate pinning:
- Fallback to the FontAwesome icon specified in the workbench's icon property.
- If no FontAwesome icon is specified, a default placeholder will be displayed.
Submit button name property in analytics events
We've introduced a new mandatory field called submitButtonName in the API driven card actions during submit.
This parameter will be used as a property in analytics events to identify the name of the submit button used to submit
- Java
- Kotlin
 // Here we retrieve the button name from our nodes.
 // Then we use this as parameter as part of the
 // new mandatory requirement for submit action

String buttonName = "";
for (Node node : card.getDefaultView().getNodes()) {
    for (Node child : node.getChildren()) {
        if (child.getType().equals("submitButton")) {
            buttonName = child.getAttributes().get("name").toString();
        }
    }
}

Map<String, Object> params = new HashMap<>();
params.put("myString", "kwl");
params.put("myBool", true);
params.put("myInt", 33);
params.put("myDouble", 3.14);

AACCardAction.submit(card, buttonName, params);
 // Here we retrieve the button name from our nodes.
 // Then we use this as parameter as part of the
 // new mandatory requirement for submit action

 var buttonName = ""
 card.defaultView.nodes.forEach {
      it.children.forEach { child ->
          if (child.type == "submitButton") {
              buttonName = child.attributes["name"].toString()
          }
      }
}

 AACCardAction.Submit(card, buttonName, mutableMapOf("myString" to "kwl", "myBool" to true, "myInt" to 33, "myDouble" to 3.14))
Image and video display height
This feature adds support for customizing the height of inline image and video elements, along with banner image and video elements to four different display heights. These are,
- "Tall" the image or video is 200 display pixels high, with the spanning the whole width and cropped as necessary. This is the default value and matches existing image and video components.
- "Medium" the same as tall, but only 120 display pixels high.
- "Short" the same as tall but 50 display pixels high. Not supported for inline or banner videos.
- "Original" the image will maintain it's original aspect ratio, adjusting the height dynamically based on the width of the card to avoid any cropping.
When using these new layouts be mindful that customers using older versions of the SDK will default to the "Tall" layout.
File upload
(introduced in 24.3.0)
A new File Upload card component is now available. This component enables users to select files from their gallery or capture photos directly. Currently, it supports uploading specific image formats, including JPEG, PNG and WebP. Additionally, DNG, TIFF, AVIF, HEIC, and HEIF files are accepted but will be automatically converted to JPEG upon upload. Please note that GIFs and non-image files are not supported.
If you wish to use this feature in your application, in your AndroidManifest.xml file you will need to add the following permissions:
<uses-permission android:name="android.permission.READ_EXTERNAL_STORAGE"
                 android:maxSdkVersion="32" />
<uses-permission android:name="android.permission.READ_MEDIA_IMAGES" />
<uses-feature android:name="android.hardware.camera.any" />
<uses-permission android:name="android.permission.CAMERA" />
When capturing photos through the File Upload component, users will also be prompted to grant permission for camera access; without this permission, the camera will be disabled.
From SDK version 25.1.0, some extra permissions need to be added to your apps AndroidManifest.xml file in order to use this feature. The addition of these permissions may require you to provide extra documentation when submitting your app for approval on Google Play.
Analytics
There are a couple of new analytics that are introduced to track the activity of the upload.
user-file-uploads-started: Emitted when the file upload process begins.user-file-uploads-completed: Emitted upon successful completion of the file upload process, indicating that all files have been uploaded successfully.user-file-uploads-failed: Emitted when the file upload process ends, either due to failure or cancellation.
These events will contain the properties such as name of the upload element, filename and bucket id
"properties": {
    "payload": {
      "upload_pqliu": {
        "fileName": "74eb338d-859c-4122-8a82-87448bb5e04e_1000006964.heif",
        "targetBucketId": "DEFAULT"
      }
    }
  }
Observable SDK events
- Java
- Kotlin
  AACSDK.observeSDKEvents(event -> {
    StringBuilder payload = new StringBuilder();
    payload.append("TimeStamp: ").append(event.getTimestamp()).append(" ");
    payload.append("EventId: ").append(event.getIdentifier()).append(" ");
    payload.append("UserId: ").append(event.getUserId()).append(" ");
    payload.append("ContainerId: ").append(event.getSdkContext().getContainerId() != null ? event.getSdkContext().getContainerId() : "").append(" ");

    switch (event.getEventName()) {
        case UserFileUploadsStarted:
            payload.append("upload ").append(event.getProperties());
            break;
        case UserFileUploadsCompleted:
            payload.append("upload ").append(event.getProperties());
            break;
        case UserFileUploadsFailed:
            payload.append("upload ").append(event.getProperties());
            break;
        default:
            // No payload outside of common
            break;
    }
});
   AACSDK.observeSDKEvents { event ->

        val payload = StringBuilder()
        payload.append("TimeStamp: ${event.timestamp} ")
        payload.append("EventId: ${event.identifier} ")
        payload.append("UserId: ${event.userId} ")
        payload.append("ContainerId: ${event.sdkContext.containerId ?: ""} ")

        when (event.eventName) {
            AACEventName.UserFileUploadsStarted -> payload.append("upload ${event.properties}")
            AACEventName.UserFileUploadsCompleted -> payload.append("upload ${event.properties}")
            AACEventName.UserFileUploadsFailed -> payload.append("upload ${event.properties}")
            else -> {} // no payload outside of common

        }
    }
Custom strings
- Java
- Kotlin
   // This is the text displayed on the retry toast message when the upload failed
if (viewModel.getStreamContainer() != null) {
    viewModel.getStreamContainer().setProcessingStateRetryMessage("Upload failed..");
}

// This is the message displayed on the overlay window during upload
if (viewModel.getStreamContainer() != null) {
    viewModel.getStreamContainer().setProcessingStateMessage("Upload is in progress..");
}

// This is the label displayed on cancel button
if (viewModel.getStreamContainer() != null) {
    viewModel.getStreamContainer().setProcessingStateCancelButtonTitle("Press to cancel");
}

// This is the text displayed when requesting camera permission which redirects to the settings
if (viewModel.getStreamContainer() != null) {
    viewModel.getStreamContainer().setRequestCameraUsageMessage("Access to your camera is required to take photos. Please enable camera access in your device settings");
}

// This is the button text which redirects to the settings
if (viewModel.getStreamContainer() != null) {
    viewModel.getStreamContainer().setRequestCameraUsageSettingsTitle("Press to go to settings");
}
    // This is the text displayed on the retry toast message when the upload failed
    viewModel.streamContainer?.processingStateRetryMessage = "Upload failed.."
    // This is the message displayed on the overlay window during upload
    viewModel.streamContainer?.processingStateMessage = "Upload is in progress.."
     // This is the label displayed on cancel button
    viewModel.streamContainer?.processingStateCancelButtonTitle = "Press to cancel"
    // This is the text displayed when requesting camera permission which redirects to the settings
    viewModel.streamContainer?.requestCameraUsageMessage = "Access to your camera is required to take photos. Please enable camera access in your device settings"
    // This is the button text which redirects to the settings
    viewModel.streamContainer?.requestCameraUsageSettingsTitle = "Press to go to settings"
Edge to edge settings
If the SDK is built with API 35 or higher, the edge-to-edge feature on these devices may affect the container's padding. A new setting, enableEdgeToEdgeHandler, has been added to AACStreamContainer to disable the extra padding if your app already applies it externally.
- Java
- Kotlin
  final AACStreamContainer streamContainer = AACStreamContainer.create("1234");
  // This is only applicable if the sdk is built with API 35 or higher, hence no effect on API < 35
  // By default there is no extra padding applied around the container
  // Setting this to true, will apply extra padding around the stream container
  streamContainer.setEnableEdgeToEdgeHandler(true);
  val AACStreamContainer streamContainer = AACStreamContainer.create("1234")
  // This is only applicable if the sdk is built with API 35 or higher, hence no effect on API < 35
  // By default there is no extra padding applied around the container
  // Setting this to true, will apply extra padding around the stream container
  streamContainer.enableEdgeToEdgeHandler = true
Dependency graph
Our transitive dependency graph is listed below (current as of release 24.2.0 of the Android SDK):
androidx.databinding:viewbinding:7.2.2
io.insert-koin:koin-android-compat:3.3.2
io.insert-koin:koin-core:3.3.2
androidx.swiperefreshlayout:swiperefreshlayout:1.1.0
io.insert-koin:koin-android:3.3.2
com.squareup.retrofit2:retrofit:2.9.0
androidx.media3:media3-ui:1.1.1
androidx.room:room-ktx:2.4.3
androidx.lifecycle:lifecycle-viewmodel-savedstate:2.5.1
androidx.media3:media3-exoplayer:1.1.1
org.jetbrains.kotlin:kotlin-stdlib-jdk8:1.7.21
androidx.media3:media3-datasource-okhttp:1.1.1
com.squareup.okhttp3:okhttp:4.11.0
androidx.lifecycle:lifecycle-process:2.4.1
com.google.android.material:material:1.6.1
io.noties.markwon:core:4.6.2
io.noties.markwon:inline-parser:4.6.2
androidx.activity:activity-ktx:1.5.1
androidx.lifecycle:lifecycle-livedata-ktx:2.4.1
com.squareup.moshi:moshi:1.13.0
androidx.constraintlayout:constraintlayout:2.1.4
androidx.exifinterface:exifinterface:1.3.5
com.squareup.retrofit2:converter-moshi:2.9.0
androidx.cardview:cardview:1.0.0
androidx.lifecycle:lifecycle-viewmodel-ktx:2.5.1
androidx.room:room-runtime:2.4.3
com.squareup.picasso:picasso:2.8
org.jetbrains.kotlinx:kotlinx-coroutines-android:1.6.4
androidx.recyclerview:recyclerview:1.3.0
androidx.lifecycle:lifecycle-common-java8:2.5.1
org.jetbrains.kotlin:kotlin-parcelize-runtime:1.6.10
androidx.lifecycle:lifecycle-runtime-ktx:2.5.1
com.jakewharton.threetenabp:threetenabp:1.4.6
com.squareup.moshi:moshi-adapters:1.13.0
androidx.fragment:fragment-ktx:1.5.3
com.caverock:androidsvg-aar:1.4
ProGuard configuration
If you come across the following exception during compilation, it's likely due to ProGuard in your configuration, such as:
  java.lang.VerifyError:
  Verifier rejected class com.atomic.actioncards
Depending on your Kotlin and ProGuard versions, you might face problems with classes that contain synchronized statements inside try-catch blocks. One workaround is to include the following in your ProGuard rules.
-keep class com.atomic.actioncards.** { *; }
Depending on your ProGuard configuration (such as using R8 Full Mode) you may need to include additional ProGuard rules in your configuration, such as:
-keep class com.atomic.actioncards.** { *; }
-keep,allowobfuscation,allowshrinking class kotlin.coroutines.Continuation
-keep,allowobfuscation,allowshrinking interface retrofit2.Call
-keep,allowobfuscation,allowshrinking class retrofit2.Response