SDK Authentication
Authenticating using a JSON Web Token (JWT)
To communicate with the Atomic Platform using one of the SDKs, the host app is required to supply a JSON Web Token (JWT) to the SDK. This JWT identifies the user and is verified by the Atomic API.
Before making a request to the Atomic Platform, the SDK asks the host app for a JWT to use for the request. It is up to the host app to determine how often these tokens should be refreshed, cached and stored on the device. If the JWT you supply is invalid, or fails verification, the SDK displays the appropriate error messaging.
Details on how to supply this JWT to each SDK is available in the installation guide for each SDK.
Configure authentication: video walkthrough
The following video will walk you through how to easily configure authentication in the Atomic SDKs:
JWT
To allow customers to authenticate with the Atomic system without a password, we support JWT authentication. Sending a JWT signed with a private key/public key pair that you control, lets us know that it really was you that requested a customer be logged in to our system.
It is recommended that you only issue a JWT to your customer once they have been verified as logged in by your existing authentication systems. Because of the requirement to sign tokens with a private key you must sign tokens in a secure server-side implementation.
JWT requirements and validation
The Atomic Platform will make the following checks:
- The token issuer is in the allowed values as configured in the Workbench
- The token has an expiry set of equal to or less than the configured "max token expiry days" on the associated API Key configuration in the Workbench.
- The token has not expired
Generating a JWT
Generating a JWT consists of the following steps:
Step 1 - Supply User ID
Every unique customer in your system must have a distinct ID, which is supplied in a JWT to the Atomic Platform via our client-side SDKs. This ID tells the Atomic Platform which customer is actioning or requesting cards, and determines which customer's cards should be returned to the SDKs.
The customer ID is supplied in the sub field, or atomic_sub if you wish to use a separate ID for Atomic in your existing JWT:
{
  "sub": "1234567890",
  "name": "Joe Bloggs"
  ...
}
In the above example, the customer ID 1234567890 is a unique identifier for the customer "Joe Bloggs". When sending an API request, this would be the ID you supply in the payload.target.usersById object.
During SDK integration testing, you can find the the customer IDs from Atomic Workbench Test Customers Section by navigating to the Configuration area. Under 'Test Customers', look for the test customer you need and click the 'Copy ID' link.
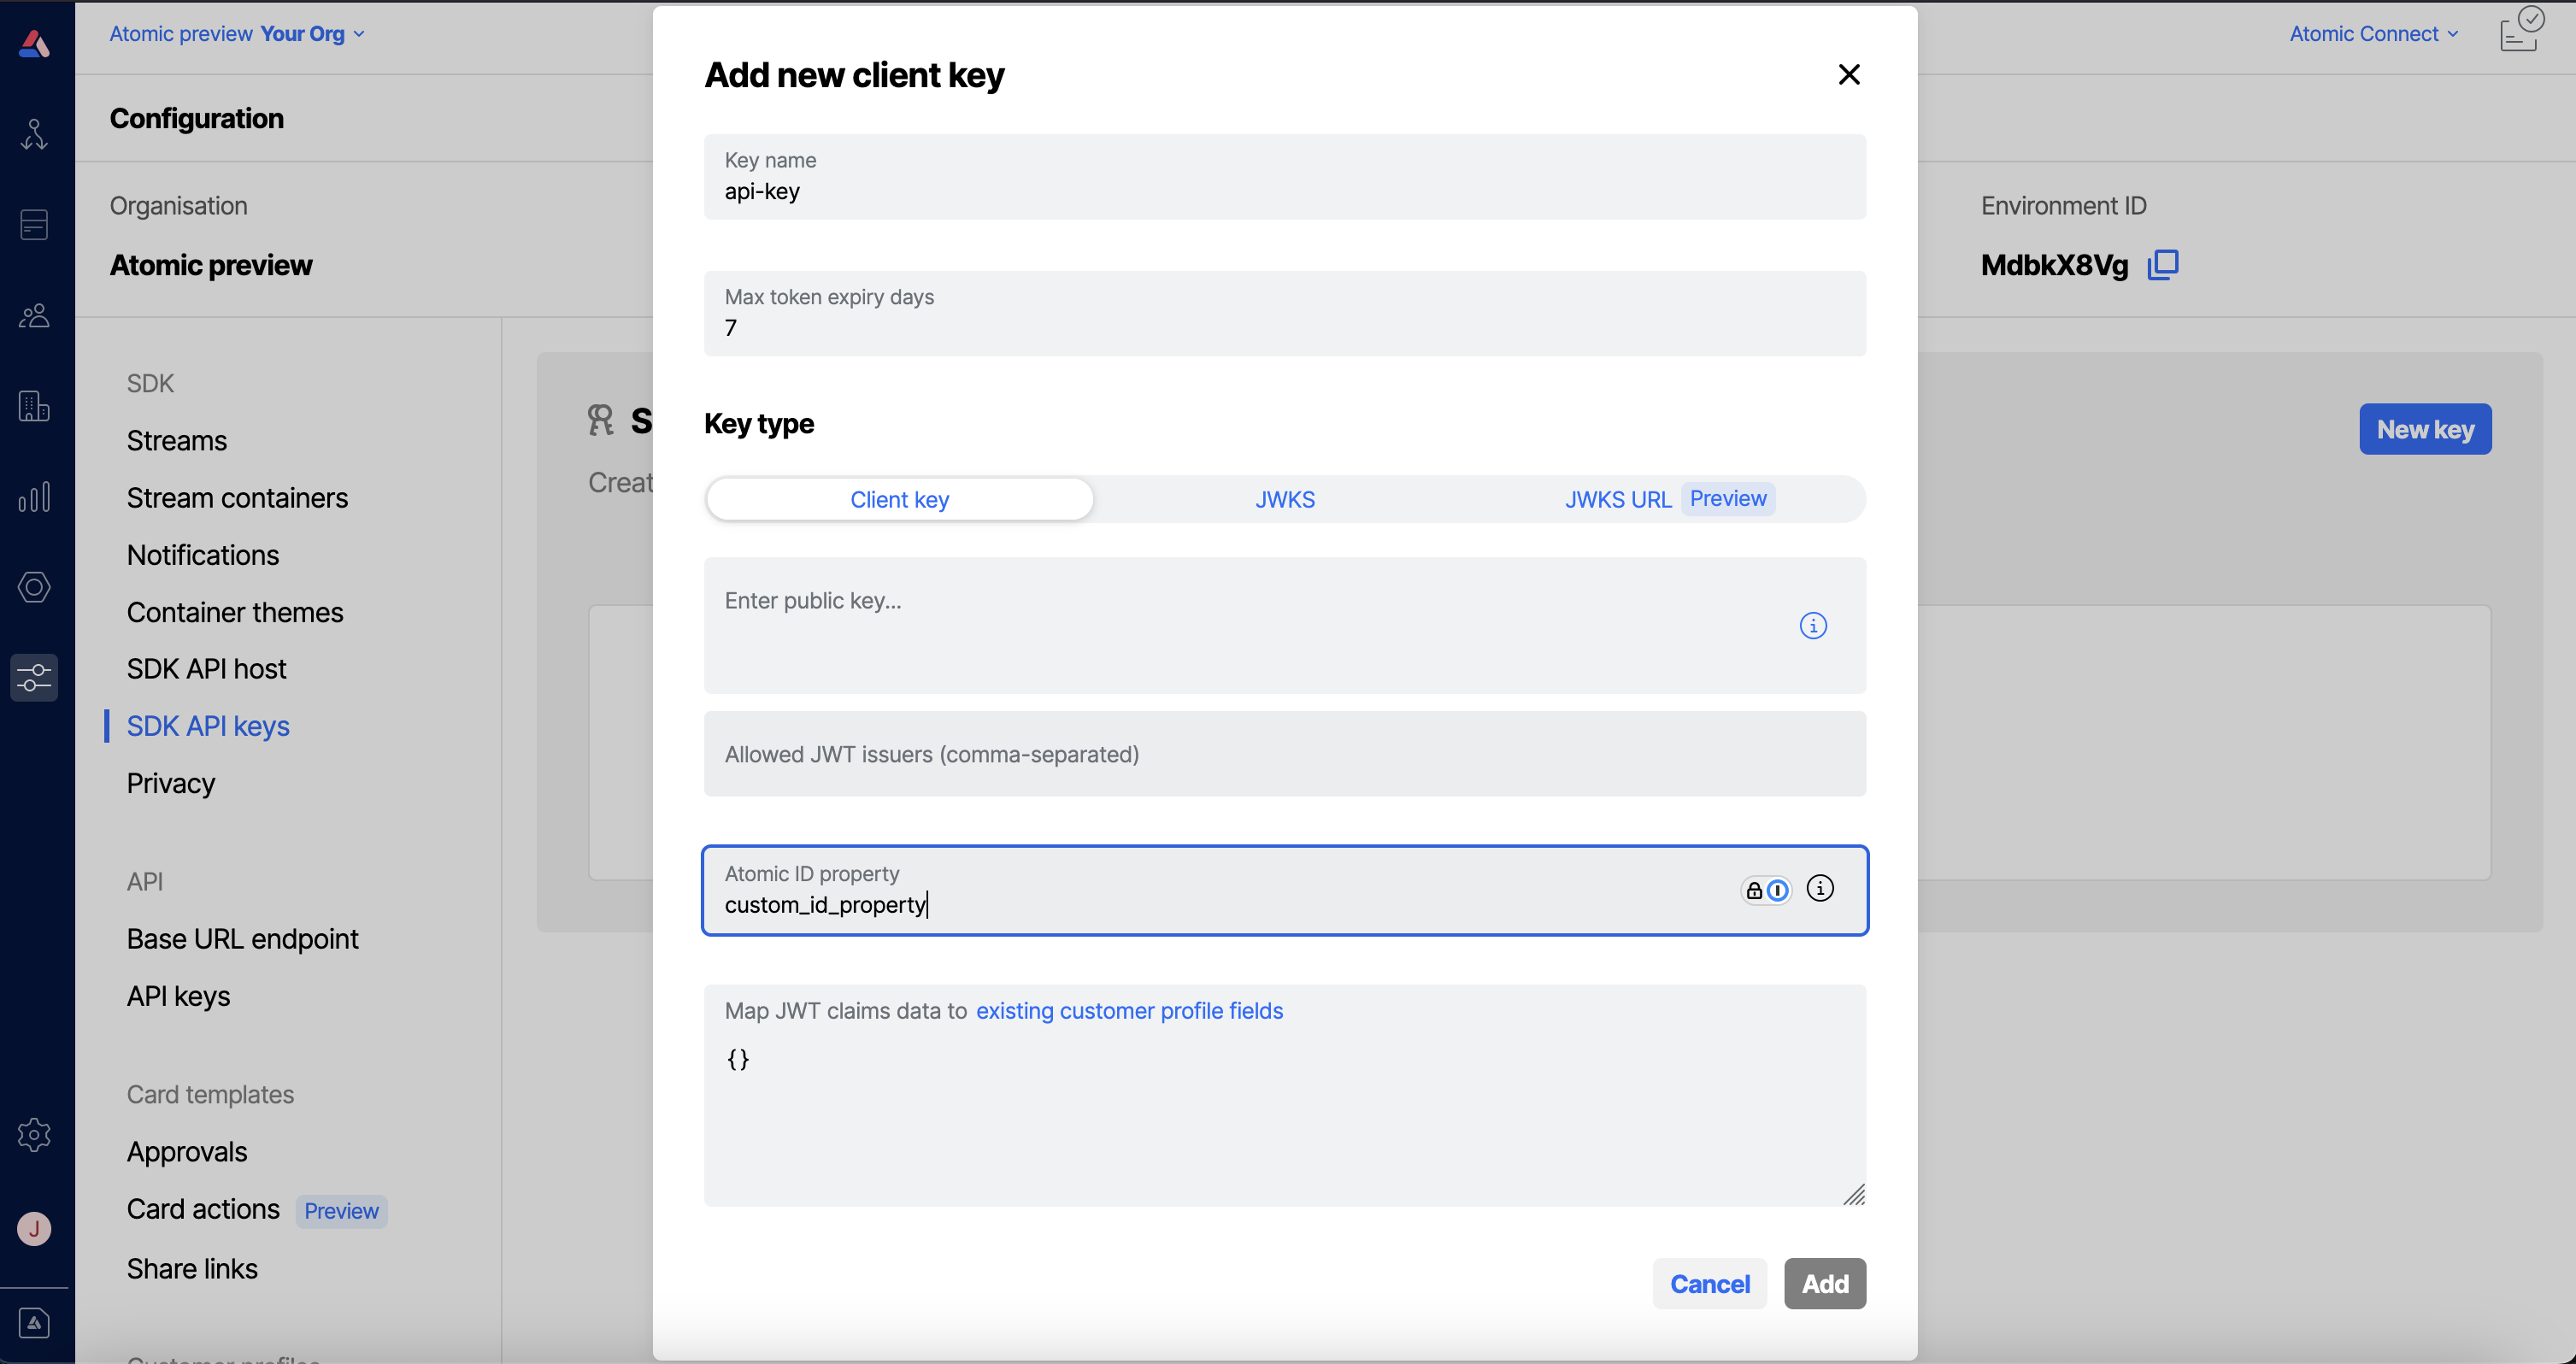
Custom ID field
If you wish, you may use your own custom field to store your customer ID. When configured this will take priority over the customer ID fields listed above. In order to do so you first need to configure this in the Atomic Workbench for the relevant SDK API key. Navigate to the configuration area, then to 'SDK API keys'. Select the API key you wish to configure the custom customer ID field for and enter this in the "Atomic ID property" field:
Once you have configured this in the workbench you will need to ensure that you call the appropriate method in the Atomic SDKs:
Step 2 - Generate a private/public key pair
You can create a private/public key pair by running the following commands one by one in your terminal:
# Creates the key pair without having to provide a passphrase
ssh-keygen -t rsa -P "" -b 4096 -E SHA512 -m PEM -f jwtRS512.key

# Convert the generated public key into the required PEM format
ssh-keygen -e -m PEM -f jwtRS512.key > jwtRS512.key.pub

# Show the contents of the public key - it should start with the public key heading `-----BEGIN RSA PUBLIC KEY----` and end with the matching footer `-----END RSA PUBLIC KEY----`
cat jwtRS512.key.pub

# Copy the contents of the public key to your clipboard - you need it in step 3
# For example, on MacOS you can use the pbcopy utility:
pbcopy < jwtRS512.key.pub
Step 3 - Upload your public key to the Atomic Workbench
Atomic will use the provided public key to confirm that JWTs were signed by you. Log in to the Workbench and add your public key there.
- From the Configuration menu in the Workbench sidebar, choose 'API Keys' under SDK.
- Select New key.
- Create a name for your key e.g.
production-environment-1. The name you have chosen is your API key. - Paste in your public key and click Add.
The API key you choose above must be passed to the SDK on initialisation. This allows the Atomic Platform to determine which public key should be used to verify the JWT you provide.
More information on how to pass your API key to the SDK is available in the corresponding section for your chosen SDK(s):
A guide for rotating your SDK authentication keys is available here.
Step 4 - Sign a JWT with your private key
This step will be different for each specific language and platform. Please see the JWT.io libraries section to find a library suitable for your platform for generating client JWTs.
The following fields must be present in your generated JWT when making client requests, (See below for code sample).
| Field name | Accepted value |
|---|---|
| [atomic_]sub | The customer ID for the logged in customer, as per step 1. The [atomic_] prefix is optional. |
| algorithm | You may only use RS256, RS512 or ES512 for signing the token. |
| exp | You must include an expiry timestamp, no further in the future than the configured "max token expiry days" on the associated API Key configuration in the Workbench. Note this should be a number, not a string. |
| iat | Your token must include an issued at timestamp. Note this should be a number, not a string. |
| keyid / kid | If the API Key relates to a JWKS SDK API Key then you must supply the matching key id from the JWKS used to sign the token. |
Do not put sensitive information inside the token. Although JWT tokens are signed securely, they are not encrypted.
Below are examples of signing the JWT in Node.js using jsonwebtoken :
Client Key Example
const fs = require("fs-extra");
const jwt = require("jsonwebtoken");

const privateKey = await fs.readFile(PRIVATE_KEY_PATH, "utf8");
const id = "unique identifier for your customer";
const token = jwt.sign({ sub: id }, privateKey, {
  expiresIn: "3d",
  algorithm: "RS512",
});
JWKS Key Example
const fs = require("fs-extra");
const jwt = require("jsonwebtoken");

const privateKey = await fs.readFile(PRIVATE_KEY_PATH, "utf8");
const id = "unique identifier for your customer";
const token = jwt.sign({ sub: id }, privateKey, {
  expiresIn: "3d",
  algorithm: "RS512",
  keyid: "aWpCL01PMXpTR3RjMlRPbzk4TWlhV2ZxTGNRPQ"
});
Step 5 - Pass the JWT to the SDK
Once a token has been signed and sent to the customer, you can pass it to the respective platform SDK to authenticate requests. See the SDK documentation for your respective platform for more details:
Use the JWT to pass additional customer information
You can pass additional information with the auth token in the SDKs. The following customer fields can be updated using this approach:
- profile fields (external id, name, email, phone, city, country, region)
- custom fields
This is explained in detail in this section about passing customer data via the authentication token, or in this video about updating customer profiles via JWT claim mapping.