Testing Action Flows
This article will cover:
- How Atomic deals with test events
- How to test Action Flows
- Atomic Connect - the demo apps provided by Atomic that you'll use to send yourself test cards and notifications while testing your Action Flows
- How to observe test analytics
How Atomic deals with test events
- Atomic enables you to send test events and generate test cards. When you do, the analytics and card instances created clearly identify as tests, so you can identify, and potentially ignore or remove them.
- You can adjust configuration settings for each Atomic environment to deal with test data in analytics to meet your needs
- When sending a test from within the Action Flow editor, the cards and analytics will automatically be marked as tests, and tests will always use the current draft version of your card templates
- When sending test requests to a configured Webhook trigger, you should ensure the trigger is in Test mode
- The Test Action Flow sender tool is available for when you need to send a batch of test events, but prefer not to use an API request.
- Only test customers can be sent test Action Flows, or will receive test cards. Attempts to target a customer ID not recognized either as a Workbench Member customer ID, or a manually created test customer will be ignored. This is a safeguard to prevent draft cards and flows being sent to live customers.
How to test Action Flows
Testing from within the Action Flow editor
There are two main ways you are likely to be testing Action Flows from within the Action Flow editor:
If you are new to Atomic, take a moment to review the Atomic Connect Demo apps section below before sending a test. You will typically want to have Atomic Connect, our demo app, open on your desktop or mobile device, so that when you follow the steps below, you will be able to switch over and see the test cards and notifications coming through.
Testing the whole Action Flow
While you are designing your Action Flow you'll find it handy to run tests. Because Action Flows can do more than just sending cards and notifications, the range of things you may need to test can be broad. For example, you may want to test a Send API request step, or test how responses you entered into a card from near the start of your flow, and passed down into steps below.
- From the Action Editor click the Test Action Flow button on the canvas, or type CMD+Enter (Mac) or Control+Enter (Windows)
- In the Test Action Flow settings, you can choose who to target with your test (usually yourself, and your name will be automatically selected)
- Next you can also supply any test variable values which will be passed into variables configured in your Action Flow, and optionally provide a unique Flow Invocation ID that will help you trace the test data created from this flow through the analytics
- When ready, click Send
- Click the Show Log button to expand the window, so you can monitor as Atomic starts the Action Flow and proceeds to run steps. Keep this window open while you switch over to Atomic Connect, or other external systems you're involving in your test, and you'll see the log continues to update as the steps are completed and started.
- If there was an error completing a step, it will be displayed in the log view. Longer messages can be copied directly from here.
Unlike the legacy card editor, you won't see many delivery options here in the test settings. This is because delivery settings in Action Flows are applied individually to each Send a card step in your Action Flow - setting them once for all cards, is likely to have unexpected consequences
Sending (just) a test card
If you are working on a complex Action Flow, you may want to simply send a test card to yourself (or another test user) instead of testing the entire Action Flow. You can do this from within the card editor screen.
When you send just a test card, any dynamic context placeholders used in your card, for example, referencing previous steps output values, may use a fallback value. If no fallback is specified, these may resolve to empty, which may make your test card look a little unexpected. To get the most realistic test cards, when this matters, we recommend testing the whole action flow, not just sending a test card.
- From the Action Editor click the Test Action Flow button on the canvas, or type CMD+Enter (Mac) or Control+Enter (Windows)
- In the Test Action Flow settings, you can choose who to target with your test (usually yourself, and your name will be automatically selected)
- Next you can also supply any test variable values which will be passed into variables configured in your Action Flow, and optionally provide a unique Flow Invocation ID that will help you trace the test data created from this flow through the analytics
- When ready, click Send
- Click the Show Log button to expand the window, so you can monitor as Atomic starts the Action Flow and proceeds to run steps. Keep this window open while you switch over to Atomic Connect, or other external systems you're involving in your test, and you'll see the log continues to update as the steps are completed and started.
- If there was an error completing a step, it will be displayed in the log view. Longer messages can be copied directly from here.
Unlike the legacy card editor, you won't see many delivery options here in the test settings. This is because delivery settings in Action Flows are applied individually to each Send a card step in your Action Flow - setting them once for all cards, is likely to have unexpected consequences
Send test API trigger events
When sending test API trigger requests to the unique API trigger endpoint for your Action Flow, you should use the /test path, not the /start path.
- From the Action Flow canvas, click the API Trigger
- In the properties panel to the right, copy the
testendpoint URL, and the example payload (by default the example payload already contains your test customer ID as the target customer) - Make an API request to the Test endpoint following the guidelines in the Action Flows API docs. We have a guide for how to use Insomnia to make API requests to Atomic, and these steps will be very similar if you prefer to use a tool such as Postman. The API docs will provide examples of scripts that you can run directly in your terminal. However you choose to send your test events, if you get stuck, we're happy to help.
- Want to see the analytics events being created from this test action flow instance? Open the Analytics Debugger to monitor events created by the Atomic platform when processing the trigger. If the trigger was successful, you'll see (and be able to inspect) events such as an Action Flow Started event, and others reflecting the steps being completed as this test instance of your Action Flow runs.
Use the Audit Log to debug incoming API requests (if you have access). You can filter the audit log down to see only the relevant requests, saving time in your testing journey.
Send test webhook trigger requests
After initially adding a webhook trigger to your Action Flow, it will be in Test mode, and Atomic will treat any requests received by the Webhook endpoint as test events. When you are happy with the configuration, have run your tests, and are publishing your Action Flow, remember to update the Webhook trigger mode to Live.
- Test your Webhook trigger by sending a webhook request to the Webhook trigger URL, make sure the structure of the body of your request matches the sample payload used when creating the mapping.
- Check that the value of the customer ID you're passing in with your request is your own workbench test customer ID, or one of the other test customers in your environment.
- Want to see the analytics events being created from this test action flow instance? Open the Analytics Debugger to monitor events created by the Atomic platform when processing the trigger. If the trigger was successful, you'll see (and be able to inspect) events such as an Action Flow Started event, and others reflecting the steps being completed as this test instance of your Action Flow runs.
Use the Audit Log to debug incoming Webhook requests (if you have access). You can filter the audit log down to see only the relevant requests, saving time in your testing journey.
Send test events using the Test Event Sender
The Test Action Flow sender tool is available for when you need to send a batch of test events, but prefer not to use an API request.
Atomic Connect Demo apps
Atomic provides iOS, Android and Web apps (called Atomic Connect) that are designed to help you test, by letting you log in using your Workbench credentials, or a magic link from the Workbench, and then receive and interact with test cards and notifications.
When you use Atomic Connect, you are role-playing your own customers' experience, seeing how cards and notifications will work, and are able to interact with cards and notifications as they will (albeit within the simple context of our demo apps).
Because the Atomic Connect apps are designed for testing, you can easily switch around and connect them to different stream containers from your environment, or different environments, as needed.
You can use Atomic Connect to see how Stream Container Themes you're designing will look, and test across mobile and web platforms.
Accessing Atomic Connect apps
Atomic Connect apps are available for iOS, Android, and Web. To use the apps, you will need to connect to one of your Atomic environments, and one specific stream container (at a time).
Atomic Connect for iOS - Available in the Apple App Store. Search for Atomic Connect.
Atomic Connect for Android - Available in the Google Play Store. Search for Atomic Connect.
Atomic Connect for Web - Access Atomic Connect in your browser by visiting https://demo.atomic.io/.
Configuring Atomic Connect apps
There are different ways to get up and running with the Atomic Connect apps:
-
Log in using your workbench credentials. You will need to open the Connect app, select ‘Get magic auth link’, and then login using your workbench login credentials. Choose the Organization, Environment, Container, and User you would like to connect to, before clicking 'Finish setup'.
-
Use a magic link from the Workbench. Click Atomic Connect from the top menu in the Workbench. Choose a stream container to connect to (or leave the default), then either scan the QR code provided, or copy and open the URL provided. If you open this link on your desktop, you'll be taken to the web demo app, and if you open it on mobile, if you have Atomic Connect installed, it should redirect you to the app, and automatically log you in, connecting to the selected stream container.
Using Atomic Connect apps
- When prompted, allow Atomic to deliver push notifications. This is important so you can receive and test the push notifications you're configuring in your Action Flows
- After signing in, or following your magic link, you should be ready to receive test events and push notifications
- Explore the menus to see how you can switch between different presentation modes, exploring some examples of how Atomic's stream containers might be embedded into your own apps
- To change which environment, or stream container you're connected to, either sign-out of the app, and sign in again, choosing a new configuration, or bring up the Workbench on your desktop, click the Atomic Connect button, choose the new options and scan the updated QR code from your mobile.
When using Atomic Connect to preview stream container themes changes you're making, be sure to force quit and reopen the app two times each time you save your theme changes. The demo apps are designed to cache themes (for performance and efficiency), but force quitting and reopening twice will clear the cache and pull in your latest theme changes
Configure the Demo app
You can easily configure the Demo app to render an alternative variant mode (display configuration).
Select the menu to open the switcher:
- Web: the cog icon in the top right.
- Android: from the
Hometab, select the kebab menu (3 vertical dots) in the top right. - iOS: select the meatball menu (3 horizontal dots) in the top left.
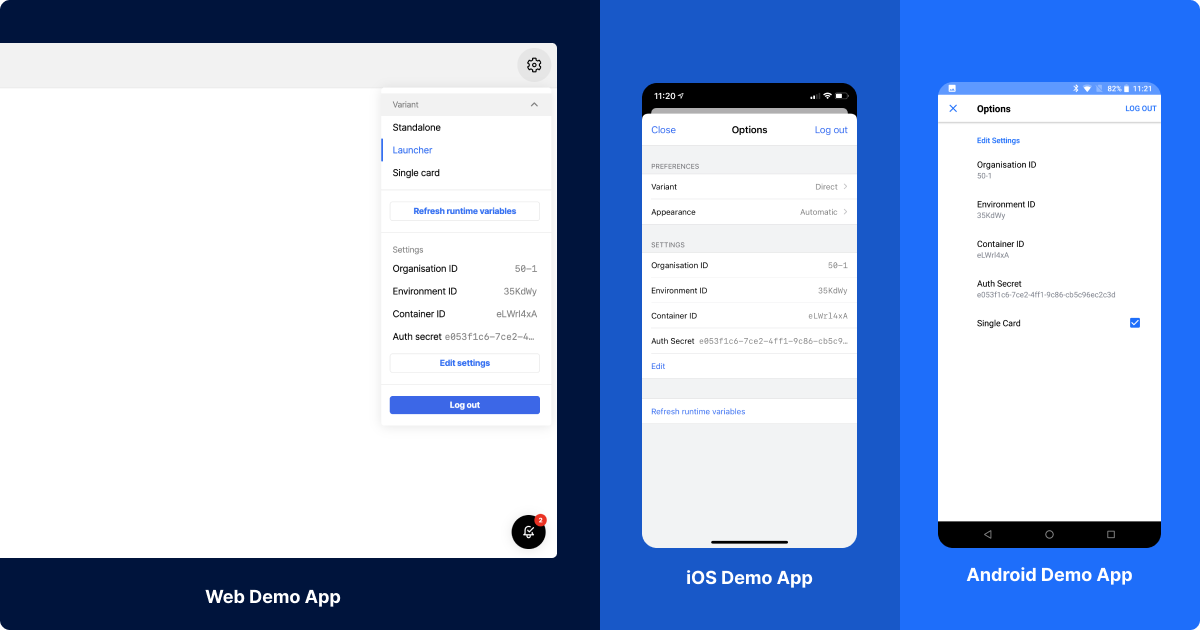 Demo app configuration options
Variant mode availability in Demo Apps
| Variant mode | Description | Support |
|---|---|---|
| Direct | The stream container is the main screen of the app. | iOS |
| Tabbed | Opens the Atomic stream container when tapping on the corresponding tab. Known as 'Footer' on iOS. | Android,iOS |
| Single Card View | A single card view is the main screen of the app. | Android,Web,iOS |
| Standalone | An iframe that you can embed anywhere on your page. You set the size and dimensions of the frame. | Web |
| Horizontal | An iframe that you can embed anywhere on your page. You set the size and dimensions of the frame. | Web, iOS |
| Launcher | A launcher button that opens an Atomic stream when clicked. Position and size is controlled by the SDK. | Web |
| Modal | Simulates opening the stream container modally (Close button at the top left) | iOS |
| Content | Simulates opening the stream container within a navigation controller (with a Back button at the top left). | iOS |
Learn more about the embed options and methods in our Integrating the SDKs tutorial.
Switch to Single Card view, and note only the top card in the stream is rendered:
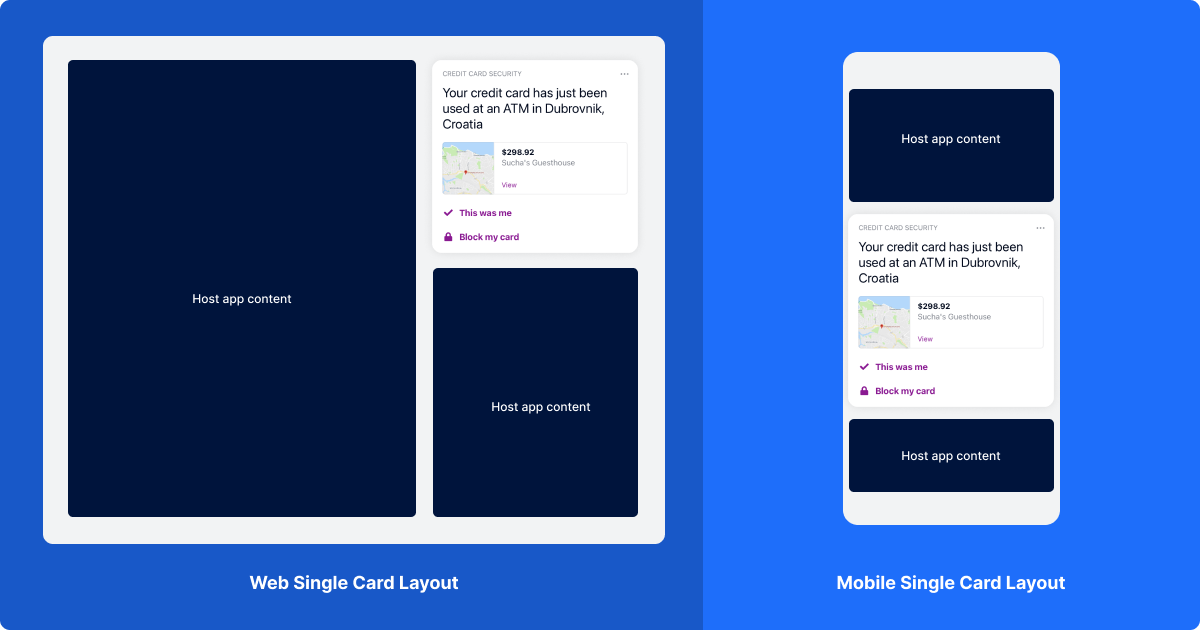 Examples of Atomic SDKs in single-card display mode
Get ready to receive your first test card
The first-time experience for each of our demo apps varies slightly. Follow the steps below that relate to the demo app you are using, to get ready to receive your first card:
- For web users: open the launcher (by selecting the bell icon). You can also use the menu in the top-right to switch to a different card container style.
- For iOS users: select
Allow notificationswhen opening the app for the first time. - For Android users: open the demo app and switch to the
Cardsarea, using the footer menu. Android users on version 13 or higher will need to accept the prompt toAllow notificationswhen opening the app for the first time.

When your card stream displays, you'll notice an explainer message. This is displayed when the customer has never received a card before and the stream is empty, and gives them some information about what to expect:
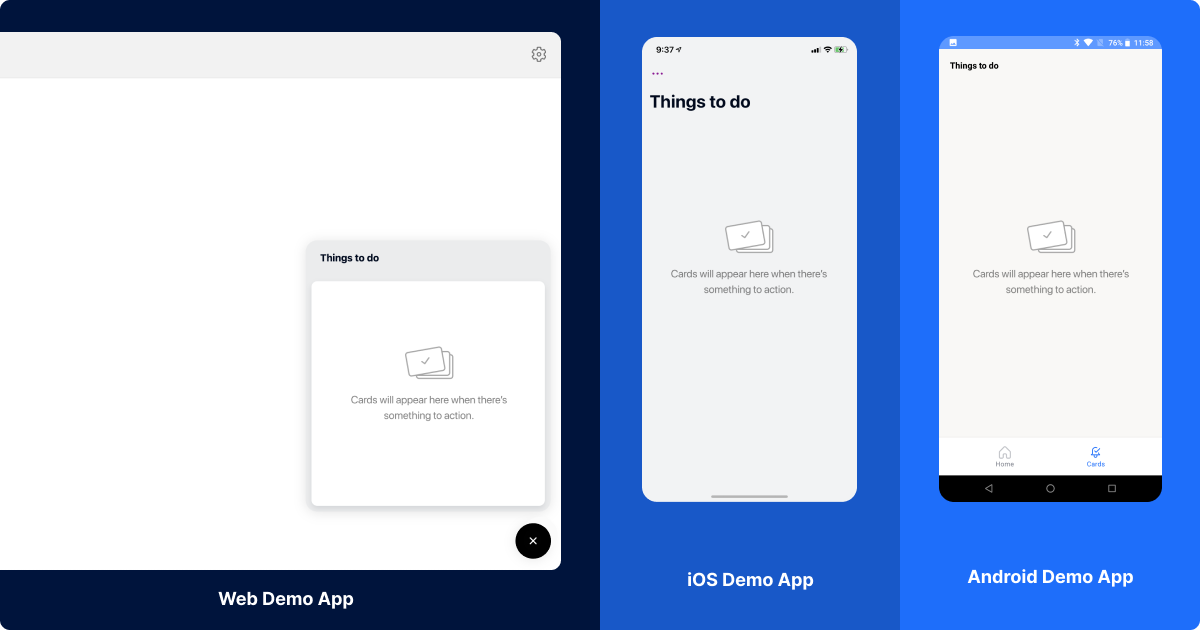
It's possible to change this message. Your developers can set this using the AwaitingFirstCard method when implementing the Atomic SDKs.
You’re now ready to receive test cards on your own device!
View a test card on the Demo app
The card that you sent yourself should now be visible in your demo app:
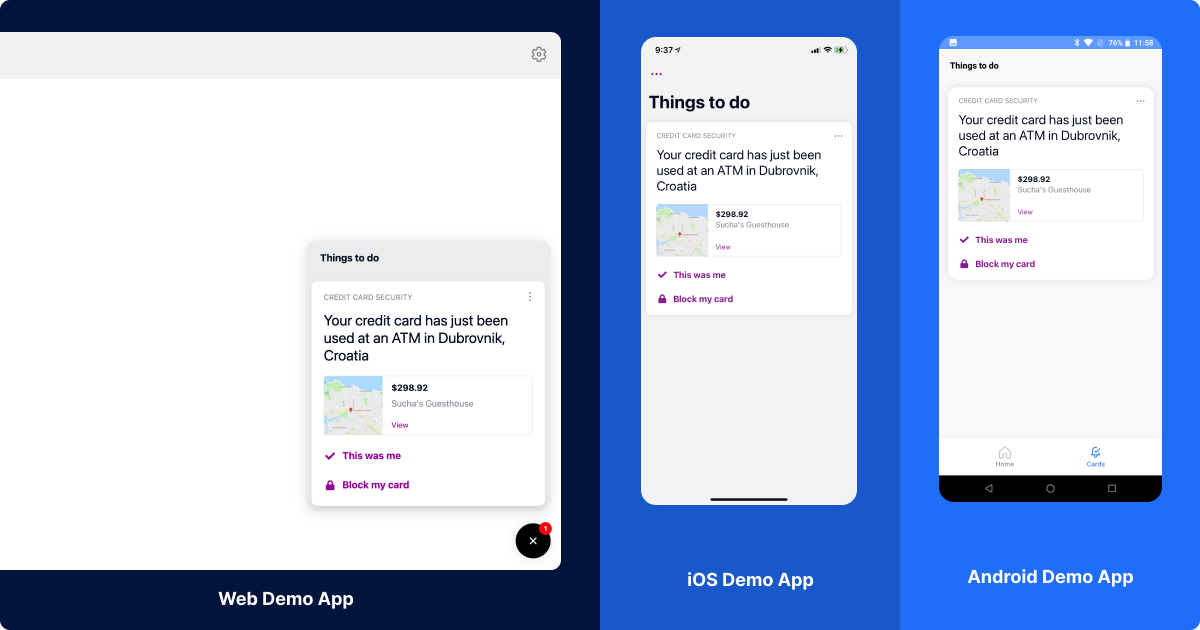 Test cards sent from the workbench displayed within Atomic demo apps
The Atomic Demo Apps use WebSockets with a fallback to polling for updates every 5 seconds if the WebSocket connection fails. Cards may not show up instantly if the SDK is using polling.
When you setup the SDK, WebSockets are used by default. If the connection fails, then the SDK will switch to polling. By default the polling interval is 15 seconds. The interval can be changed through the configuration of the SDK in your application.
Atomic keeps the card streams in sync across the different platforms (Web, iOS, and Android). i.e. if a card is dismissed on web, then it disappears from other platforms also.
Troubleshooting Atomic Connect
If you are not receiving cards or notifications as expected in Atomic Connect, these troubleshooting tips may help.
Troubleshooting the Atomic Connect Demo App setup
Before receiving cards, you need to have the Atomic Connect app installed for either iOS or Android. The Web Connect app does not require installation.
1. Refresh your app
- iOS: perform a force close by swiping up from the home screen or double-tapping the home button, finding the Atomic Demo App, and then swiping up on the preview. To see updates to themes, a second force close may be required, as the old theme may be cached.
- Android: on the navigation bar at the bottom of the screen, select the square, and then swipe the Atomic Demo App away to close it.
- Web: refresh your browser to ensure you have any recent updates.
2. Configure the app
- Open the settings screen, and check you are connected to your desired Organization, Environment, Container, and are assuming your desired user profile.
- See more on configuring the Demo App.
A stream is a collection of cards. Every card is always assigned to the All cards stream, but can be assigned to multiple streams. One stream can be assigned to multiple containers.
A container contains one stream of cards. The container is the object inside your apps that renders cards. Each container references one Theme (or two, if you’d like to add a dark mode option).
3. Notifications are enabled on your device
-
iOS:
- Go to Settings > Do Not Disturb and check that Do Not Disturb is off, or not currently scheduled.
- Go to Settings > Notifications > Atomic Demo App and make sure that Notifications are on.
-
Android:
- Go to Settings > Do not disturb, and check it is off.
- Go to Settings > Apps and Notifications, and for the Atomic Demo App, select App notifications. Check they are on.
4. Get the latest version of the app
- iOS: iOS automatically updates Atomic Connect by default, but if there is an issue go to the App Store, and tap your profile icon at the top of the screen, and then scroll to see pending updates and release notes. Tap Update next to an app to update only that app, or tap Update All.
- Android: You can have auto updates for Atomic Connect enabled for Android. If it is not enabled, to manually update it go to the Google Play Store app and at the top right tap the profile icon. Next tap "Manage apps & device", and check Atomic Demo App is not labeled "Update available." If it is, tap Update.
- Web: Refresh your browser to ensure you have the latest version.
5. For the Web Demo App, check you are not using any browser plugins that may be blocking content.
Troubleshooting the Workbench setup
If you’ve checked all the above steps, then you can log into the Atomic Workbench and check the following:
- Refresh your browser to ensure you are using the latest version of the Atomic Workbench.
- Sign out and then sign back in to the Workbench.
- Notifications are properly configured. If you are expecting to see a notification, check that the card has a notification configured for it, or — if you're using an Action Flow Send Notification step — that the step has been configured properly.
- Sent to the correct customer. When testing your Action Flow, check you are selecting the customer ID that matches the one used when signing into the Atomic Connect Demo App you are expecting to receive the card on.
- Correct organization and Environment. If you are a member of multiple organizations, check you are sending the test card from the correct one. Similarly, check you are in the correct Environment.
- Theme configured. A theme needs to be configured before cards can be received. You can add a theme in the Workbench under Configuration > SDK > Container themes.
- Container and stream configured. Check the container is referencing the stream that the card is also referencing. To check, in Configuration > SDK > Stream container, check if the Container you are connecting to is using that stream.
Troubleshooting preferences using the API
- If you are expecting to see a notification, check via the user preferences API endpoint whether "do not disturb" preferences are set for your customer, and if so, it indicates that notifications should not be sent at the time of testing.
Observe test analytics in the Analytics Debugger
Use the Analytics Debugger to monitor events created by the Atomic platform from your testing.