Insomnia instructions
This guide explains how you can send requests to the Atomic API to complete three different types of actions:
- Create a card.
- Dismiss a card.
- Retrieve the cards in a customer's stream.
There are many other requests that can be sent to the Atomic API using Insomnia.
A full Atomic public API spec can be found in the Open API specification.
Note on Insomnia and other third party tools
These instructions are written specifically for Insomnia. If you're using another third party tool (such as Postman), you will find all of the variables needed on this page and in the Atomic API spec https://01.customer-api.atomic.io/redoc.html. If you still have questions, do not hesitate to contact us at support@atomic.io.
Step 1: Download and install Insomnia
Insomnia is an application that enables you to interact with API endpoints, and is available on MacOS, Windows and Linux. You can download it from its official website: https://insomnia.rest/download.
The instructions and screenshots in this article use the native Mac desktop app.
Step 2: Add the Atomic collection into your Insomnia account
We have created a collection of all possible API requests, including the ones mentioned in this article, that you can import into your own Insomnia app and use.

To import the Atomic collection to your Insomnia account:
- Open Insomnia.
- Click the “Create” button and then Import From -> URL

- Paste the Atomic Swagger Collection URL https://01.customer-api.atomic.io/spec.yaml and select "Fetch & Import".
- When prompted, choose either "Request Collection" (requests only) or "Design Document" (which also includes documentation).
You should now have a collection of requests in your account named "Atomic API 1.x.y".
Once imported, the collection does not get updated automatically. Keep an eye on our changelog updates to see when the Atomic API spec is updated. You can then import its latest version repeating the same steps.
Step 3: Prepare the Atomic Workbench
Before we send an API request from Insomnia, we need to ensure our Atomic account is configured correctly, and contains the necessary content:
- In the Atomic Workbench, ensure you’re in the correct environment you wish to send the Insomnia requests to. To change the environment, select the switcher at the top of the screen and select the organization and environment.
- If you have not already, you’ll need to add API credentials.
- Create an Action Flow that contains at least one send a card step.
- Publish the card. A card does not need to be published to send a test event from within the Workbench, but it does need to be published for any API use.
Step 4: Add Atomic environment details to the Insomnia environment

In Insomnia, select the environment in the top left (if you have a new account it will be No environment > Manage Environments or keyboard shortcut + E).
Add a new Sub environment, and give it a name. We suggest using the name of the environment you are trying to connect to, for example Staging. You can also add the scope of the API token you're using, so the complete name would look something like Staging - events token.
Scoped API tokens are explained at the end of this section.
Copy and paste the below JSON into the space provided on the right:
{
  "base_url": "https://REPLACE-WITH-ORGANIZATION-ID.customer-api.atomic.io",
  "environmentId": "REPLACE-WITH-ENVIRONMENT-ID",
  "oauth2ClientId": "REPLACE-WITH-CLIENT-ID",
  "oauth2ClientSecret": "REPLACE-WITH-CLIENT-SECRET"
}
We now need to replace the placeholder content with details from the Atomic Workbench.
-
Find (or create) the required values in the API keys and paths article
-
oauth2ClientId: Client Id
-
oauth2ClientSecret: Client Secret
Note: different endpoints require differently scoped API tokens (Events, Workbench or Auth). The token type that an endpoint requires can be found in the endpoint name in Insomnia, for example the "Retrieve cards (token: events)" endpoint requires an "Events" scoped token. Read more about the scoping of API credential roles in the Authentication guide.
You may like to create separate Insomnia configuration environments for each scope type to easily switch between API scopes. You can do something similar when working with multiple Atomic environments.
Send a card using the API
Once you've completed steps 1-4 as described above, you can send a card using the API.
- Select the request titled ‘Trigger an Action Flow’ from your collection.

- Navigate to the card you want to send. Make sure it is published before trying to send it using the API. The Action Flow API only works for cards that are published.
Select the trigger tab. You will see the API endpoint for sending this card. The flowConfigId is the id in betweenaction-flowandstart.
In Insomnia, replace the placeholder in the request with the actual flowConfigId value.

In Insomnia you can always check the URL preview under the query tab to make sure the url looks exactly like the API start trigger.
- Select a target. Target is the only mandatory field in this API request. You can target segments, tags, customer IDs or even filters. In this example, we'll send a card to your own test customer ID. Copy the code snippet below and paste it in the JSON body of your API request. You can replace the targetUserId with your own test customer ID.
See the test customers article if you need to create a test customer, or need help finding test customer IDs.
{
  "flows": [
    {
      "target": {
        "type": "user",
        "targetUserIds": ["REPLACE-WITH-YOUR-TEST-USER-ID"]
      }
    }
  ]
}
- If you want, you can add options, variables or metadata to the request payload. You can find more examples in the Atomic API spec https://01.customer-api.atomic.io/redoc.html or in the Action Flow API guide.
Access token
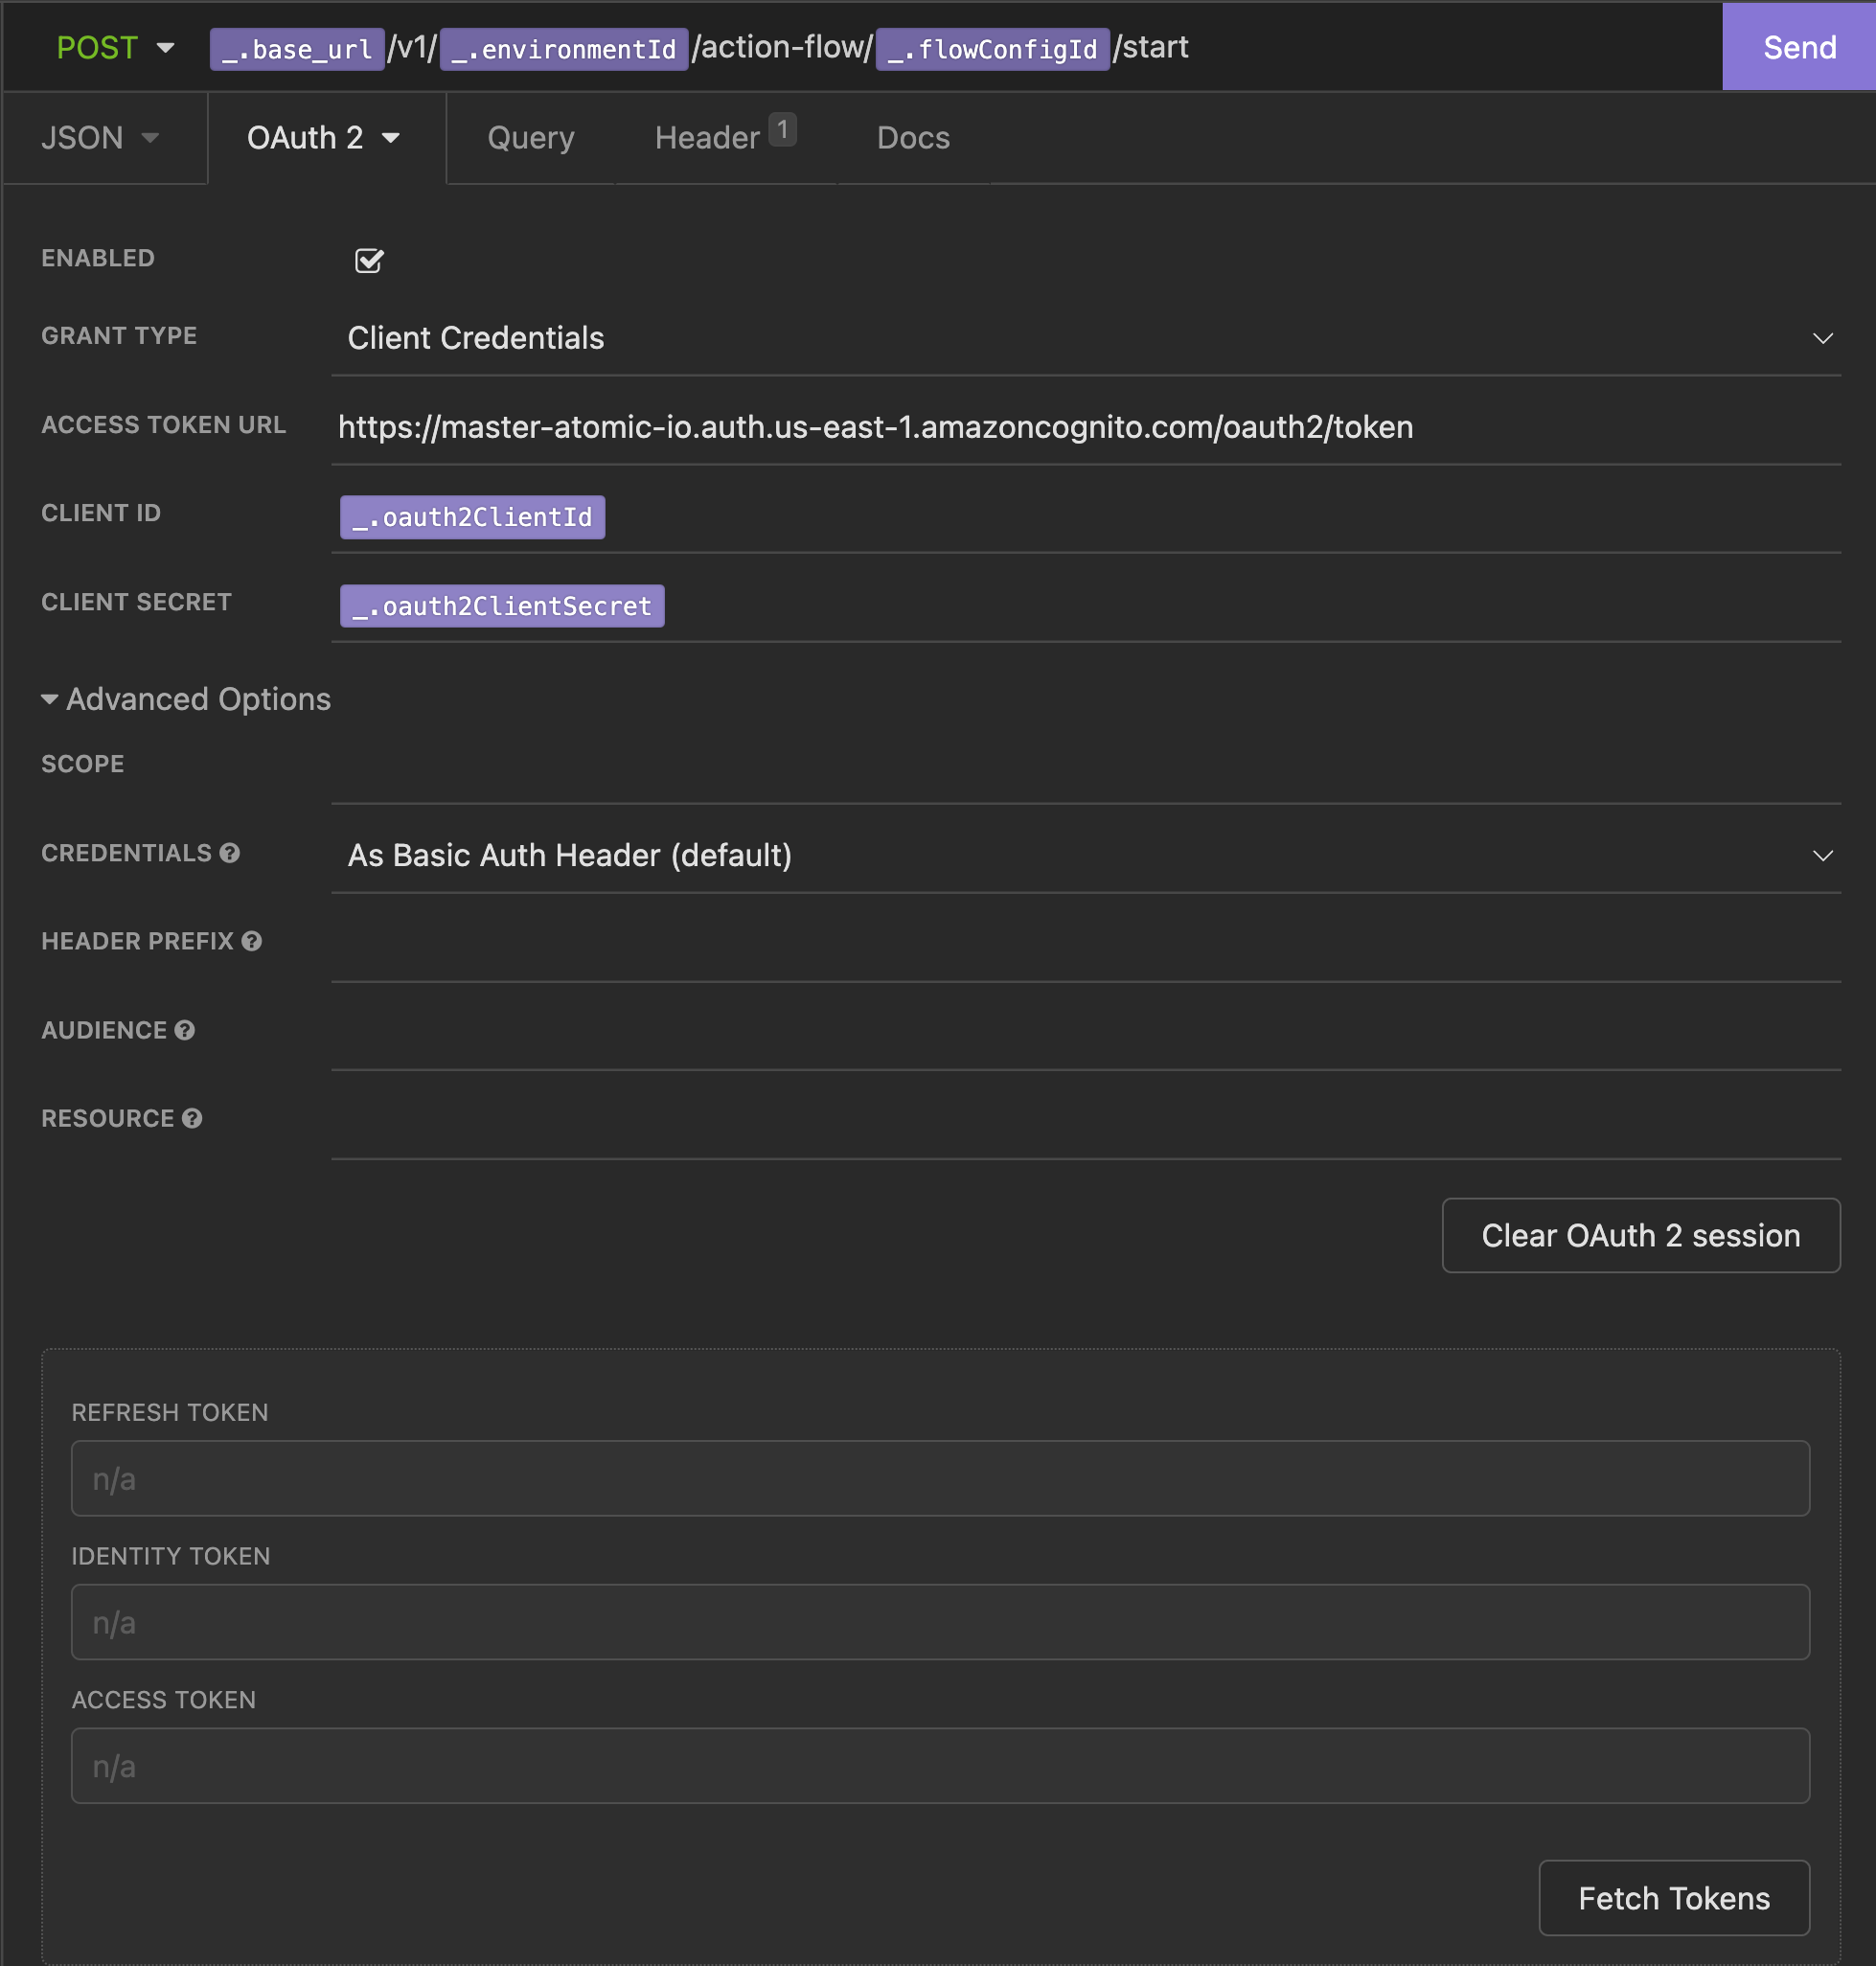
To ensure the data we’re accessing is completed securely, we need to get an access token. This is easily done in Insomnia - open the authorization tab and make sure all settings look like the screenshot below.
- switch the ‘type’ to ‘OAuth 2.0’. (if it is not OAuth 2.0 already)
- switch the grant type to ‘Client Credentials’
- reference the Access Token URL variable
- reference the Client ID variable
- reference the Client secret variable
- click
Fetch tokens
Now you can send the card to your Atomic demo app.
- Open your Atomic demo app — either mobile or web.
- In Insomnia, send the request (button to the right of the method).
- Note: if there is trouble sending the request, check the
OAuth 2tab and ensure thatAdvance Options > scopeis empty.
- Note: if there is trouble sending the request, check the
- Confirm on your web or mobile Demo App that a card has been delivered.
Add card expiry
As an optional extra, you may like to add an expiry time and date for the card that you sent successfully in the previous step. To add a countdown expiry for the card, add the expiresInterval variable within the options field in payload, like this:
{
  "flows": [
    {
      "payload": {
        "cardOptions": {
          "expiresInterval": "PT10S"
        },
        "variables": {
          "name": "Jessica Jones"
        }
      },
      "target": {
        "type": "user",
	      "targetUserIds": ["${targetUser1}", "${targetUser2}"]
      }
    }
  ]
}
This syntax will expire the card after 10 seconds.
You can experiment with other durations by replacing the ‘PT10S’ value. Learn more about using expires and expiresInterval, including some examples in our working with dates and times article.
Cancel a card
This endpoint allows you to cancel cards programmatically. An example could be a promotion you run where the first 100 customers who respond, get a gift. After giving away 100 gifts, you no longer want this card to appear in customers' streams.
Make sure you have sent a card to your demo app first, before trying to cancel the card.
- Select the request titled 'Cancel cards’ from your collection.
- Configure the authentication (OAuth 2.0) tab as before - refer to the section about access tokens.
- In the 'query' tab, tick the checkbox next to cardTemplateId. Then add the cardTemplateId of the card you’d like to cancel.
- Now, open your Atomic Demo App, and note the card you’ve recently sent is still there.
- In Insomnia, send the cancel request.
- Check back in the demo app that the card has been cancelled.
You can read more about cancelling cards using Insomnia in the Cancel cards guide.
Retrieve cards for a customer
This request lists all of the active cards for a given customer in the environment. Make sure this customer has some active cards in the demo app, so there will be some data to return when we make the request. If not, send some cards to the customer using Insomnia or test cards from the Atomic Workbench.
- Select the request named ‘Retrieve cards'.
- Configure the authentication (OAuth 2.0) tab as before - refer to the section about access tokens.
- In the 'Query' tab, tick the check box next to userId. Add the customer ID for the customer whose cards you wish to retrieve. The URL preview should now look something like this:
https://$ORG_ID.customer-api.staging.atomic.io/v1/$ENVIRONMENT_ID/cards?userId=123
- Send the request.
Note the response contains all of the data from the active cards that the customer has in their feed.
You can read more details in the Retrieving cards section of the Cards API guide.
Now you’ve got the basics, you may like to explore the rest of our API guides, such as the Action Flow APIguide.