Organizing Action Flows with folders
As your library of Action Flows grows, keeping them organized becomes important - both for your own productivity and for making it easier for your team to find and manage Action Flows. Atomic's folder system lets you group related Action Flows together, with support for up to three levels of nesting so you can reflect the structure that makes most sense for your team.
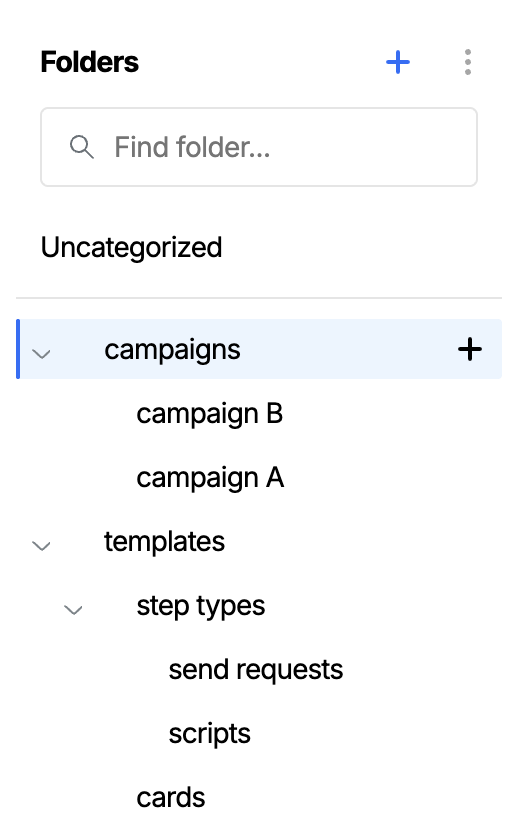
The folder panel on the Action Flow dashboard showing a nested folder tree
Why use folders?
Folders are optional, but they become very useful once you have more than a handful of Action Flows. Here are some common ways teams use them:
- By product area or feature - Group Action Flows for onboarding, billing, and support separately so each team can quickly find what they own.
- By campaign or initiative - Keep Action Flows related to a specific campaign together for easy review before and after launch.
- By status or workflow stage - For example, a
Templatesfolder for draft Action Flows your team clones from, and separate folders for Action Flows that are live in production. - By region or audience - If you operate in multiple markets, separate folders make it easy to see what's running where.
- By trigger type - For teams managing many Action Flows, grouping by trigger type (scheduled, event-driven, batch) helps with at-a-glance understanding.
Consider creating a Templates folder and populating it with well-designed Action Flows your team can clone as a starting point. This is a great way to promote consistency and save time.
Filtering by status
The top of the left panel on the Action Flow dashboard has a set of status filters that scope the main list. Selecting one shows a different slice of your environment:
- All active - Every non-archived Action Flow you have permission to see, regardless of which folder it's filed in. Use this when you want to search or browse across your whole library without worrying about folder structure.
- Draft - Action Flows whose latest version is a draft. A flow with a published Version 1 and a draft Version 2 in progress will appear here, because Version 2 is the latest. Archived flows are excluded.
- Awaiting approval - Action Flows whose latest draft has been submitted for approval but hasn't received all required approvals yet. The draft is read-only while in this state. Only shown when approvals are enabled.
- Ready to publish - Action Flows whose latest draft has received all required approvals and is waiting to be published. Only shown when approvals are enabled.
- Published - Action Flows that have ever been published. A flow stays in this filter even if its latest version is now a draft on top of an earlier published version, so the same flow can appear in both Draft and Published. Archived flows are excluded.
- Archived - Action Flows that have been archived. Archived flows are hidden from every other status filter and from every folder view, so this is the only place to find them.
Awaiting approval and Ready to publish are only present when your environment has the approvals feature turned on; without it, the panel goes straight from Draft to Published. For background on draft and published versions more generally, see Publishing Action Flows.
The folder panel
Below the status filters is the folder panel, which lists the folders in your environment and offers two further ways to scope the main list:
- A search box to filter the folder list by name. When searching, the full path of nested folders is shown (e.g.
Onboarding > Welcome series) so you can tell folders apart even if they share a name. - Uncategorized - Non-archived Action Flows that haven't been filed into a folder yet. Use this to find flows that still need to be organized. A flow moves out of Uncategorized as soon as it's added to any folder, and reappears here if it's later removed from all folders (for example, by deleting the folder it was in).
- Your folders - Listed as a tree below Uncategorized. Folders with sub-folders can be expanded to show the sub-folders.
Clicking a folder — or Uncategorized — scopes the main list to show only the matching Action Flows.
All active (a status filter, above) and Uncategorized (a folder-panel entry) sound similar but are not the same. All active is a superset that includes every non-archived flow; Uncategorized is a much smaller subset containing only the flows that aren't in any folder. If every Action Flow in your environment is filed into a folder, Uncategorized will be empty even though All active is not.
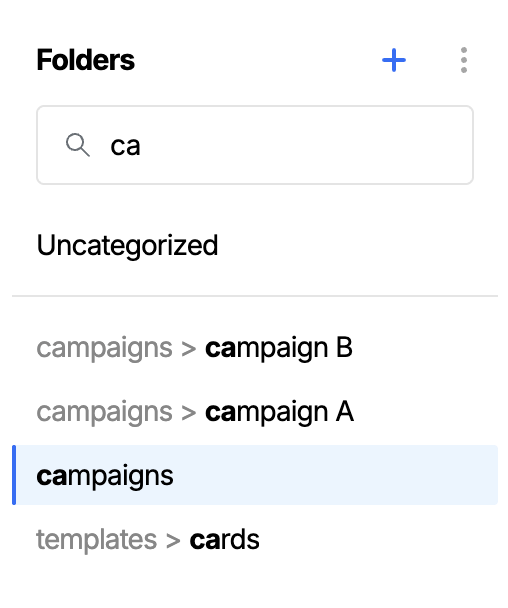
Searching folders shows the full path for nested folders, and highlights the matched text
Browse folders
Browse folders is in beta and may be subject to change. Please contact us to provide feedback.
For organizations with deep folder structures, the Browse folders view offers a quicker way to navigate. It shows your folders in side-by-side columns, with the Action Flows inside each selected folder listed inline alongside its sub-folders, so you can drill down without losing sight of where you started.
To open it, click the Browse folders icon (a folder with a magnifying glass) next to the search bar at the top of the Action Flows list. The icon only appears once your organization has at least one folder.
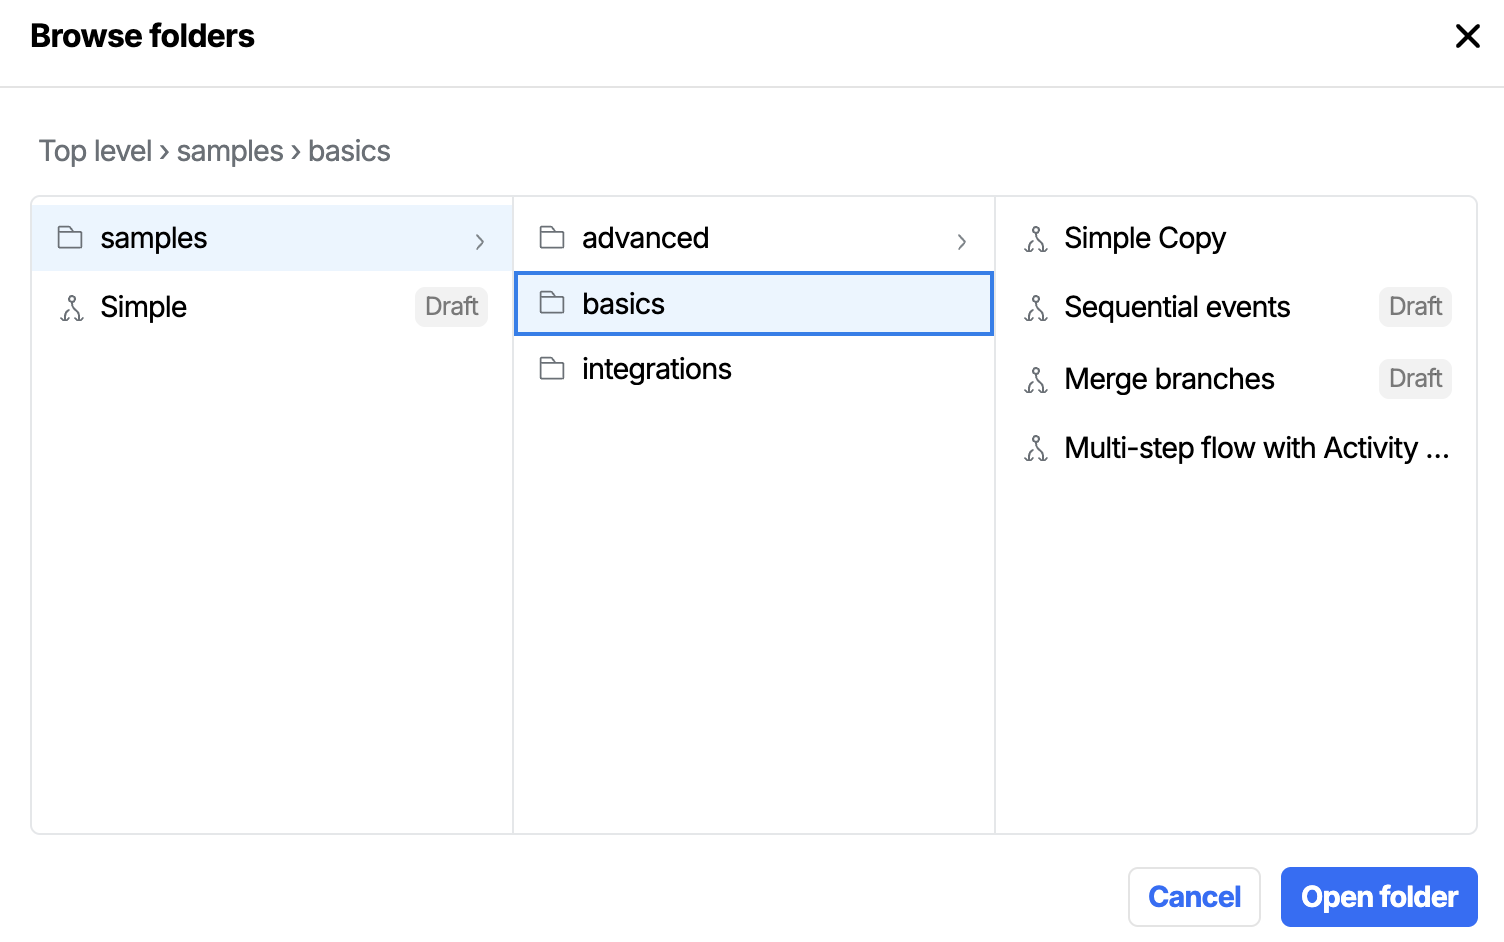
Browse folders shows your folders side-by-side in columns, with the Action Flows inside each selected folder listed inline
To use it:
- Click a folder in the leftmost column. A new column appears to the right showing its sub-folders, and any Action Flows inside that folder are listed inline below them.
- Keep clicking through to drill deeper, up to the maximum nesting depth.
- Click an Action Flow row to navigate straight to it.
- Use the back-arrow on a column header, or click any folder in a previous column, to step back up the tree.
Moving Action Flows between folders by drag and drop
Inside the Browse folders view you can move an Action Flow into a different folder by dragging it.
- Open Browse folders and drill into the folder containing the flow you want to move.
- Drag the Action Flow row.
- Drop it onto any folder in any column to move it there. Drop it onto Uncategorized in the leftmost column to remove it from all folders.
The flow moves immediately. Any open folder views refresh so the flow disappears from its old folder and appears in its new one without a manual reload.
Drag and drop is only available inside the Browse folders view. The main Action Flows list does not support drag and drop - to move a flow from there, use Add to folder from the ⋯ overflow menu instead.
Creating a folder
- In the folder panel, click the + button next to the Folders heading.
- Enter a name for your folder. Folder names can contain letters, numbers, spaces, hyphens, and underscores.
- Click Create.
Your new folder will appear in the panel and you can start moving Action Flows into it straight away.
Creating a sub-folder
Folders support up to three levels of nesting — a top-level folder, a sub-folder inside it, and one further level beneath that.
To create a sub-folder:
- In the folder panel, hover over the folder you want to nest inside.
- Click the + icon that appears on the right side of the folder row.
- In the Create a new sub-folder dialog, enter a name for the sub-folder.
- Click Create.
The parent folder will automatically expand to show the new sub-folder once it's created.
The + button only appears on folders that can still accept sub-folders. If a folder is already at the maximum nesting depth, the button won't be shown.
Adding an Action Flow into a folder
You can assign any Action Flow to a folder at any time, regardless of whether it's published or still in draft.
- From the Action Flow list, find the flow you want to move.
- Click the ⋯ overflow menu on the right side of its row.
- Select Add to folder.
- At the top of the dialog, choose how you want to find the destination folder:
- Dropdown - the original list view. Pick a folder from the dropdown; nested folders are shown with their full path (e.g.
Campaigns > Q3 > Email follow-up) so you can easily tell them apart. - Browser - the same side-by-side column layout used by Browse folders, except Action Flows are hidden so the focus stays on choosing the destination folder. Useful for picking from a deep folder structure.
- Dropdown - the original list view. Pick a folder from the dropdown; nested folders are shown with their full path (e.g.
- Select the destination folder, then click Save.
You can also create a new folder directly from the Add to folder dialog - in the Dropdown view, click + New folder at the bottom of the list and optionally choose a parent folder to nest it under.
Renaming a folder
- In the folder panel, click the folder you want to rename to select it.
- In the panel header area that appears, click Edit folder.
- Update the name and press Enter or click Save changes.
Deleting a folder
- In the folder panel, click the folder you want to delete to select it.
- Click the ⋯ overflow menu in the folder header area.
- Select Delete folder and confirm.
A folder cannot be deleted if it contains sub-folders. Deleting a folder does not delete the Action Flows inside it - they will be moved to Uncategorized.
Folders in analytics
When an Action Flow is triggered, the ID of the folder it belongs to is captured as workbenchFolderIds in the platformContext of every analytics event that flow generates. This lets you filter or segment analytics data by folder in downstream tools.
See Analytics event reference for the full list of platformContext properties.
You can also filter the Insights dashboard by one or more folders, scoping all metrics to Action Flows within those folders.
Sorting folders
You can change the order in which folders appear in the panel. Click the ⋯ overflow menu next to the Folders heading and choose from:
- Recently edited - Folders whose contents were most recently updated appear first.
- Ascending (A–Z) - Alphabetical order.
- Descending (Z–A) - Reverse alphabetical order.
Your chosen sort order is remembered between sessions.
Managing folders via the API
The same folder structure can be managed programmatically with the Workbench Folders API. It exposes list, create, get, rename, and delete operations against the same folders shown here, which is useful for provisioning folders as part of an environment setup script or keeping them in sync with another system.
The API requires a fine-grained API key with the matching workbench_folders:* scopes - see the API page for details.
Restricting access to specific folders
Secure folder mode is in preview and may be subject to change. Please contact us to provide feedback.
When separate teams manage distinct product areas, you can restrict folder visibility so members only see the folders their groups have been given access to. This is done in two steps:
- An Environment: Admin turns on secure folder mode for the environment.
- A member whose role grants Workbench folder: Admin opens the Access panel on each folder and adds the groups that should see it.
When secure folder mode is on, the folder panel hides folders the member can't access, the Uncategorized filter is reserved for Workbench folder: Admin members, and a padlock icon next to Folders indicates the environment is being gated. The Insights dashboard is scoped the same way.
See Workbench permissions - secure folder mode and per-folder access for the full model, including how access combines across groups and what each permission level allows.