MCP Server
This is in preview and may be subject to change. Please contact us to have this feature enabled in your organization or to provide feedback.
The Atomic.io MCP Server lets you connect AI assistants and developer tools that support the Model Context Protocol (MCP) to your Atomic organization. Once connected, these tools can query your Atomic data using natural language without leaving your editor or AI assistant.
Example use cases
- Ask an AI coding assistant to list all Action Flows in a given environment while building an integration.
- Use Claude or VS Code Copilot to look up a customer's profile and tags during debugging.
- Query Action Flow analytics for a specific flow using a conversational prompt.
- Explore which environments exist in your organization without opening the Workbench.
Enable the MCP Server
Only organization members with permission to manage organization preferences can enable the MCP Server.
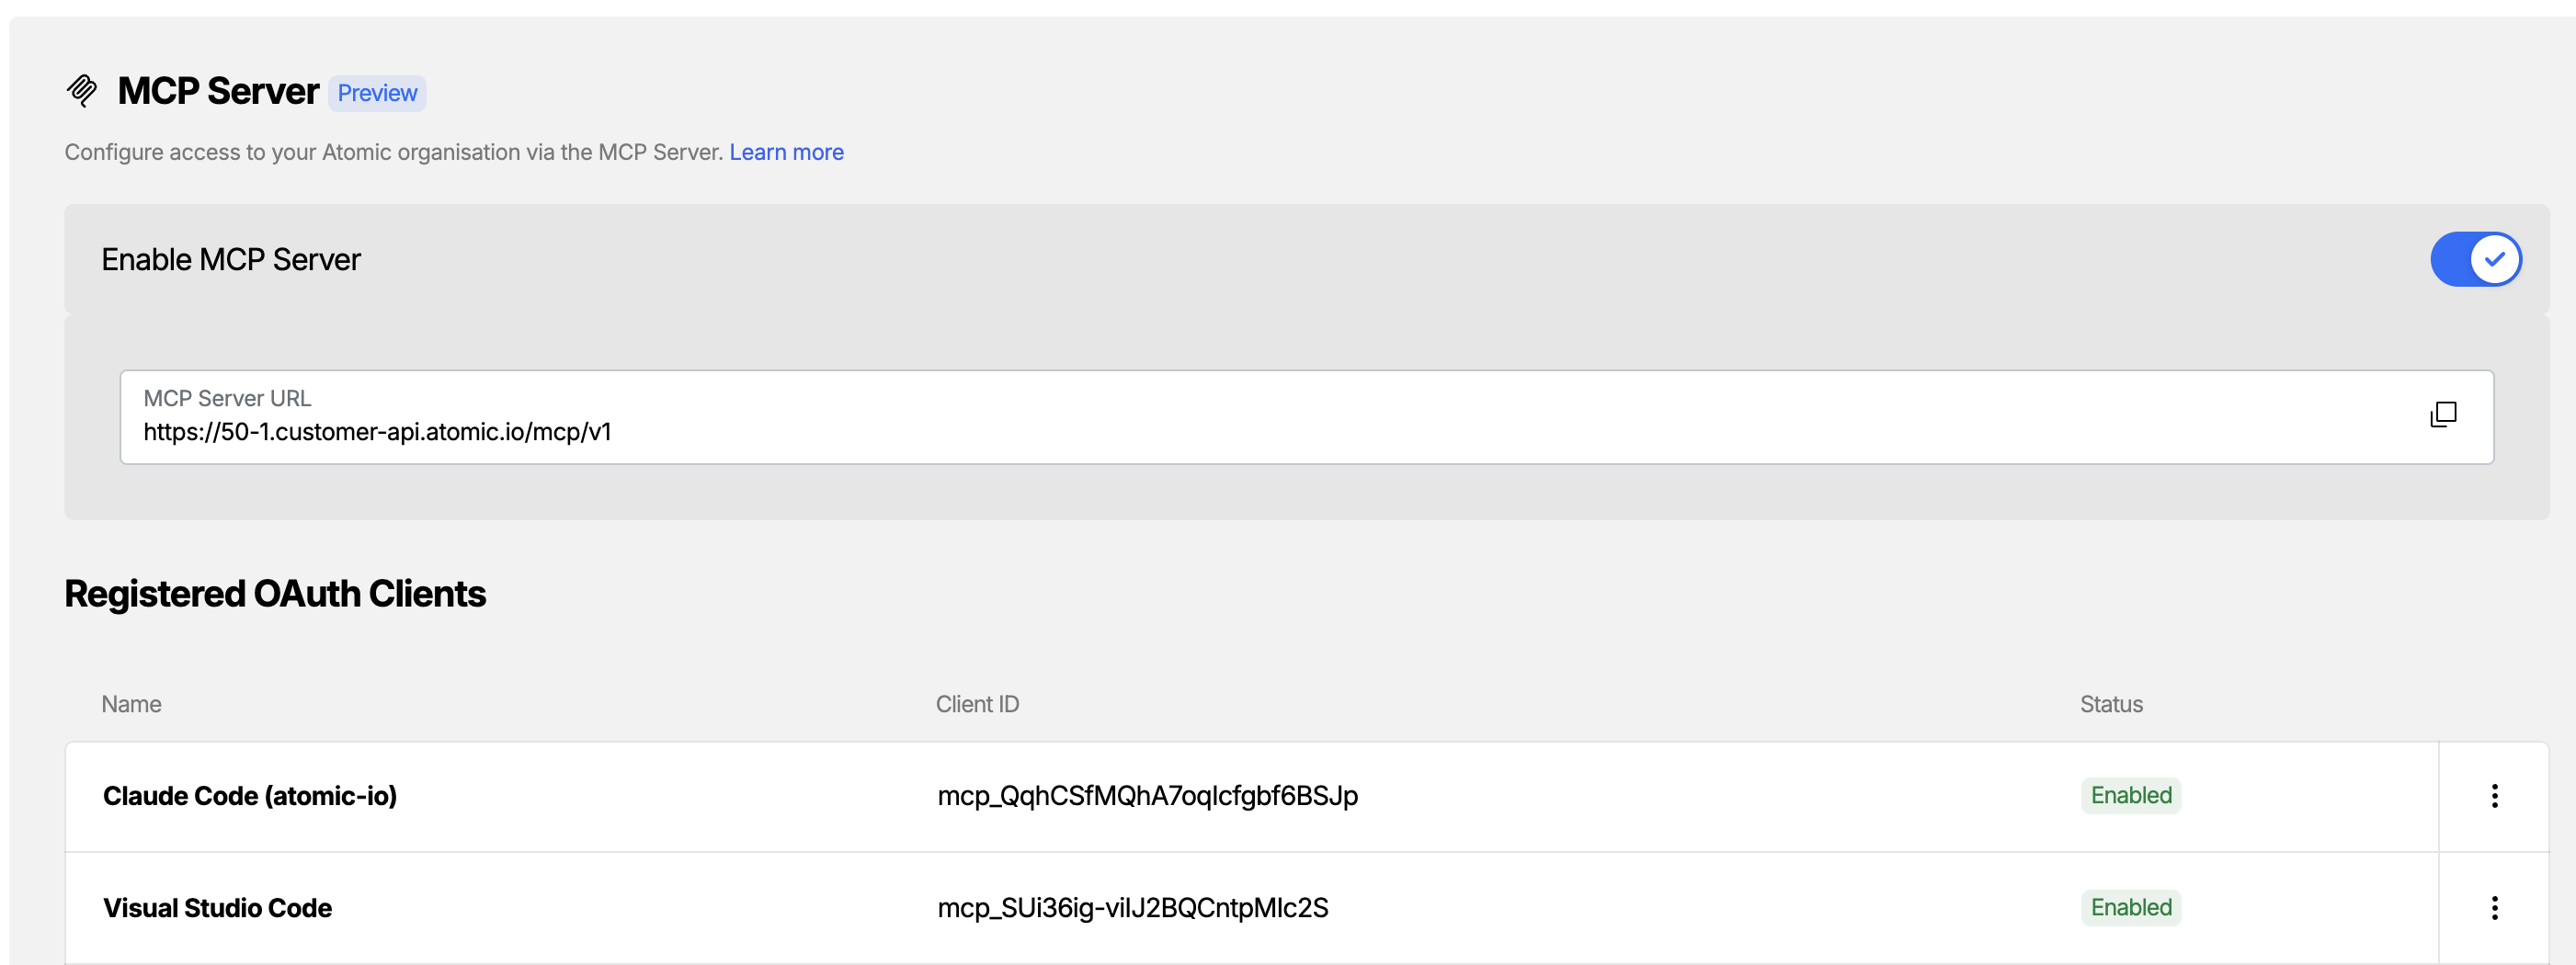
- In the Atomic Workbench, open Organization Settings from the Manage settings side navigation.
- Naviage to MCP > Clients
- Toggle Enable MCP server on.
Once enabled, your organization's MCP Server URL is displayed. Copy this URL as you will need it when configuring your MCP client.
Authentication Flow
The MCP Server uses OAuth 2.0 to authenticate each user individually. After the initial sign-in, a refresh token is issued so the connected client can stay authenticated without the user needing to sign in again for every session.
How long a refresh token remains valid depends on how users authenticate to the Workbench:
- Username and password - Refresh tokens are valid for up to 30 days.
- SSO - Users must reauthenticate every 24 hours. This ensures that any role changes made in your external SSO provider are captured promptly.
Independently of token expiry, access can be controlled at any time via:
- Workbench Roles and Groups - update or remove a user's MCP permissions. See Grant user access for details.
- Revoking a user's token - organization admins can revoke a connected client's access from the MCP > Clients screen in Organization Settings.
Grant user access
After enabling the MCP Server, individual users need two permissions before they can fully use the MCP Server:
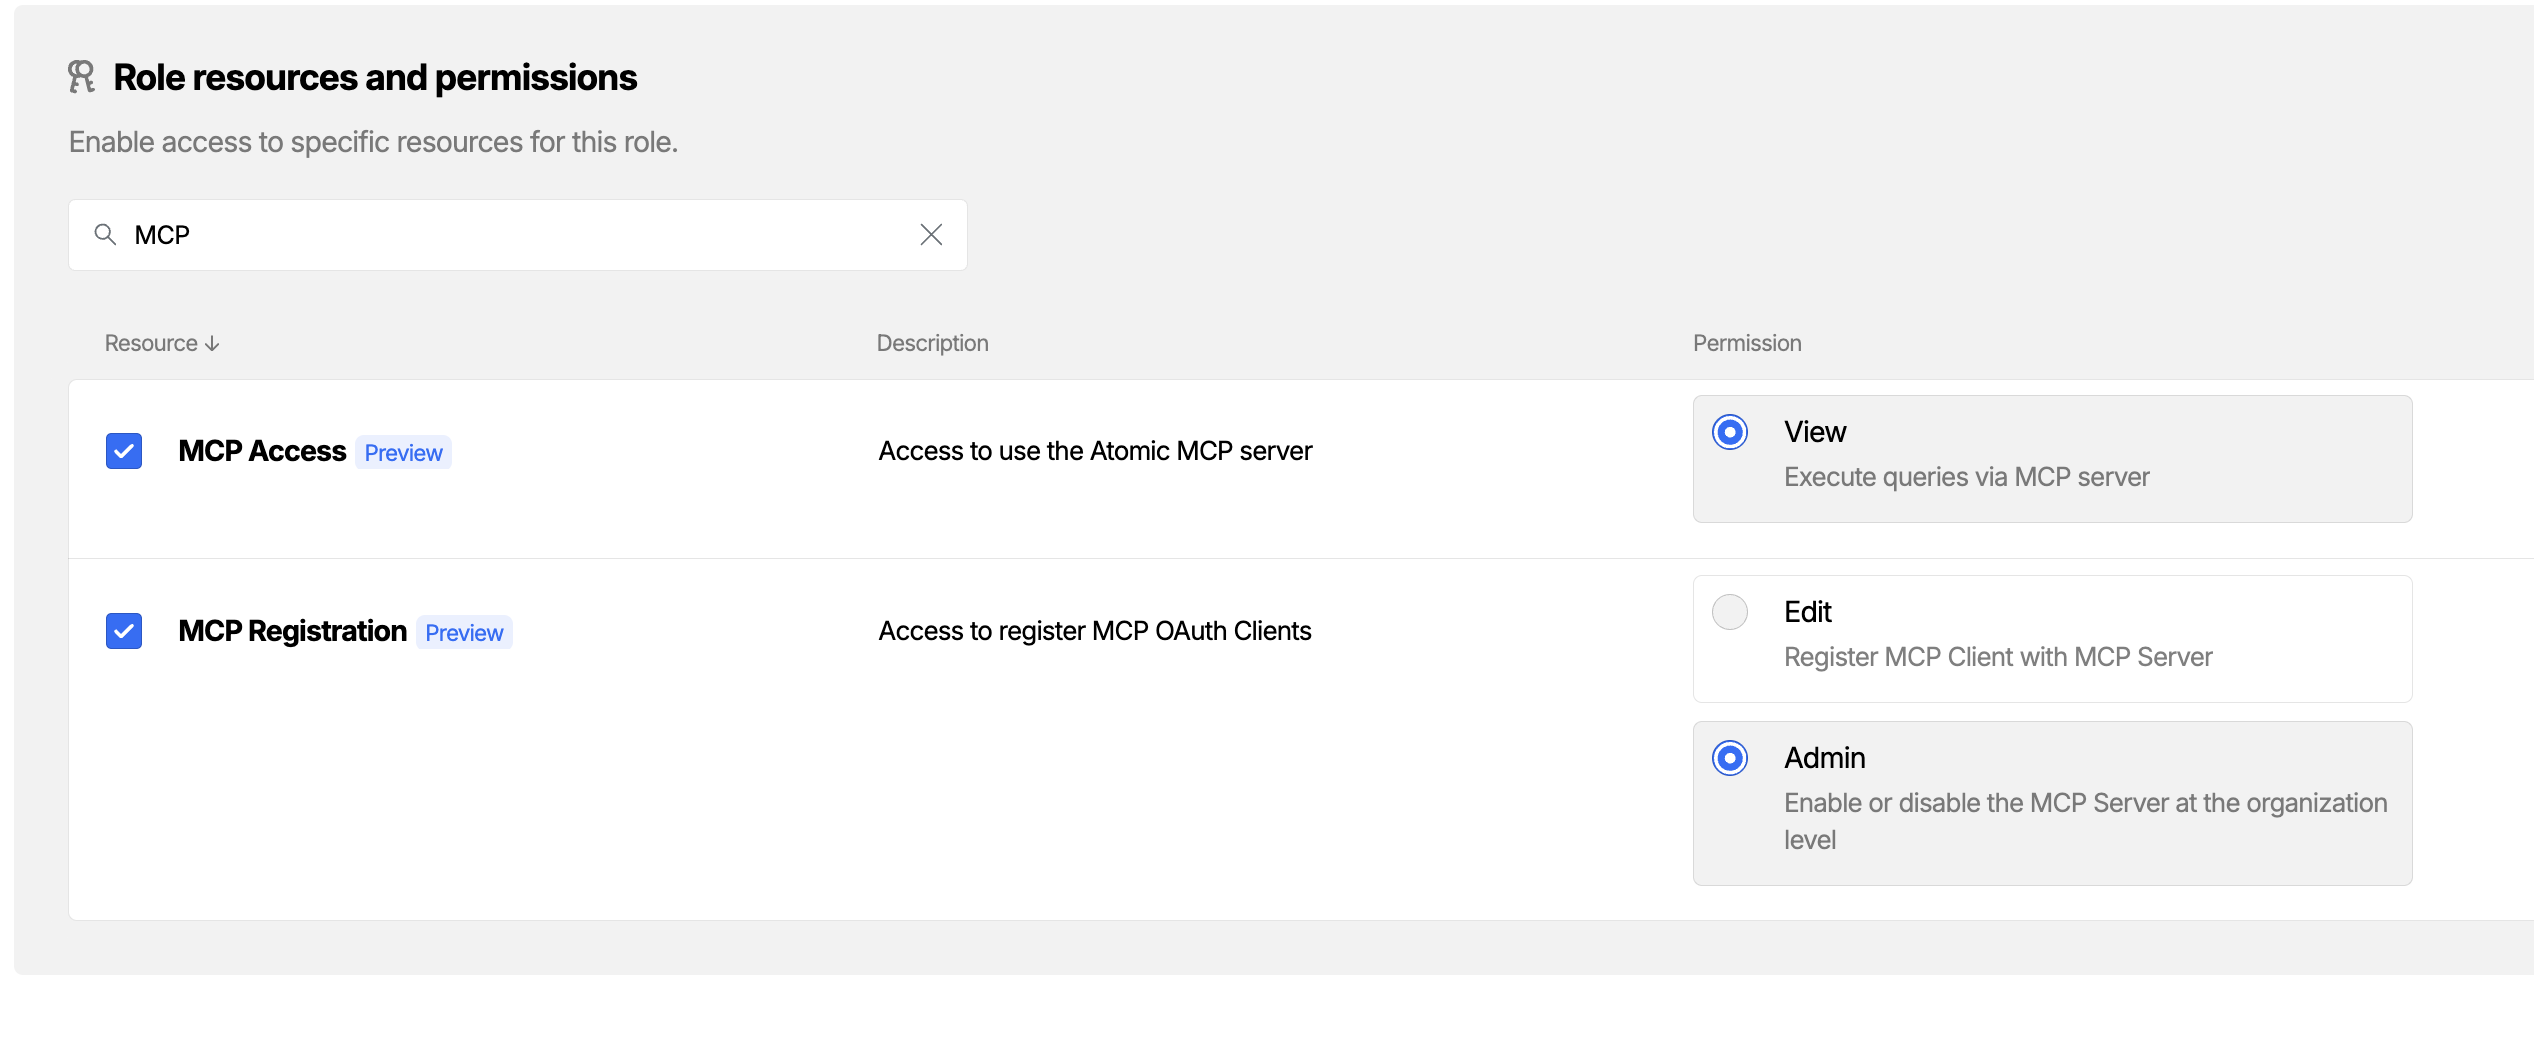
- MCP Registration - allows a user to register and connect an MCP client to your organization.
- MCP Access - allows a user to query Atomic data through a connected MCP client.
Both permissions must be assigned for a user to connect a client and retrieve data.
Access is controlled through three layers:
- Permissions are added to Roles.
- Roles are added to Groups.
- Users are assigned to Groups.
To give a user MCP access, ensure they belong to a Group whose Role includes both MCP permissions.
For more detail on permission levels, see the Permissions guide.
MCP permission levels
| Permission | What it allows |
|---|---|
| MCP Registration (Admin) | Enable or disable the MCP Server at the organization level, and register MCP clients |
| MCP Registration (Edit) | Register and connect MCP clients |
| MCP Access (Admin) | Manage MCP access settings and query Atomic data through a connected client |
| MCP Access (View) | Query Atomic data through a connected client |
Add the MCP permissions to an existing Role
Use this approach if you have an existing Role and Group that already covers the right set of users.
- In the Atomic Workbench, navigate to Organization > Workbench Members.
- Select Roles.
- Open the Role you want to update.
- Search for MCP in the permissions list.
- Add MCP Registration and set the appropriate level to Admin or Edit.
- Add MCP Access and set the appropriate level to Admin or Edit.
- Save the Role.
All users in any Group assigned this Role will now have MCP access.
Create a new Role with the MCP permissions
Use this approach if you want to be more selective, for example to grant MCP access to a subset of users who don't share a Role with others.
Step 1: create the Role
- In the Atomic Workbench, navigate to Organization > Workbench Members.
- Select Roles, then click Create a new Role.
- Give the Role a name (for example,
MCP Users). - Search for MCP in the permissions list.
- Add MCP Registration and set the appropriate level to Admin or Edit.
- Add MCP Access and set the appropriate level to Admin or Edit.
- Save the Role.
Step 2: assign the Role to a Group
- Select Groups and open an existing Group, or click Create a new Group.
- Add the Role you just created to the Group.
- Save the Group.
Step 3: add users to the Group
- Open the Group and add the users who should have MCP access.
Users added to this Group will now be able to connect an MCP client and query data from your organization.
Connect an MCP client
The MCP Server uses OAuth to authenticate. When you add it to a client for the first time, you will be redirected to sign in with your Atomic Workbench account and authorize access to your organization.
VS Code (GitHub Copilot)
-
Open the Copilot panel in VS Code and select the Agent mode dropdown (the model picker at the bottom of the chat input).
-
Click Add MCP Server, then choose HTTP.
-
Enter your MCP Server URL when prompted and give the server a name (e.g.
atomic).VS Code saves this to your workspace
.vscode/mcp.json, which will look like:{
"servers": {
"atomic": {
"url": "https://<your-org>.customer-api.atomic.io/mcp/v1",
"type": "http"
}
}
} -
Click Connect - VS Code will open a browser window to complete the OAuth flow. Sign in with your Atomic Workbench account and authorize access.
-
Once connected, the Atomic tools will appear in the Copilot agent tool list.
Microsoft Copilot Studio
- Open Copilot Studio and select your agent.
- Select the Tools page, then click Add a tool.
- Select New tool, then choose Model Context Protocol.
- Fill in the details:
- Server name - for example,
Atomic - Server description - for example,
Access Atomic Action Flows and customer data - Server URL - paste your MCP Server URL from the Atomic Workbench
- Server name - for example,
- Under Authentication, select OAuth 2.0, then choose Dynamic discovery.
- Click Create. Copilot Studio will discover the authentication configuration automatically from the server.
- Click Add to agent to finish.
When a user runs the agent for the first time, they will be prompted to sign in with their Atomic Workbench account to authorize access.
Claude for Work (Teams / Enterprise)
Setup is split into two stages: an admin adds the connector once for the organization, then each user connects their own Atomic Workbench account.
Adding an organization connector requires admin access to your Claude for Work organization. You can also see Anthropic's Get started with custom connectors using remote MCP.
Step 1: admin setup
To make the MCP server available for all users in your Claude organization.
- In the Claude admin console, select Connectors under Libraries & Access.
- Click Add > Custom > Web. The Add custom connector dialog opens.
- In Name, enter a name for the connector. Include your Atomic organization ID or name, because the MCP URL is scoped to a single organization (for example,
Atomic - acme-corp). - In Remote MCP server URL, paste your MCP Server URL from the Atomic Workbench.
- Click Continue, then follow the remaining prompts to finish adding the connector.
Step 2: user setup
To connect your own account once an admin has added the connector.
- In Claude, navigate to Customize > Connectors. If the connector does not appear immediately, close and reopen the app or refresh the browser.
- Find the Atomic connector and click Connect.
- Complete the OAuth flow to sign in with your Atomic Workbench account.
Once authenticated, the Atomic tools are available in your Claude chats.
Claude Code
Run the following command in your terminal, replacing the URL with your MCP Server URL from the Atomic Workbench:
claude mcp add --transport http atomic https://<your-org>.customer-api.atomic.io/mcp/v1
The --transport http flag configures the server to use Streamable HTTP transport. The third argument (atomic) is the name you give the server. You can change it to any name you prefer.
When you next use Claude Code, it will complete an OAuth flow to authenticate with your Atomic Workbench account and authorize access to your organization.
Available tools
Once connected, your AI assistant has access to the following Atomic tools.
Environments and Action Flows
- list_environments - lists all active environments in your organization, with their IDs and Workbench links.
- list_action_flows - lists all Action Flows in an environment, with their IDs, Workbench links, and approval status. Approval status is only returned when approvals are enabled for the environment.
- get_action_flow_analytics - aggregates analytics events for Action Flows and cards. Filter by Action Flow, card template, customer, event name, and time range. The window can reach back 30 days, and defaults to the last 7.
Customers and segments
- get_user_profile - looks up a single customer profile by external ID, including their tags and custom profile fields.
- get_user_segment_membership - checks whether a customer is currently a member of a segment.
- list_segments - lists all customer segments defined in an environment.
Environment configuration
- list_custom_events - lists all custom events registered in an environment.
- list_stream_containers - lists the enabled stream containers in an environment, with their assigned stream and themes, card limit, and the SDK data last seen for each.
- list_notification_platforms - lists the push notification platforms configured for an environment. Filter by platform ID, app ID or bundle identifier, or platform type.
Theming
- list_themes - lists all themes in an environment, and which of them is the default.
- get_theme - fetches a theme by ID, returning its named variables, the compiled values the SDKs actually render, and the raw payload when the theme uses variables.
- describe_theme_elements - explains the shape of a theme payload, mapping the components you see in the theme editor to their payload paths and value types.
Documentation
- documentation_embedded_search - searches this documentation for material relevant to a question.
Each tool that reads your organization's data respects your Workbench permissions. If you don't have view access to a resource, the tool returns a message indicating no access rather than returning data. documentation_embedded_search is the exception, since it only searches this public documentation.
One organization per connection
Each MCP Server connection gives access to a single Atomic organization. If you have access to multiple Atomic organizations, add a separate MCP server entry for each one using that organization's unique MCP Server URL.
Troubleshooting
I don't see the Enable MCP Server toggle.
You may not have permission to manage organization preferences. Ask your Atomic organization owner to enable the MCP Server or to grant you the required permission.
I can authenticate but receive an authorization error when connecting an MCP client.
Your account may be missing the MCP Registration or MCP Access permission (or both). Ask your organization owner to add both permissions to a Role in a Group you belong to. See Grant user access for details.
VS Code shows an authentication error when connecting.
If the connection fails after a previous successful authentication, your cached credentials may be stale. Open the VS Code Command Palette and run Authentication: Remove Dynamic Authentication Providers, then reconnect and complete the OAuth flow again.
The AI assistant reports no access to a tool.
Each tool checks your Workbench permissions before returning data. If you lack view access for a resource in a given environment, the tool returns a no-access message. Contact your organization owner to review your role and permissions.
I enabled the MCP Server but the URL is not visible.
Try refreshing the page. The URL is displayed after the toggle is saved successfully.
A registered client shows "MCP Disabled" status.
This means the MCP Server toggle has been turned off at the organization level. Any registered OAuth clients lose access when the MCP Server is disabled. Re-enable the toggle to restore access.