Triggering Atomic from Customer.io
This guide covers both directions of a round-trip between Customer.io and Atomic.
- Customer.io to Atomic: start an Action Flow when a customer reaches a step in a journey.
- Atomic to Customer.io: record what the customer did with the card, so the journey can react to it, or it can be stored for later use.
How it works
Customer.io's Send Data action is a general purpose webhook. Atomic's Webhook trigger is a general purpose inbound endpoint with a payload mapper. The two can be connected to trigger Atomic Action Flows.
Customer.io signs every webhook with an HMAC-SHA256 signature, and Atomic's signed request verification can be configured to check that signature. This means you get an authenticated connection.
To follow the steps in this guide, you will need:
In Atomic:
- Edit-level permissions in your Atomic environment, so you can add and configure a Webhook trigger on an Action Flow.
- For the return leg, a Customer.io credential holding a Customer.io App API key.
In Customer.io:
- Permission to edit automations or broadcasts in the workspace. Note that automations were previously called campaigns in Customer.io.
- Access to Settings > Workspace Settings > API & Webhook Credentials, to read your webhook signing key.
Before you start: match your customer identifiers
Atomic's Webhook trigger targets customers using targetUserIds, and that value must be the ID that Atomic knows the customer by. Customer.io needs to send an ID that Atomic recognizes.
There are two options:
- Your identifiers already match. If the
idyou use to identify people in Customer.io is the same ID you use for customers in Atomic, you can send{{customer.id}}. This is common when both systems are fed from the same internal customer record. - Store the Atomic ID as a Customer.io attribute. If the identifiers differ, add the Atomic customer ID to each Customer.io profile as a custom attribute, for example
atomic_id, and send{{customer.atomic_id}}instead.
If you are not sure which applies to you, check a single customer in both systems and compare. Getting this wrong produces requests that are accepted but match no customer.
Click your avatar in the bottom left of the Atomic Workbench and select Copy my test customer ID. Use this value while testing so the cards come to you.
Part 1: Triggering Action Flows from Customer.io
Step 1: Add a Webhook trigger in Atomic
In the Atomic Workbench:
- Open the Action Flow you want Customer.io to trigger, or create a new one.
- Add a Webhook trigger to the canvas. Atomic generates a unique inbound URL. Copy this, you will need it in Customer.io.
- Leave the trigger in Test mode. It stays in Test mode until you have finished testing and are ready to generate live cards.
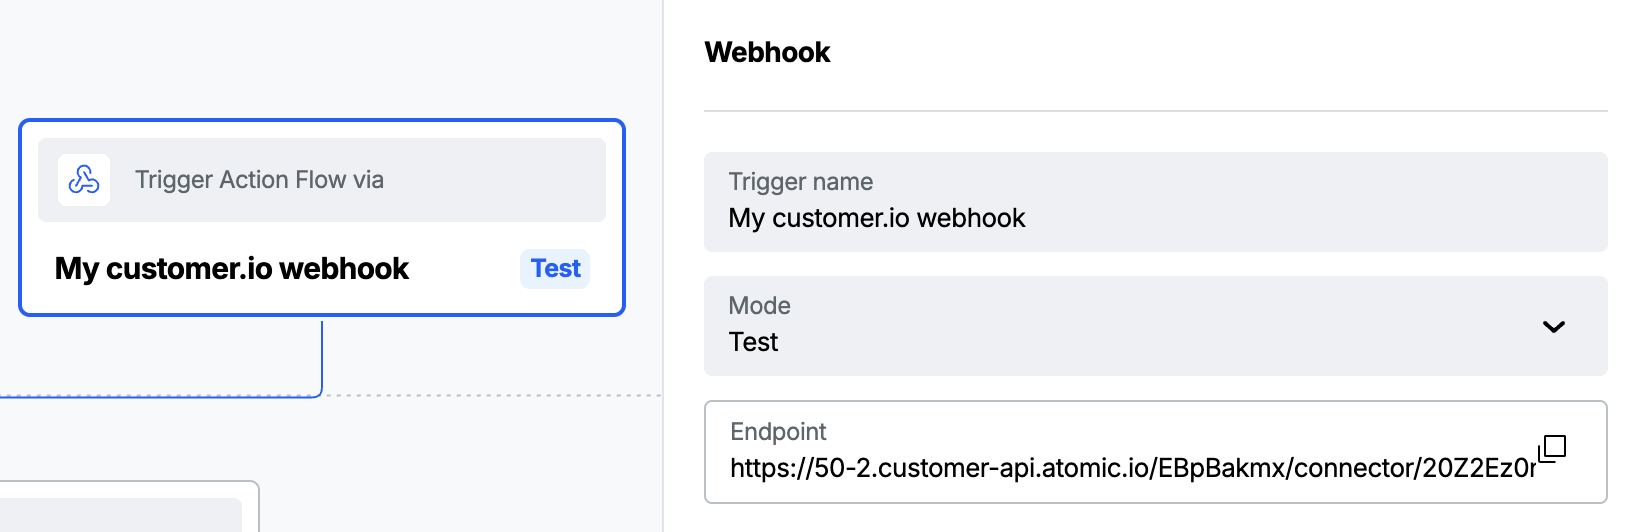
The endpoint follows this shape, where the final segment is a secret:
https://<my-org>.customer-api.atomic.io/<my-env>/connector/<flow-id>/<secret>
Anyone holding the full URL can trigger your Action Flow if you don't configure request verification. Store it somewhere safe, keep it out of tickets and screenshots, and recreate the trigger if you think it has been exposed.
See Webhook triggers for full details on configuration and Test versus Live mode.
Step 2: Add a Send Data action in Customer.io
In Customer.io, open the Automation or broadcast you want to trigger from, and add a Send Data action at the point in the workflow where the card should be sent.
Configure it as follows:
- Set the method to POST and paste your Atomic Webhook trigger URL.
- Leave the Content-Type header as
application/json. - In the body, build a payload in the shape Atomic expects.
Atomic accepts the following shape directly, so if you build it in Customer.io you do not need any mapping on the Atomic side:
{
  "targetUserIds": ["{{customer.atomic_id | strip}}"],
  "flowInvocationId": "renewal-{{customer.atomic_id | strip}}-{{customer.policy_id | strip}}",
  "variables": {
    "firstName": "{{customer.first_name | escape | strip}}",
    "renewalDate": "{{customer.renewal_date | escape | strip}}",
    "premiumAmount": "{{customer.premium_amount | escape | strip}}"
  }
}
Only targetUserIds is required. The variables object maps onto the context variables in your Action Flow, and flowInvocationId protects you against duplicate sends, which is covered in Stop duplicate sends below.
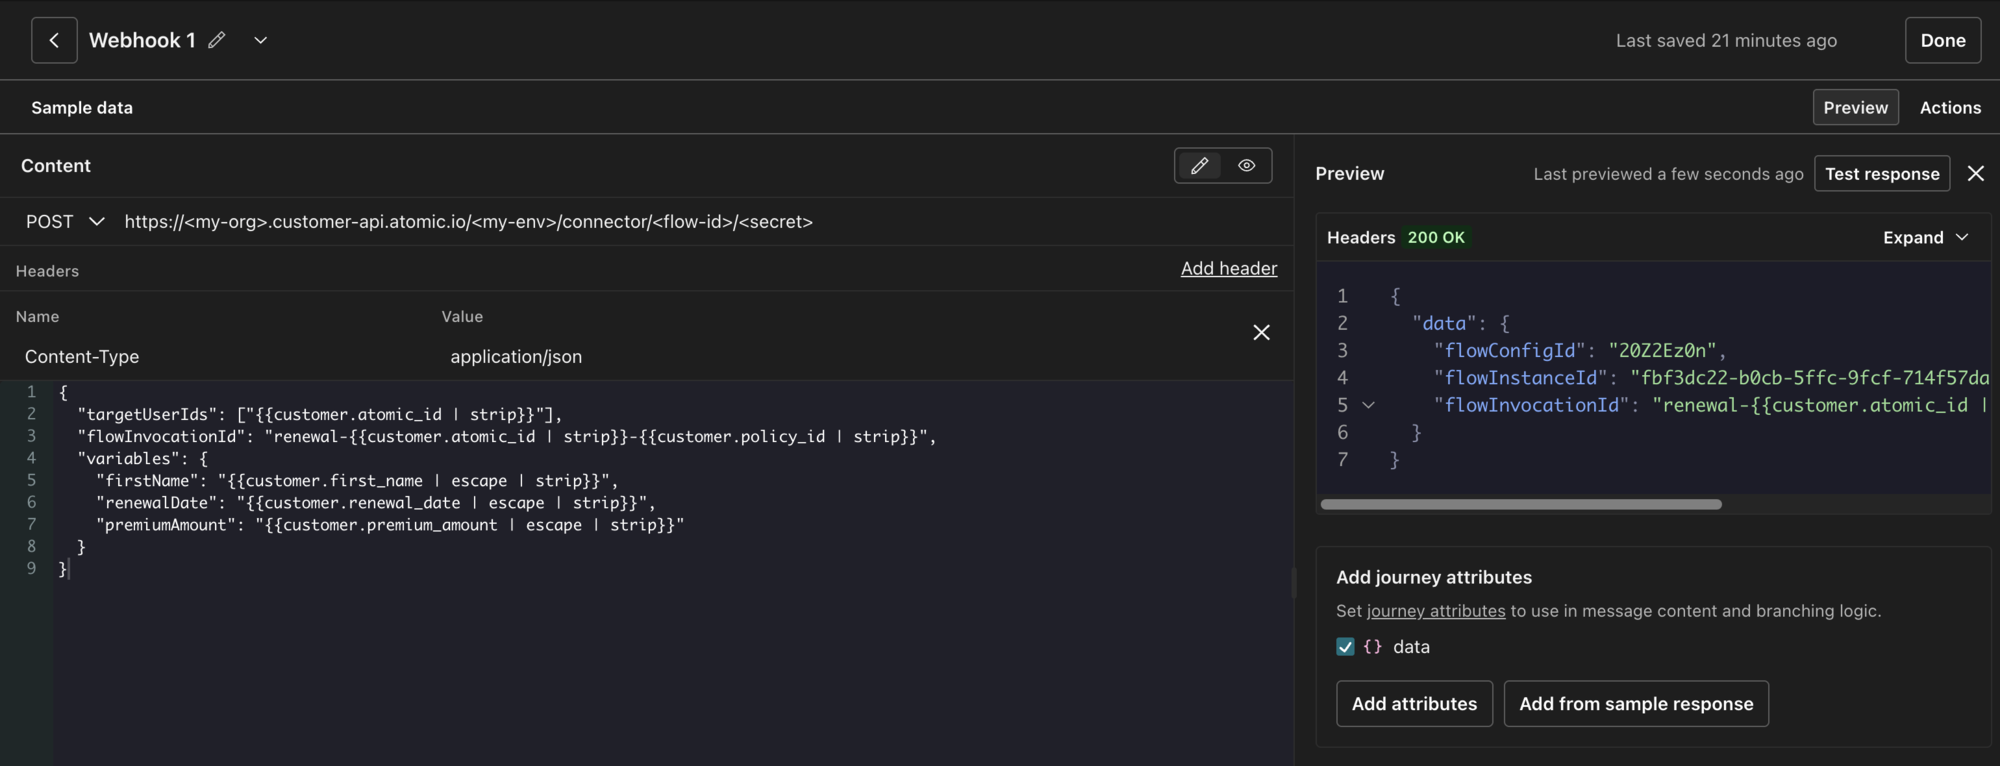
Use the Preview panel to check your work before saving. A successful call returns 200 OK with a data object describing the Action Flow that started, as shown above.
Each customer who reaches this step generates one request. Customer.io does not batch journey members into a single call, so if you are adding this to a broadcast that targets a large segment, expect a request per customer rather than one bulk request.
Step 3: Map the payload, if you need to
If you built the body in Atomic's shape as shown above, skip this step.
You may prefer to keep the Customer.io body simple and let Atomic do the transforming, particularly if several journeys post slightly different payloads to the same trigger. In that case, send whatever shape suits you:
{
  "atomic_id": "{{customer.atomic_id | strip}}",
  "policy": "{{customer.policy_id | strip}}",
  "renews_on": "{{customer.renewal_date | strip}}"
}
Then map it in Atomic:
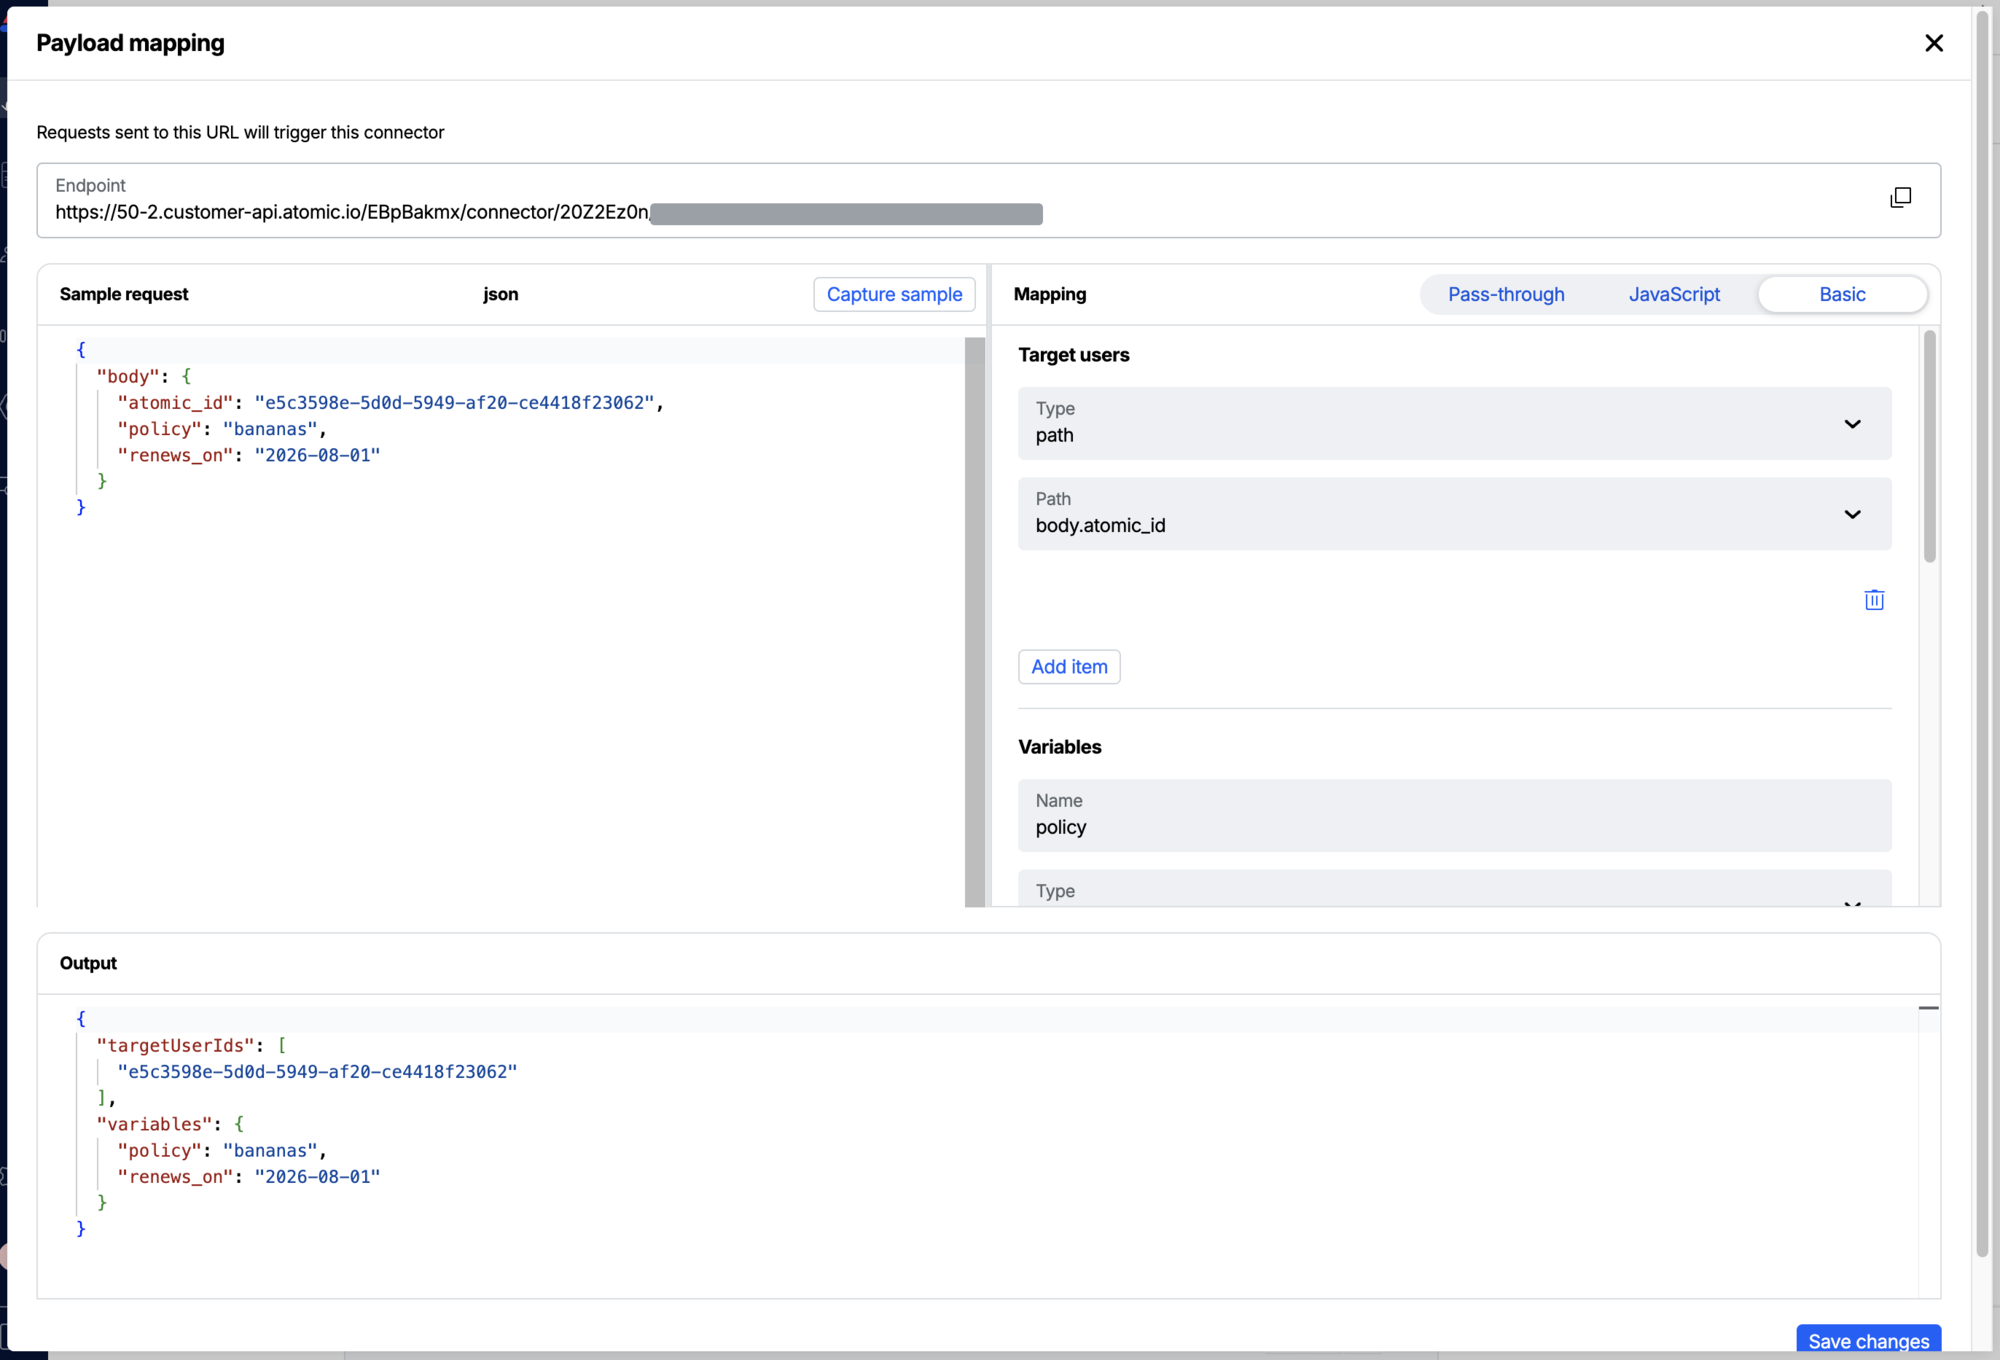
- Select the Webhook trigger on the canvas and click Edit payload mapping.
- Click Get new sample, then send a test from Customer.io. The first attempt fails because no mapping exists yet, but it populates the Sample payload body field.
- With Basic selected, set the target user Type to
pathand the Path tobody.atomic_id. Atomic namespaces the incoming request body underbody, so your fields are addressed asbody.<field>. Map the remaining fields to your Action Flow variables the same way. For anything more involved, switch to the JavaScript option.
The Output panel at the bottom shows the result of your mapping, so you can confirm it produces the targetUserIds and variables Atomic expects before saving.
Step 4: Secure the connection
The trigger URL contains a hard-to-guess token, so on its own it acts as a shared secret. That is a reasonable baseline, but it offers no protection against a replayed or tampered request. Add one or both of the following.
Verify signed requests
Customer.io signs every webhook with an HMAC-SHA256 signature over the string v0:<timestamp>:<body>, sending the result in an X-CIO-Signature header alongside an X-CIO-Timestamp header. Atomic can verify this directly.
- In Customer.io, go to Settings > Workspace Settings > API & Webhook Credentials and open the Webhook signing keys tab. Copy the signing key.
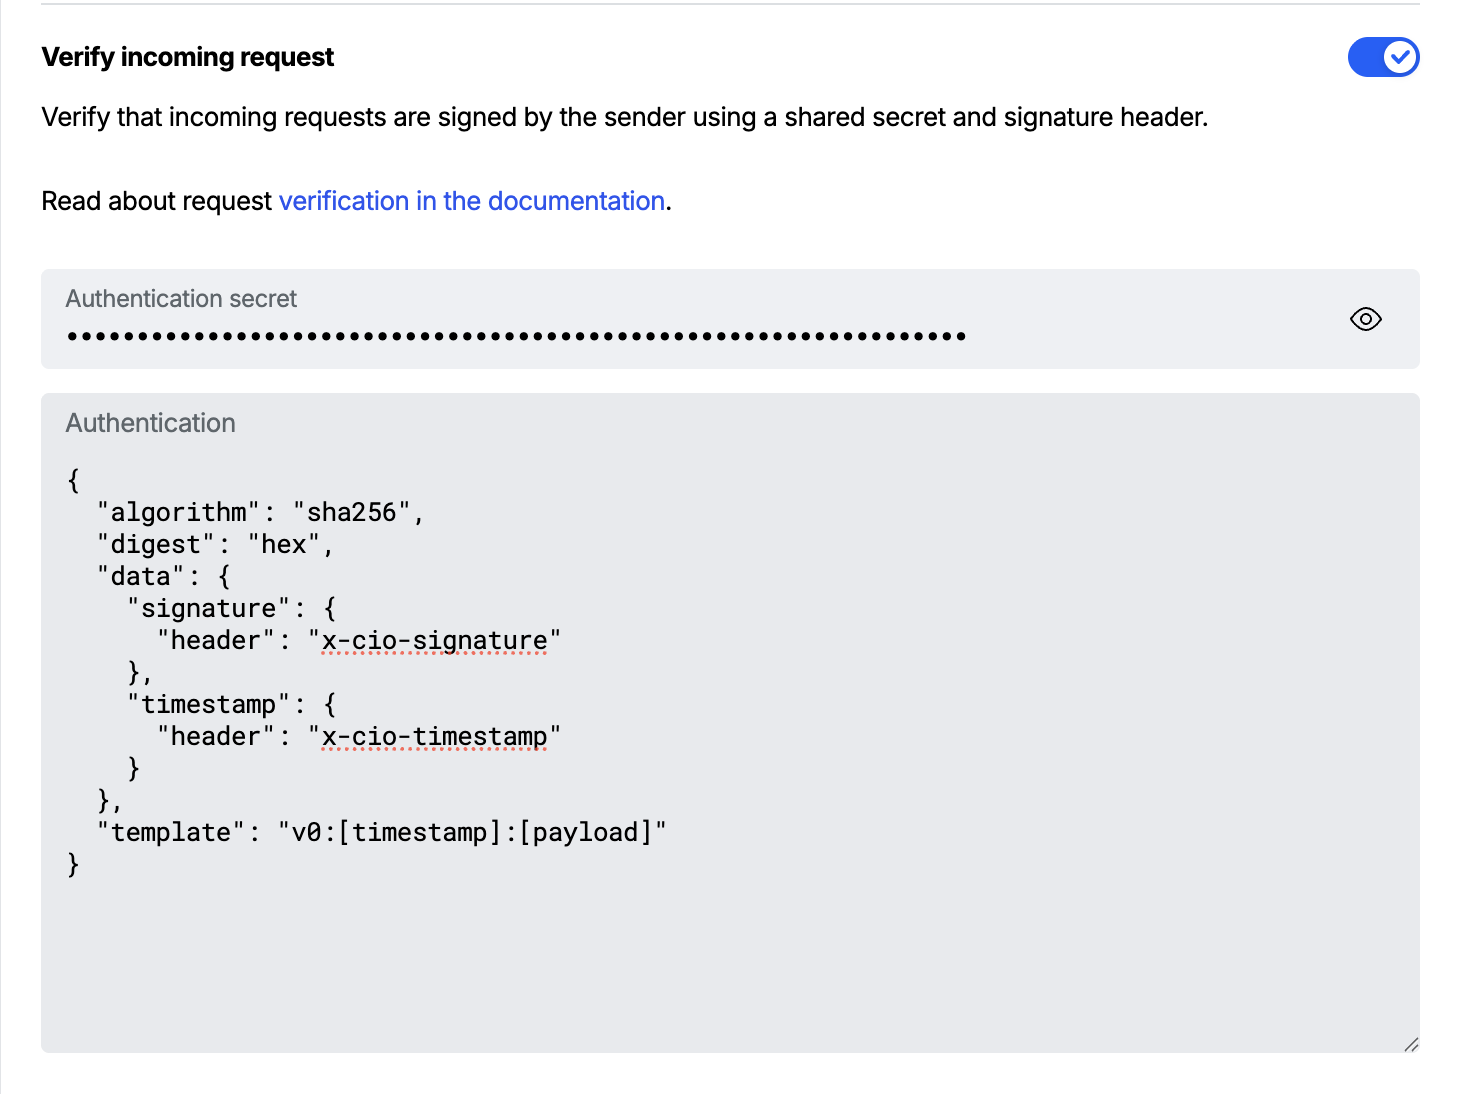
- In Atomic, select the Webhook trigger, and under Verify incoming request paste the signing key into Authentication secret.
- In the Authentication field, enter the following configuration:
{
  "algorithm": "sha256",
  "digest": "hex",
  "data": {
    "signature": {
      "header": "x-cio-signature"
    },
    "timestamp": {
      "header": "x-cio-timestamp"
    }
  },
  "template": "v0:[timestamp]:[payload]"
}
Atomic replaces [timestamp] with the value from the X-CIO-Timestamp header and [payload] with the raw request body, then hashes the result with your signing key and compares it to the X-CIO-Signature header. Because Customer.io puts the signature and the timestamp in separate headers, no parsePrefix is needed.
Allowlist Customer.io's IP addresses
Atomic can reject requests that do not originate from an expected IP address. Customer.io publishes the outbound IP addresses it uses for webhooks, with separate lists for its US and EU regions. Add the list for your Customer.io region to the trigger's IP allowlist.
Treat this as ongoing maintenance rather than a one-time task. Customer.io maintains these lists over time and does not guarantee that they are permanently static, so check the Customer.io IP addresses page periodically. If the list is left empty, requests from any IP address are allowed.
Stop duplicate sends
Customer.io retries a failed webhook up to 11 times over roughly an hour, for responses of 408, 409, 429, or any 5xx, and it times a request out after 16 seconds. Without protection, a slow response followed by a retry could send the same customer two cards.
Atomic guards against this with flowInvocationId, an idempotency key. If Atomic sees the same flowInvocationId twice with the same payload, it recognizes the second request as a duplicate rather than starting another Action Flow.
Build the value from attributes that identify this particular send (this will vary based on your own use-cases), for example:
"flowInvocationId": "renewal-{{customer.atomic_id | strip}}-{{customer.policy_id | strip}}"
Two rules make this work well:
- Keep it deterministic. The value must come out the same on a retry as it did on the first attempt. Avoid anything time-based, such as a rendered timestamp, because a retry would produce a different value and defeat the protection.
- Keep it unique per intended send. If you include only the customer ID, a customer who legitimately re-enters the journey later will be treated as a duplicate and receive nothing. Include something that changes between genuine sends, such as a policy number, order ID, or renewal date.
If the same flowInvocationId arrives with a different payload, Atomic rejects the request with a 422 response rather than guessing which version you meant. Customer.io does not retry 422 responses, so a rejected duplicate will not loop.
Also consider the Action Flow's participation mode, which controls whether a customer can be in the same Action Flow more than once. It works alongside the idempotency key rather than replacing it.
Step 5: Test and go live
- With the Atomic trigger in Test mode, use Customer.io's preview and test tooling to send a request, targeting your own Atomic test customer ID. Only test customers can receive test cards, so a real customer ID will be ignored here by design.
- Confirm the request arrives, the signature verifies, and the mapping produces the result you expect. Test cards and analytics are clearly marked as tests.
- When you are happy, publish the Action Flow and switch the Webhook trigger to Live mode so incoming requests generate live cards.
Part 2: Sending data back to Customer.io
Triggering a card is only half the loop. The reason to send a card is to get a response, and Customer.io needs to know what that response was before the journey can react to it.
Atomic ships pre-configured Customer.io steps for exactly this, so no custom HTTP requests are needed. See Action Flow steps for the full list, which also includes identifying users and reading attributes and segments.
Report the outcome with a Track event step
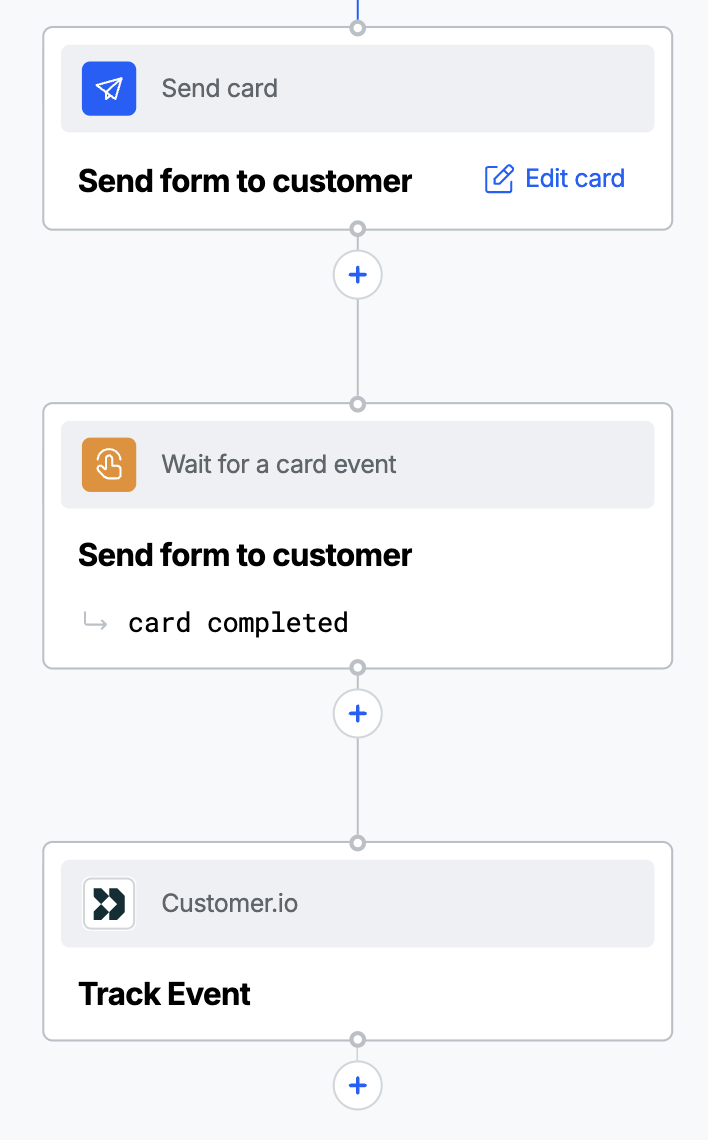
To report an outcome, your Action Flow needs to wait for the customer to act on the card first, then send the event:
- After your Send card step, add a Wait for a card event step and set it to the event you care about, such as
card completed. This holds the Action Flow until the customer acts. - Add a Customer.io > Track Event step after it, and select your Customer.io credential. If you have not created one yet, see Integrations and credentials.
- Set the event name to something the journey can wait for, such as
atomic_card_completed. - Add any properties worth recording, such as which option the customer chose, using values from your Action Flow context.
Back in Customer.io, the journey can then use a Wait until condition or a segment built on that event to decide what happens next. A common pattern is to have the journey wait for the Atomic event for a few days, continue down a "completed" path if it arrives, and fall back to another channel if it does not.
Capture Atomic's response in the journey
Customer.io can also store what Atomic returns from the original webhook call. A successful trigger responds with a data object describing the Action Flow that started:
{
  "data": {
    "flowConfigId": "20Z2Ez0n",
    "flowInstanceId": "fbf3dc22-b0cb-5ffc-9fcf-714f57da0f11",
    "flowInvocationId": "renewal-e5c3598e-5d0d-5949-af20-ce4418f23062-bananas"
  }
}
In the Send Data action's Preview panel, use Add journey attributes and tick data to save it. You can then reference values with dot notation, such as data.flowInvocationId. This gives you a direct link between a journey member and the Atomic Action Flow run they triggered, which is useful when investigating an individual customer.
Journey attributes are scoped to the journey and are removed when it ends. If you need the value to persist on the profile, save it as a customer attribute instead.
Monitoring progress
Once the integration is live, each system shows you a different half of the picture.
- In Customer.io, the workflow view reports how many customers reached the webhook action and how many requests succeeded or failed. A cluster of failures here usually points at the request itself, such as malformed JSON or a signature mismatch.
- In Atomic, the Runs tab shows each Action Flow run that started, with the variables it received. This is the fastest way to confirm that a Customer.io request produced the result you intended.
- The Audit log records rejected requests along with the reason, which is where to look when Customer.io reports a failure but nothing appears in Atomic.
- Card analytics report what customers did with the cards themselves. See Reporting.
Troubleshooting
Customer.io reports a 401 and Atomic rejects the signature
Check these in order:
- The signing key. Webhook actions use the key from Settings > Workspace Settings > API & Webhook Credentials > Webhook signing keys within Customer.io. This is a different value from the Reporting Webhooks signing secret.
- The template. It must be exactly
v0:[timestamp]:[payload], including thev0:prefix and both colons. - The header names. Both must be lowercase:
x-cio-signatureandx-cio-timestamp.
Requests succeed, but no cards are sent
The most likely cause is an identifier mismatch. Atomic accepts the request, finds no customer matching the targetUserIds value, and starts nothing. Compare the value Customer.io sends against the customer ID in Atomic, and review Before you start.
If the Atomic webhook trigger is in Test mode, this is also expected for any customer who is not a registered test customer. Test triggers only reach test customers.
The same customer received two cards
Add a flowInvocationId to the payload if you have not already, and check that its value is deterministic. See Stop duplicate sends.
A customer who should have received a card got nothing the second time
Your flowInvocationId may be too broad. If it is built only from the customer ID, the second genuine send looks identical to the first and is treated as a duplicate. Include a value that differs between sends, such as an order or policy number.
Can I trigger an Action Flow using a customer's email address?
No. Webhook triggers target customers by targetUserIds only. If Customer.io identifies people by email but Atomic does not, store the Atomic customer ID on the Customer.io profile as an attribute and send that instead.
Can I trigger an Action Flow from an email bounce or unsubscribe?
Yes, though through a different mechanism. Those account-level messaging events come from Customer.io's Reporting Webhooks rather than from a journey step. They are signed with the same v0:<timestamp>:<body> scheme, so the same Atomic authentication configuration works. Point a Reporting Webhook at an Atomic Webhook trigger URL and map the payload, remembering that its shape is set by Customer.io, so you will need a mapping in Atomic to extract the customer identifier from the event's data object.