Triggering Atomic from Snowflake
Snowflake can call out to Atomic when data in your warehouse meets a condition you care about, for example; a balance threshold is crossed, a new statement is ready, or a risk score changes. This tutorial describes how to make Snowflake send an HTTP request to an Atomic Webhook trigger so that those events start an Action Flow and deliver cards to your customers.
To follow the steps in this tutorial, you will need:
- Edit-level permissions in your Atomic environment so you can add and configure a Webhook trigger on an Action Flow.
- A Snowflake account with privileges to create a network rule, an external access integration, a secret, and a stored procedure (typically
ACCOUNTADMIN, or a role granted the relevantCREATEprivileges), plus the ability to create the Task or Alert that runs the procedure.
How it works
The integration uses a capability on each side:
- Snowflake external network access: A Python stored procedure makes an outbound HTTPS
POSTto Atomic. To allow this, you create a network rule that permits egress to Atomic's host and an external access integration that the procedure references. The procedure is run from a Snowflake Task or Alert. - Atomic Webhook trigger: an Action Flow trigger that exposes a unique inbound URL and a payload mapper that transforms the incoming request into the shape Atomic needs (
targetUserIds,variables, and so on).
Because Atomic's payload mapper handles the transformation, you don't need Snowflake to match Atomic's API schema. Keep the Snowflake payload simple and shape it inside Atomic.
Snowflake Task / Alert
        │  CALL send_to_my_atomic_webhook(...)
        ▼
Python stored procedure ──(external access integration)──► outbound HTTPS POST
        │                                                          │
        └── network rule permits egress to Atomic's host           ▼
                                              Atomic Webhook trigger URL
                                                          │  payload mapping
                                                          ▼
                                                    Action Flow → cards
Snowflake also offers a NOTIFICATION INTEGRATION of type WEBHOOK, but its WEBHOOK_URL is restricted to Slack, Microsoft Teams, and PagerDuty hosts, so it can't POST to an Atomic URL. To call an arbitrary endpoint like Atomic, use external network access, which is what this guide uses.
Step 1: Add a Webhook trigger in Atomic
In the Atomic Workbench:
- Open the Action Flow you want Snowflake to trigger (or create a new Action Flow).
- Add a Webhook trigger to the canvas. Atomic generates a unique inbound URL, copy this for use in Snowflake.
- (Optional, but recommended) Add security controls to the trigger, see Securing the webhook below.
- Leave the trigger in Test mode for now. It stays in Test mode until you've finished testing and are ready to generate live cards.
See Webhook triggers for full details on configuration, security, and Test vs. Live mode.
Step 2: Allow outbound access to Atomic from Snowflake
In Snowflake: create a network rule that permits egress to your Atomic host, store the trigger URL as a secret so it stays out of your procedure code, then bundle both into an external access integration.
-- 1. Permit egress to your Atomic host (use your environment's host)
CREATE OR REPLACE NETWORK RULE atomic_webhook_rule
  MODE = EGRESS
  TYPE = HOST_PORT
  VALUE_LIST = ('<your-org-id>.customer-api.atomic.io');

-- 2. Store the full Atomic trigger URL (it contains a hard-to-guess token) as a secret
CREATE OR REPLACE SECRET my_atomic_webhook_url
  TYPE = GENERIC_STRING
  SECRET_STRING = 'https://<your-org-id>.customer-api.atomic.io/<...>/connector/<...>';

-- 3. Allow procedures to use the rule and the secret
CREATE OR REPLACE EXTERNAL ACCESS INTEGRATION atomic_access_int
  ALLOWED_NETWORK_RULES = (atomic_webhook_rule)
  ALLOWED_AUTHENTICATION_SECRETS = (my_atomic_webhook_url)
  ENABLED = TRUE;
Step 3: Create a stored procedure that posts to Atomic
Because the handler is just Python, the procedure can query Snowflake and build the payload itself, including a JSON array of users for a batched request, rather than receiving a fixed string.
This Python stored procedure reads the trigger URL from the secret and POSTs a JSON payload to Atomic. Add it in Snowflake and adjust as per your own needs.
CREATE OR REPLACE PROCEDURE send_to_my_atomic_webhook(payload STRING)
  RETURNS STRING
  LANGUAGE PYTHON
  RUNTIME_VERSION = 3.12
  PACKAGES = ('snowflake-snowpark-python', 'requests')
  EXTERNAL_ACCESS_INTEGRATIONS = (atomic_access_int)
  SECRETS = ('atomic_url' = my_atomic_webhook_url)
  HANDLER = 'send'
AS $$
import _snowflake
import requests

def send(session, payload):
    url = _snowflake.get_generic_secret_string('atomic_url')
    resp = requests.post(
        url,
        data=payload,
        headers={'Content-Type': 'application/json'},
    )
    return f'{resp.status_code}: {resp.text}'
$$;
You can call it directly from Snowflake to test:
CALL send_to_my_atomic_webhook('{"targetUserId": "user-123", "balance": 1500}');
You can get your Atomic test customer ID by going to the bottom left of the Atomic Workbench, clicking on the user avatar and selecting "Copy my test customer ID".
Replace user-123 above with your test ID to target yourself for the test send.
To map this payload in the Atomic workbench, in your webhook trigger settings click "Get new sample" before sending the test in Snowflake, the first test will fail due to missing mapping, but will populate the "Sample payload body" in Atomic.
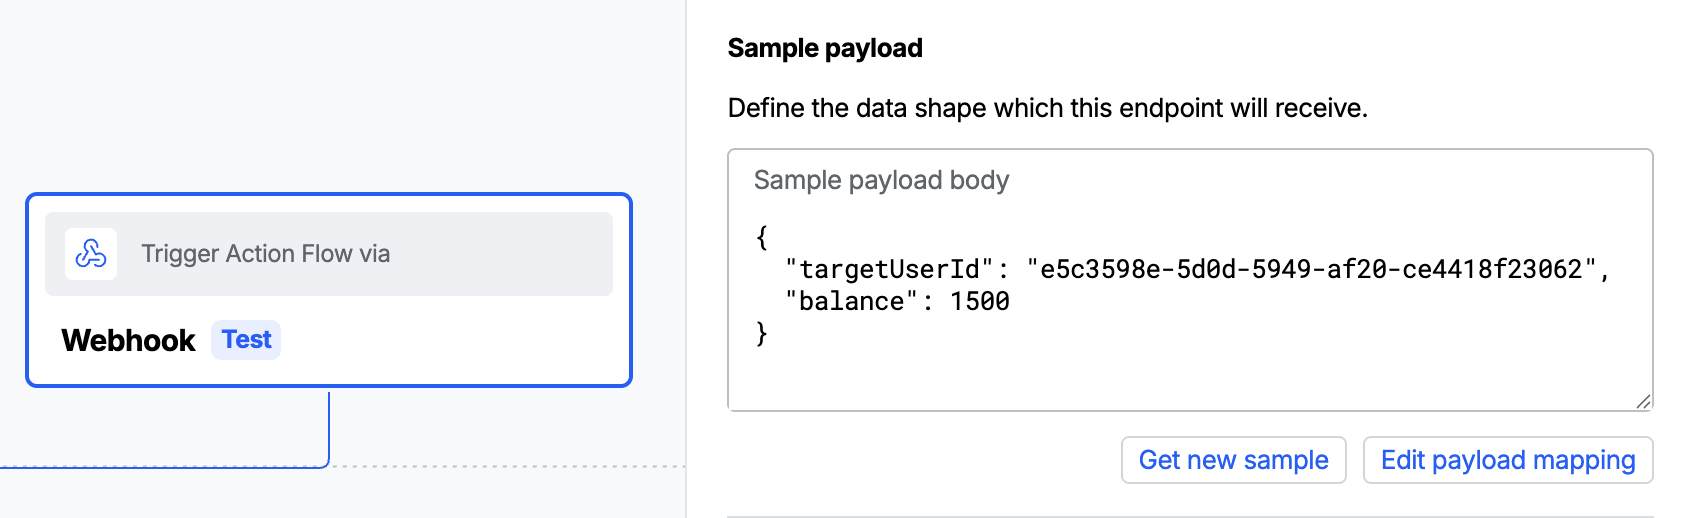
Next, create a basic mapping to get the target Atomic ID and place balance in to an Action Flow variable.
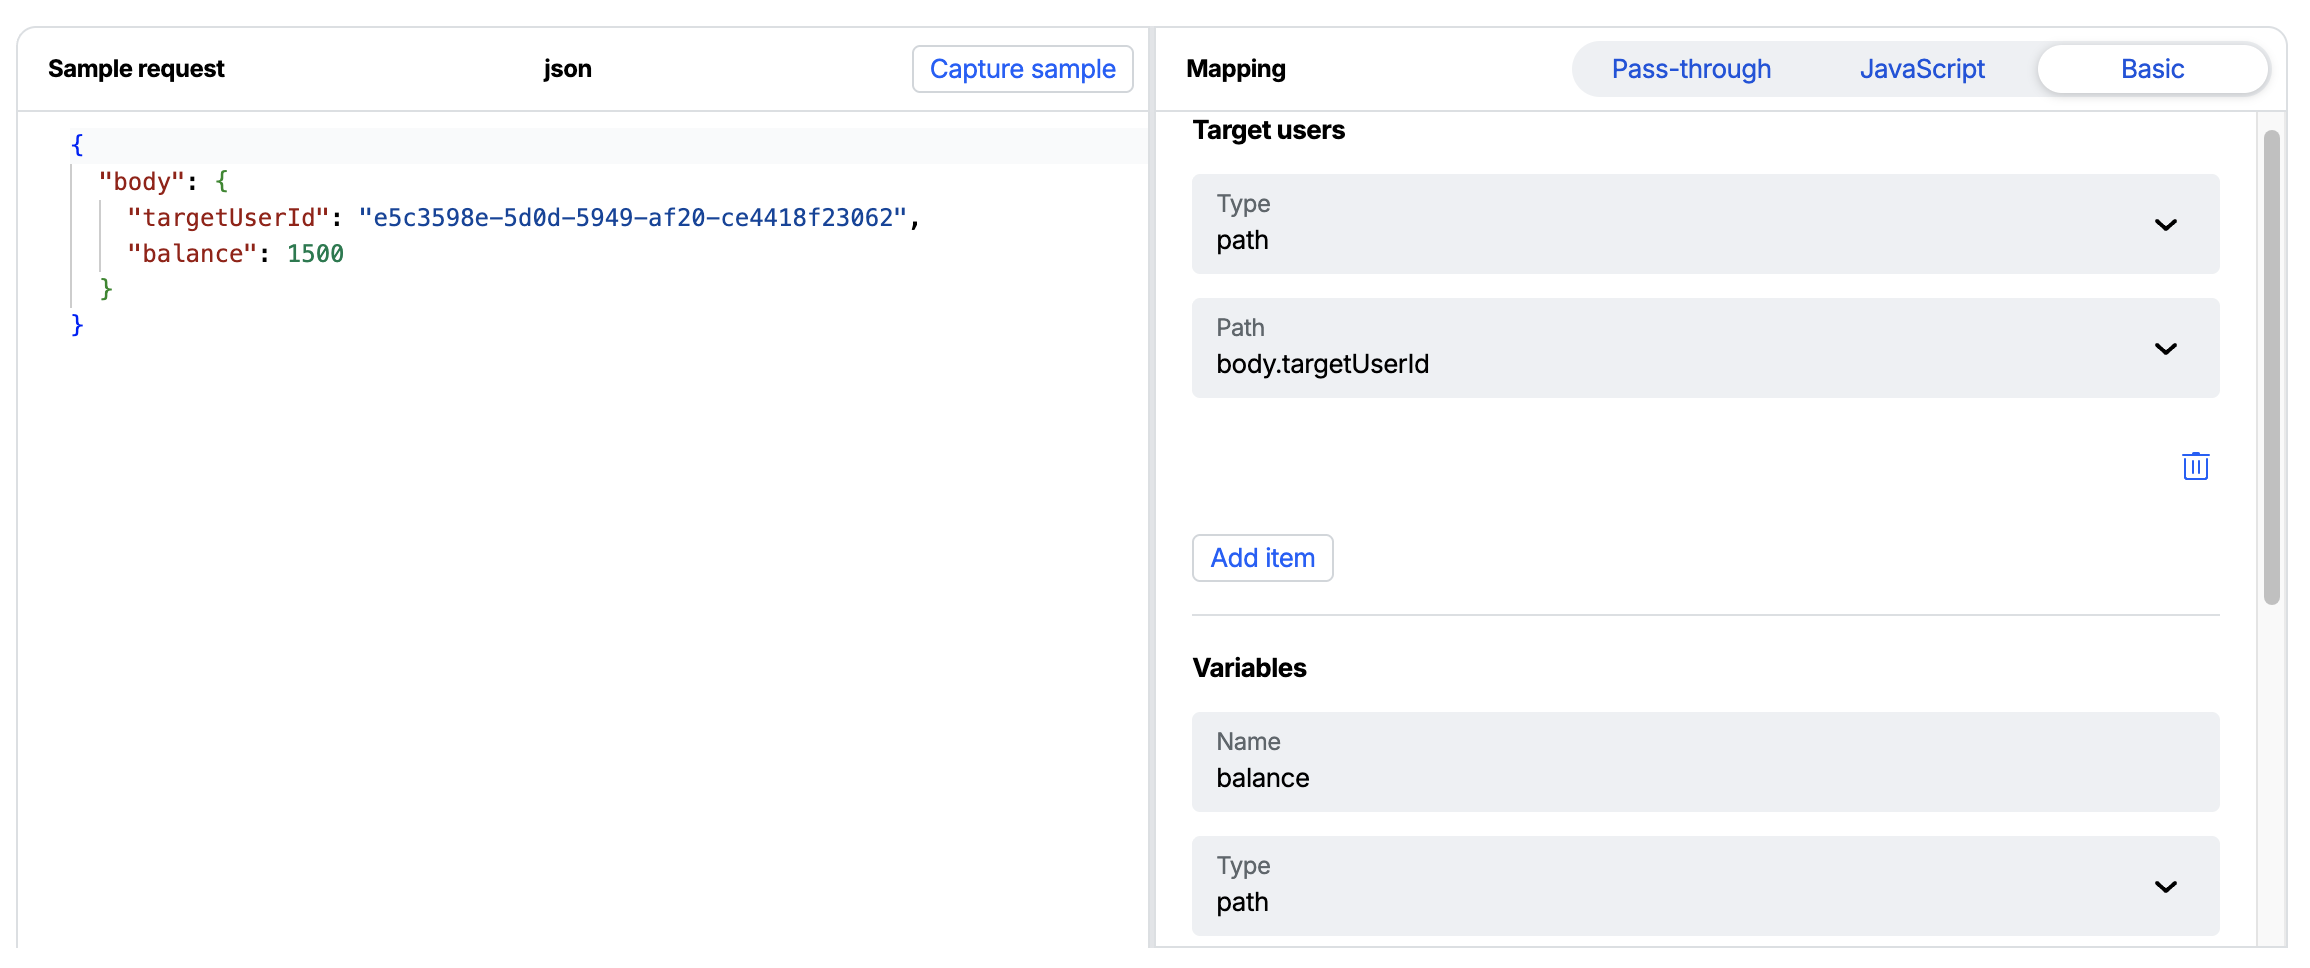
Finally, run the test again in Snowflake, it should now succeed.
Step 4: Run the procedure from a Task or Alert
To automatically trigger Atomic Action Flows from Snowflake when certain criteria is met: call the procedure from a Task on a schedule, or from an Alert that fires when a query condition is met:
CREATE OR REPLACE ALERT balance_threshold_alert
  WAREHOUSE = my_wh
  SCHEDULE = '5 MINUTE'
  IF (EXISTS (
    SELECT 1 FROM accounts WHERE balance < 100 AND notified = FALSE
  ))
  THEN
    CALL send_to_my_atomic_webhook('{"targetUserId": "user-123", "event": "low_balance"}');
Sourcing user IDs from a query
The Alert's IF EXISTS condition only decides whether the action runs, it doesn't pass the matching rows to the CALL, so the example above hard-codes a user ID. To target the actual users from your data, have the procedure run the query itself (using its Snowpark session) and build the payload from the results. This example selects the pending users and posts them as a single batched array:
CREATE OR REPLACE PROCEDURE send_pending_to_atomic()
  RETURNS STRING
  LANGUAGE PYTHON
  RUNTIME_VERSION = 3.12
  PACKAGES = ('snowflake-snowpark-python', 'requests')
  EXTERNAL_ACCESS_INTEGRATIONS = (atomic_access_int)
  SECRETS = ('atomic_url' = my_atomic_webhook_url)
  HANDLER = 'send'
AS $$
import _snowflake
import json
import requests

def send(session):
    rows = session.sql(
        "SELECT user_id, balance FROM accounts "
        "WHERE balance < 100 AND notified = FALSE"
    ).collect()
    if not rows:
        return 'no users to notify'

    payload = [
        {"targetUserId": r["USER_ID"], "balance": float(r["BALANCE"])}
        for r in rows
    ]
    url = _snowflake.get_generic_secret_string('atomic_url')
    resp = requests.post(
        url,
        data=json.dumps(payload),
        headers={'Content-Type': 'application/json'},
    )
    return f'{resp.status_code}: sent {len(payload)} users'
$$;
The Alert then just calls it, with no per-row arguments:
CREATE OR REPLACE ALERT balance_threshold_alert
  WAREHOUSE = my_wh
  SCHEDULE = '5 MINUTE'
  IF (EXISTS (
    SELECT 1 FROM accounts WHERE balance < 100 AND notified = FALSE
  ))
  THEN
    CALL send_pending_to_atomic();
Securing the webhook
Layer on one or more of the following controls:
-
Treat the trigger URL as a secret (baseline): The Atomic Webhook trigger URL contains a hard-to-guess token, so the URL acts as a bearer secret, only a caller who knows it can reach your Action Flow. Storing it as a Snowflake secret (as in Step 2) keeps it out of your procedure code and logs. Rotate it by recreating the trigger if it may have been exposed. On its own, though, a secret URL gives no protection against replay or payload tampering.
-
Signed requests (HMAC): Atomic's signed-request verification expects an HMAC signature computed over the request body (and optionally a timestamp) using a shared secret. Because you control the Python handler, you can compute this directly and send it as a header. Store the shared secret in the Atomic webhook under "Verify incoming request" > "Authentication secret" and in Snowflake as a second secret and add it to the procedure's
SECRETS:import hmac, hashlib, time
signing_secret = _snowflake.get_generic_secret_string('signing_secret')
ts = str(int(time.time()))
signature = hmac.new(signing_secret.encode(), f'{ts}.{payload}'.encode(), hashlib.sha256).hexdigest()
headers = {'Content-Type': 'application/json', 'x-signature': f'v1={signature}, t={ts}'}Then configure the trigger's signature verification so it agrees with what the handler sends. The handler above puts both values in the
x-signatureheader (prefixedv1=andt=), hashes with SHA-256/hex, and signs[timestamp].[payload], so the matching Atomic configuration under "Verify incoming request" > "Authentication" is:{
"algorithm": "sha256",
"digest": "hex",
"data": {
"signature": {
"header": "x-signature",
"parsePrefix": "v1="
},
"timestamp": {
"header": "x-signature",
"parsePrefix": "t="
}
},
"template": "[timestamp].[payload]"
} -
IP allowlisting: Restrict the Atomic Webhook trigger to Snowflake's egress IP ranges. Snowflake exposes these via the
SYSTEM$GET_SNOWFLAKE_EGRESS_IP_RANGESfunction, but the ranges are stable, not permanently static, they carry an expiration (around 90 days) and Snowflake recommends automating periodic refresh of your allowlist. Treat this as ongoing maintenance, not a one-time setup.
Test and go live
- With the Atomic trigger in Test mode, run
CALL send_to_my_atomic_webhook(...). Confirm the request arrives and the mapping produces the expected result. Test cards and analytics are generated rather than live ones and only test customers can be targeted. - Once the mapping and Action Flow behave as expected, switch the Webhook trigger to Live mode so incoming requests generate live cards and publish the Action Flow, if you haven't already. Remember to switch back to Test mode before making further changes to a live trigger.
The procedure returns the HTTP status code and response body, so a failing call surfaces Atomic's error directly. You can also temporarily point the secret at a service such as https://webhook.site/ to inspect the exact body Snowflake sends. On the Atomic side, use the Webhook trigger's testing tools to verify your mapping. Atomic's Audit log and Runs tab can also help to debug failing triggers.
Alternative: store a custom event instead of triggering a flow
Sometimes you don't want to start a specific Action Flow, you just want to record that something happened against a customer. Atomic's custom events do exactly this: a custom event populates the customer's first_[event-name]_at and last_[event-name]_at profile fields (useful for building segments), and can also trigger Webhooks and Action Flows. Instead of POSTing to a Webhook trigger, you call Atomic's Analytics API and authenticate with API credentials.
The Snowflake side is the same external-network-access pattern as above, with two differences: you authenticate using the client-credentials OAuth2 flow, and you must allow egress to both Atomic's API host and its OAuth token endpoint.
Allow egress and store API credentials
-- Allow egress to the Atomic API host and the OAuth token endpoint
CREATE OR REPLACE NETWORK RULE atomic_api_rule
  MODE = EGRESS
  TYPE = HOST_PORT
  VALUE_LIST = (
    '<your-org-id>.customer-api.atomic.io',
    'master-atomic-io.auth.us-east-1.amazoncognito.com'
  );

-- Store the Atomic API client id and secret as a username/password secret
CREATE OR REPLACE SECRET atomic_api_creds
  TYPE = PASSWORD
  USERNAME = '<your-client-id>'
  PASSWORD = '<your-client-secret>';

CREATE OR REPLACE EXTERNAL ACCESS INTEGRATION atomic_api_int
  ALLOWED_NETWORK_RULES = (atomic_api_rule)
  ALLOWED_AUTHENTICATION_SECRETS = (atomic_api_creds)
  ENABLED = TRUE;
Create the Atomic API credential in the Workbench under Configuration > API Keys — see API keys. It needs the fine-grained permission scope for Events > Send Events.
Create a procedure that posts a custom event
Atomic's access tokens are valid for one hour, and the OAuth endpoint is rate limited (it returns HTTP 429 if you request a token too often), so you should not fetch a new token on every call. Because a Snowflake stored procedure holds no state between invocations, cache the token in a small table and reuse it until it nears expiry.
-- A single-row cache so the token is reused across procedure calls.
-- Restrict access to this table — the access token is a bearer credential.
CREATE TABLE IF NOT EXISTS atomic_token_cache (
  access_token STRING,
  expires_at   TIMESTAMP_LTZ
);
This procedure reuses a cached token, only calling the OAuth endpoint when no valid token is cached, then sends the event to the Analytics API.
CREATE OR REPLACE PROCEDURE store_atomic_event(end_user_id STRING, event_name STRING)
  RETURNS STRING
  LANGUAGE PYTHON
  RUNTIME_VERSION = 3.12
  PACKAGES = ('snowflake-snowpark-python', 'requests')
  EXTERNAL_ACCESS_INTEGRATIONS = (atomic_api_int)
  SECRETS = ('creds' = atomic_api_creds)
  HANDLER = 'store_event'
AS $$
import _snowflake
import base64
import datetime
import requests

ORG_ID = '<your-org-id>'
ENVIRONMENT_ID = '<your-environment-id>'
OAUTH_URL = 'https://master-atomic-io.auth.us-east-1.amazoncognito.com/oauth2/token'

def get_access_token(session, creds):
    # Reuse a cached token while it still has at least 5 minutes of life
    cached = session.sql(
        "SELECT access_token FROM atomic_token_cache "
        "WHERE expires_at > DATEADD(minute, 5, CURRENT_TIMESTAMP()) LIMIT 1"
    ).collect()
    if cached:
        return cached[0]['ACCESS_TOKEN']

    # Otherwise request a new token and cache it
    basic = base64.b64encode(f'{creds.username}:{creds.password}'.encode()).decode()
    resp = requests.post(
        f'{OAUTH_URL}?grant_type=client_credentials&client_id={creds.username}',
        headers={
            'Content-Type': 'application/x-www-form-urlencoded',
            'Authorization': f'Basic {basic}',
        },
    )
    data = resp.json()
    session.sql(
        "INSERT OVERWRITE INTO atomic_token_cache (access_token, expires_at) "
        "SELECT ?, DATEADD(second, ?, CURRENT_TIMESTAMP())",
        params=[data['access_token'], data['expires_in']],
    ).collect()
    return data['access_token']

def store_event(session, end_user_id, event_name):
    creds = _snowflake.get_username_password('creds')
    token = get_access_token(session, creds)

    body = {'data': [{
        'eventName': event_name,
        'eventType': 'custom',
        'endUserId': end_user_id,
        'timestamp': datetime.datetime.now(datetime.timezone.utc).strftime('%Y-%m-%dT%H:%M:%S.%fZ'),
    }]}
    resp = requests.post(
        f'https://{ORG_ID}.customer-api.atomic.io/v1/{ENVIRONMENT_ID}/analytics',
        json=body,
        headers={
            'Content-Type': 'application/json',
            'Authorization': f'Bearer {token}',
            'User-Agent': 'snowflake-atomic-events',  # the Atomic API requires a User-Agent
        },
    )
    return f'{resp.status_code}: {resp.text}'
$$;
Call it from a Task or Alert, the same way as the webhook procedure:
CALL store_atomic_event('user-123', 'low-balance-detected');
The required fields for a custom event are eventName, eventType, endUserId, and timestamp; add any custom metadata under a properties object. See Custom events.